It has been really damp and cool the last two days. My grandparents referred to this as Blackberry winter. This cool weather is necessary to set the buds on blackberry plants so there will be juicy ripe berries to pick around the fourth of July. There are a lot of "winters" in our part of the country. Dogwood winter, redbud winter, strawberry winter and now blackberry winter. Every time you think warm weather is here, it is time for something else to bloom and we get a little cold spell. Hopefully, this is the end of them for this year. I am ready for some consistently warm weather!
Cool days always make me want soup. Soup is easy, nutritious, and goes a long way for little money. Today, I am making chicken tortilla soup. Yum. This is my own recipe, one that I invented after having chicken tortilla soup in a restaurant. It was really good and my thought was "I can come close to this!" I don't always use recipes, but I am going to share how I make this soup with you so I have been measuring ingredients as I prepare them. This makes a lot of soup, but we eat it for days. It is so nice to have something just to warm up when we get hungry and not have to prepare a full meal every time. Saves money too! When you make soup, make a lot. You can freeze some of it for later, you can take some in your lunch and you have a quick and easy dinner when you get home. You can always add a sandwich if you like, or a salad. We like jalapeno cheddar corn muffins with ours. (see recipe below)
I make this in a 12 quart pot. It makes about 6 quarts of soup or 1/2 pot.
Chicken Tortilla Soup
2 32 ounce boxes of chicken stock (I use Aldi's Fit and Active....low sodium, no msg and fat free)
8 cups water
3 boneless/skinless chicken breasts, I get 3 skinless breasts at Aldi's for around $5.00 (or you can boil a whole chicken if you want to pick it off the bone or use one of the roasted ones from the grocery, just remove the skin)
2 large potatoes, peeled and cut into 1 inch pieces (2 cups)
1 cup carrots peeled and cut into 1/2 inch medallions
l large onion cut into 1 inch pieces
1 28 ounce can crushed tomatoes
1 can rotelle with chilis
1 15 ounce can black beans drained and rinsed
1 cup frozen whole kernel corn
1 cup rice
cumin, to taste (I used 1.5 Tbsp)
salt if needed
Grated cheddar cheese
Your favorite tortilla chips
Boil chicken breasts whole in stock and water until done, about 30-40 minutes. They are done when white all the way through. Remove breasts. If the water/stock has gone down a lot due to cooking, I add more water at this point. I like the pot 1/2 full of liquid. Add the diced vegetables, crushed tomatoes, rotelle with chilis and let cook until potatoes and carrots are soft. Add black beans, corn and rice, let cook until rice is no longer hard. At this point, I add cumin and salt to taste. Cumin gives it that lovely smokey taste that makes the soup so good. Cut chicken into bite sized pieces and add to soup and let heat through. Time to serve!
Put chips and cheese on the table in serving bowls. Add the amount of grated cheese you want to your bowl of soup (it melts fast when soup is hot) and crumble tortilla chips on top of soup. Enjoy!
Jalapeno cheddar cornbread -- very easy!
Mince 6 or seven pickled jalapeno slices (these are about the size of a nickel, not whole jalpenos)
Grate your favorite cheese (we like cheddar)
1 box jiffy cornbread mix
1 can creamed corn
1 egg
Add 1 can creamed corn and egg to Jiffy Cornbread mix. Stir until mix is no longer dry and egg is blended in. Add jalapenos and about 1/2 cup cheese. You can bake these as muffins or in a round pan. We prefer muffins as they are easy to reheat if there are leftovers. They need to bake a little longer than the box calls for because of the creamed corn. Bake until golden brown. Remove. Delicious with some butter on them.
Our kitchen is filling with the wonderful smell of soup and it's making my mouth water. I can honestly say I am looking forward to this delicious meal and we will have a few lunches and dinners ready for the rest of the week. I only used one pot, and a few utensils and bowls. Now how easy is that?
It is supposed to warm up by the end of the week which will be very welcome, but for tonight, we will be enjoying a delicious, filling meal and I will have a few day's reprieve from meal preparation. That leaves a LOT more time for all my creative projects. Give this recipe a try. I hope you enjoy it.
Everyday Donna
Things to remember:
“You have not lived a perfect day, even though you have earned your money, unless you have done something for someone who will never be able to repay you.” - Ruth Smeltzer
Monday, June 6, 2011


One Thing Always Leads To Another


The Old Time Pottery had a big sale a few weeks ago and I purchased some new place mats in a beautiful sea blue color for the table for only $.88 each which was a great price. There were some napkins that I loved there in blues and tans which reminded me of the beach and ocean for only $.78 each (another bargain), so they all came home with me. They had been sitting in the sack since then waiting for an inspiration. The shell wreath was that inspiration.
Because we have to put a leaf in the table when we have company, I like my centerpiece to be something that can be moved easily without dismantling it every time and then having to put it back together. This is what I came up with for the summer.
Sea glass comes in lots of different colors and shades and is really beautiful. There will be another project with sea glass that I will show you later.

I placed the cylinder vase in the center of the tray, mixed the sea glass so all colors were represented and put some in the bottom of the vase, filling it about 1/3 full. Then, I set a tea light holder on either side of the vase. I put 3 of the orchids in the vase and filled it with water. The orchids were on a bush and I simply pulled three of the flowers off the stems. The "silk" flowers we buy are really polyester for the most part and will float in water and are MUCH cheaper than real orchids. Also, they do not have to be replaced every few days which is a plus. (If you were using this centerpiece for a party or wedding reception, you might choose fresh orchids.) Now, I mixed the shells and the remaining sea glass around the vase and candle holders on the tray. I added a tea light to each candleholder and put one to float in the water in the vase. Could that be any easier? Total cost for this centerpiece would be $8.00. This would also be great for a luau party, birthday party, shower or wedding reception. The orchids are available in several colors, but I chose yellow because it goes with our decor.
Now, I needed some napkin rings. Here is what I did - cheap and easy. My two most favorite words.


Now, wrap the left side over and under. Then, use your wire cutters like pliers and bend the end of the wires into loops like this:


I placed the shell napkin rings around the napkins and finished decorating the table. Two of the place mats were turned vertically so it gave the effect of a table runner down the center of the table. We turn them horizontally when we are having dinner. I just liked the way it looked. Now, we have a beach look for summer and it is one more thing to help tie the beach/cottage look of the room together.
We may not have an ocean view out the window, but this will be a reminder of all the wonderful times we have spent at the beach. Sure wish I was there now!
Everyday Donna
Things to Remember:
"Empty pockets never held anyone back. Only empty heads and empty hearts can do that."
- Norman Vincent Peale
Friday, June 3, 2011
Wishing I Was At The Beach - How To Make A Shell Wreath
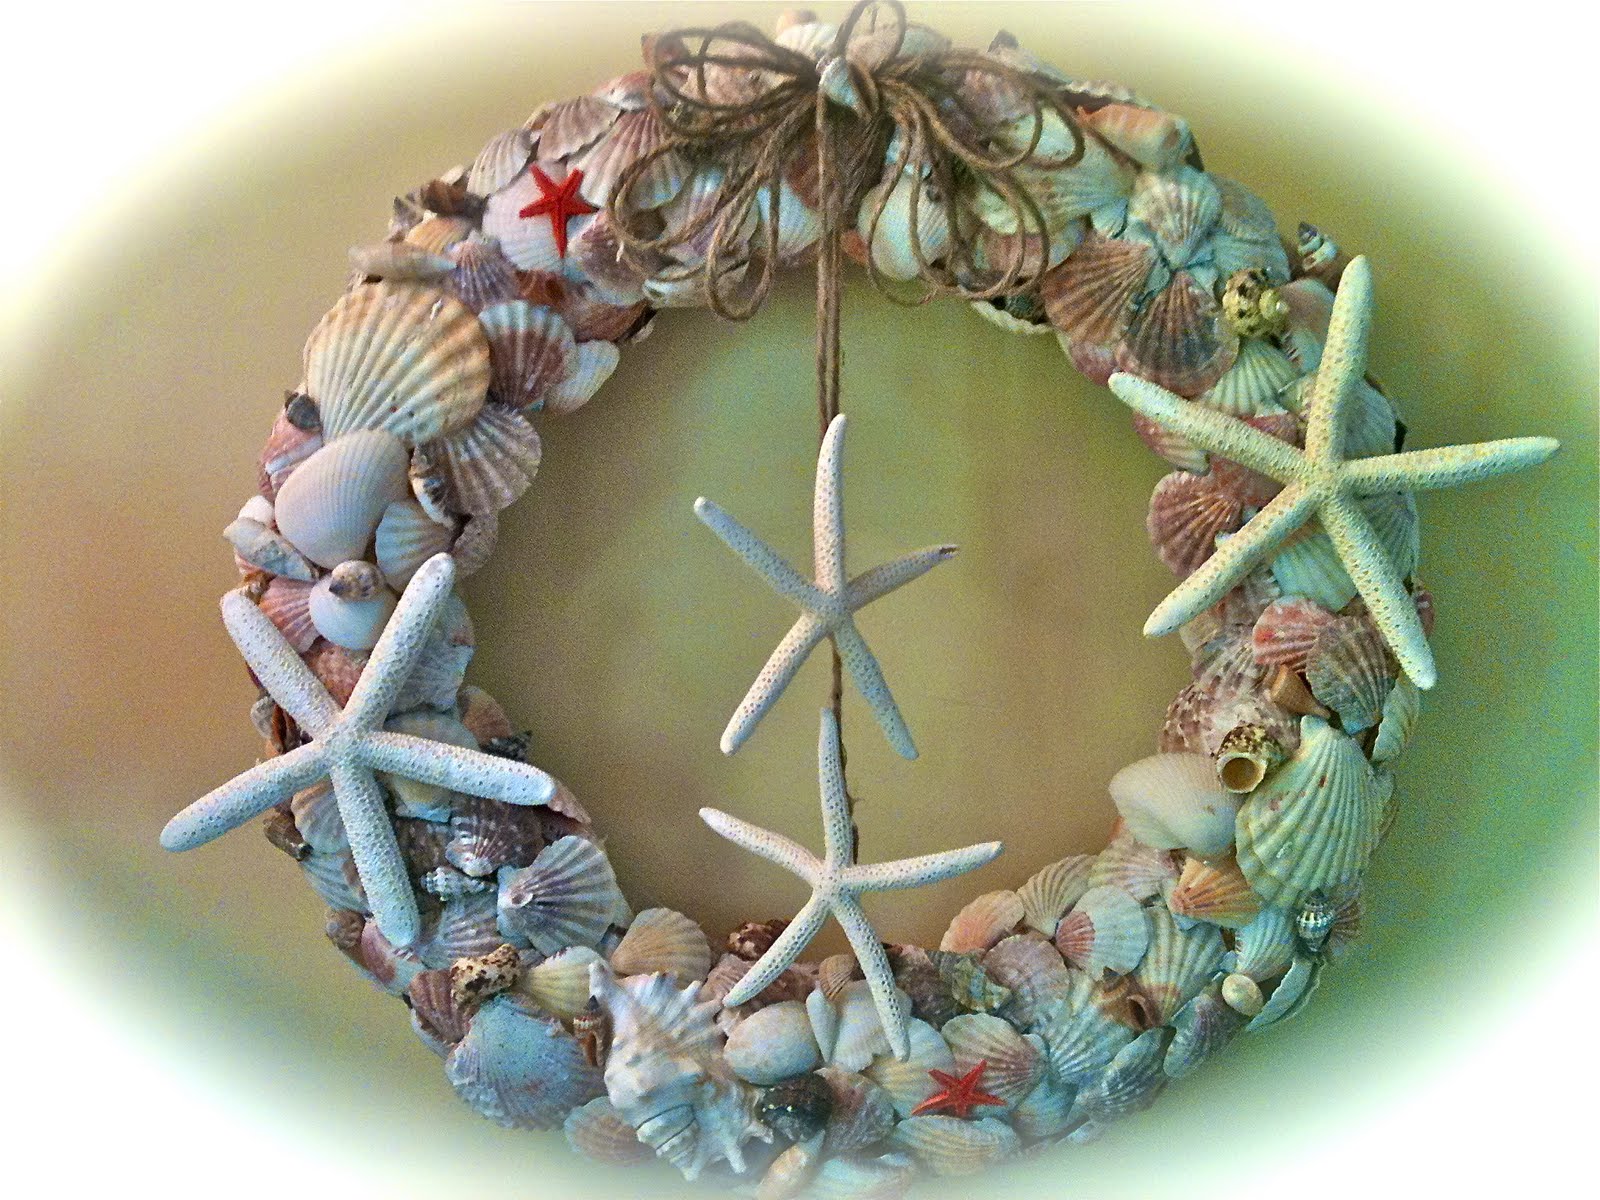

There is nothing better than sun, sand, and surf. Nothing. Did I say nothing? And that is how I feel. I would love to live on the beach with a front window view of the ocean. Unfortunately, that is not where I live. Summertime is here in middle Tennessee and it is plenty hot already, but it is not like being at the beach. So, I will do the next best thing and use a beach theme in the little yellow cottage. This season there are a lot of decorative accessories with a beach theme and many are very inexpensive. That is just my price range.
Thursday morning I was watching the Today show and there was a segment on how to make your house more cottage or beach like. Um hmmm. Just my style. I have been working on our little yellow cottage, making some changes in my decorating style and I have been adding some beach type items. As they panned the set, they showed a fabulous shell wreath that really made me sit up and take notice. The person doing the segment said they had copied it from a wreath costing $150.00. Excuse me? Did you say $150.00? Whoa. They had done a DIY and made their own. Well, the creative juices started flowing immediately and I knew exactly where I could get a lot of shells. Big Lots! Time for a road trip.


Here are my shell finds from Big Lots. I bought two of the $4.00 bags of shells and one of the baskets of six starfish for $6.00. I had an 18 inch straw wreath which cost about $2.00. Time to get out the glue gun, heat it up and start gluing! First, make a hanger on the wreath by putting a piece of wire around the wreath, twisting it and making a loop, twisting again. I visually divided the wreath into north, south, east and west. I laid down a patch of shells at each point and then filled in between the sections. I used as many of the flat shells as I could to cover the top, inside and outside of the wreath leaving no wreath "form" showing. Leave the back of the wreath open with no shells on it so it will lay flat against the wall.
Some of the shells were big and they covered a lot of area. I used the smaller shells to fill in the gaps. It took me about an hour and a half to make the wreath. Once all of the area was covered, I went back and filled in with all of the little decorative shells and added two starfish (as you can see in the picture). I made a "bow" by looping sisal back and forth and tied it in the middle, gluing it to the center of the wreath. I left two long tails on the bow. I cut the tails to different lengths and glued a small starfish onto each length. Below is a picture of what the shells look like close up so you can see how closely I placed them.

After I finished gluing all the shells on, I removed all of the glue "webs" and hung it on the wall. There were just enough shells in the two packages to cover the 18 inch wreath. Could anything make you feel more "beach like"? I don't think so. I had a few starfish left so I placed them in a small basket on the cabinet to continue the theme. One of these days I will post a picture of my mantle, which also has a bit of a shabby chic/beach theme. The wreath helps tie the room together. Things are looking very beachy here in the little yellow cottage and that puts a smile on my face.
For less than $20.00 and a little time, you can make a beautiful shell wreath that can be used year after year. Don't you love saving money? I sure do! Now, if only there were an ocean out my front window.
Everyday Donna
Things to Remember:
"We don't see things as they are, we see them as we are." Anais Nin
Thursday, June 2, 2011
Inexpensive Centerpieces You Can Do


It's finally the time of year when the fear of frost is over and we all rush to the garden center to purchase all the blooming plants we want to put in our flower gardens and various and sundry pots here and there. Do you spend countless hours planting, weeding and watering? How much do you really enjoy all this hard work? I find there is something so calming about getting your hands dirty, digging and planting. It is a very rewarding job to watch things grow and blossom, nurturing and fertilizing, turning your yard into a garden Monet would want to paint.
At our previous home, I had worked for years creating my secret garden, a place I truly loved. Since our move a few months ago, I find that I am basically starting over. I have done some planting of blooming things, done a vignette or two on our deck, planted our vegetable and herb garden. But gardens take time and thought, many years of planning and planting. It is somewhat like raising a family and it takes a lot of hard work.
To me, true luxury would be to have fresh flowers in our home every day, but that takes a lot of disposable income. Since we have a yard full of blooming flowers, why not take advantage of that and bring them into the house to enjoy? Don't just let them sit in the yard for you to look at from time to time. It's like saving the silver for company only, or the good china. Bring flowers inside for everyone to enjoy. Flowers bring so much color and texture to an interior. Their fragrance cannot be copied by any scented candle or air freshener. Whether you place them in a simple jelly glass or make an elegant arrangement, there can never be too many fresh flowers in your house.
This morning I went out and cut a couple of magnolia blossoms from the magnificent tree in our yard. The creamy, waxy flowers have a heady scent that is wonderful inside. I used my big glass salad bowl, put some black river rocks in the bottom, filled it with water and floated two of the beautiful blossoms with some leaves attached on the water. Stunning. Fragrant. Organic. Beautiful.
I keep glass cylinder vases in several sizes to use for flower arrangements. I have found a couple of great places to buy them for cheap! TJ Maxx usually has cylinder vases for $3.99 up to $6.99 depending on size. Old Time Pottery is another place to purchase really reasonable vases. The hobby stores and JoAnn's charge $20.00 to $40.00 for the very same thing. I check out TJ Maxx every time I go just to see what interests me. It is truly an excellent place for decorative items at a reasonable price. If you need things in quantity, Old Time Pottery is the place to go, since TJ Maxx may have only a few of each item. Dollar tree will order vases or rocks in quantity for you. You can have them shipped to the store for pick-up saving shipping costs as vases and rocks are heavy. Another good place to check is Gordman's if you have one near you. They usually have a great clearance section. I have purchased vases for as little as a dollar there. And, don't forget Big Lots as a great resource for many decorative things.
If you have a wedding reception in your future, a shower, or even a dinner party, consider some of these ideas to help ease the pain in your pocket book. Magnolia leaves are beautiful all year round, green and shiny. You can cut branches and lay them in the center of the table, staggering floating candles among the branches, or remove leaves and lay them around your vases. Dollar Tree has black river rock, multi-colored brown river rock, clear glass marbles, or even beautiful sea glass in blue, green or tan for only $1.00 per bag. One bag per vase should work. You can use these with fresh or artificial flowers. Or, Pier 1 has tea lights in clear plastic cups which will float. You get 30 in a package for $6.00, cheaper than WalMart, and they are unscented. Using small cube vases from Dollar Tree with a little water in them, or taller cylinder vases from Dollar Tree, you can have really inexpensive floating candles for centerpieces. Dollar Tree also has packages of sea shells for $1.00 which can go in the bottom of a vase, or use rocks of your choice, add water and floating tea lights. Beautiful, simple and inexpensive. You would spend less than $3.00 per centerpiece.
In the picture above, I have used two small tea light holders from The Dollar Tree, one on each side of the centerpiece. I buy bags of tea lights at Big Lots for $5.00 that contain 144 tea lights, or one gross. You can do a lot of centerpieces for $5.00 worth of tea lights and dollar candleholders.
Do you have hydrangea bushes in your yard or access to them? Why pay a florist or wholesale club $10.00 per bloom, when you can cut all you want from your own yard? Just have buckets of water ready to put the blooms in as soon as you cut them. Hydrangea comes from the word hydra meaning water and they will wilt almost immediately if not placed in water. You can float them in bowls or place a few blooms in vases for lovely, inexpensive centerpieces. Hyrdrangeas come in many color varieties and are very showy on a table. There are lots of options in the summer.
Don't leave all the beautiful flowers you work so hard to grow on the outside. Bring them in. Enjoy their beauty and fragrance while you can! Wish you could smell these magnolias. Simply amazing.
Everyday Donna
Things to Remember:
Love is that which is without condition, it requires nothing in order to be expressed. It asks nothing in return. And it is free. Love is that which is free, for freedom is the essence of what God is, and love is God, expressed. Neale Donald Walsch
Wednesday, June 1, 2011
Ambrosia For The Gods (Peach Cobbler)

In my hometown in Southern Indiana, there was this stuff people made at Thanksgiving and Christmas called ambrosia. It had mandarin oranges, coconut and miniature marshmallows in it among other things. I liked it okay, but I would not call it ambrosia, food fit for the gods. In Greek mythology, the food fed to the gods was called ambrosia and their drink was called nectar. Therefore, we use the saying nectar of the gods, or food for the gods. I am here to tell you, this peach cobbler truly is ambrosia and fit for any mythological god or human being to eat!
Our weekend trip to the farmer's market here in Nashville offered up some of the most divine, delectable peaches I have had in a long, long time. They are cling peaches from South Carolina and are positively indescribable. I cannot think of enough descriptive words for them. They are sweet and juicy and simply heavenly. I peeled two, sliced them and put them on our breakfast plates and there are no words for the gastronomical sensation these peaches created. I knew the rest of the basket was destined for pure ambrosia..... homemade peach cobbler!
I am a very thrifty person when it comes to our food, mainly because I have had to be raising four children on a teacher's income. Those of you out there who can relate understand. There is no shopping at Whole Foods for us even now(or as my daughter calls it, Whole Paycheck). I do cook from scratch most of the time using few prepared foods. I know that organic food is the best for us, but it is not always within our retirement budget, even though there are only two of us to feed most of the time. We do love to shop the farmer's markets though and support locally grown food which is very important. This, on the other hand, was time for a splurge of epic proportions. A basket of peaches was $18.00. It actually hurts me to type this, but I knew what the results of this purchase would be as the smell of the ripe peaches wafted through the air at the market. So, I ponied up the money and took my basket of peaches home along with my tomatoes, corn, cabbage and Vidalia onions. We are going to have our first major summertime feast. Soon, we will be picking vegetables right from our garden. Our tomato plants have little tomatoes on them. Oh boy, oh boy. Sorry, I am digressing.
There is not a written recipe I use for the filling, so I will do my best to tell you how I make this. I can only call it Grandma's way. The crust is another matter. The recipe will be below and it is a truly flaky crust that is a complete complement to this cobbler. If you prefer, you can make it a pie since it is a two crust recipe, but we prefer the cobbler.
Ingredients:
Peeled and sliced fresh peaches (as many as it takes to cover the bottom of a 9x13 baking dish 1/3 to 1/2 full which was most of the basket)
sugar to taste (these only needed about 3/4 cup because they are so sweet and juicy)
a pinch of salt
pats of butter
cinnamon
After peeling and slicing the basket of peaches, I put sugar over them, and stirred, mixing well. Add a pinch of salt and repeat. I put them in the refrigerator in a covered bowl overnight to allow the sugar to draw the juice from the peaches. This step is not mandatory. You can put the peaches directly into a baking pan. The next day, I made my crust, put the peaches in the bottom of the pan, cut pats of butter and placed them randomly over the top of the peaches (about 12) and sprinkled the entire pan with cinnamon. Place the crust over the top and place in a 400 degree oven until the crust turns a light brown. Remove from oven. Delicious served warm with a big dollop of ice cream. Pure ambrosia, there is no other description.
Crust recipe (will make an 8, 9 or 10 inch double crust pie or one 9x13 cobbler)
2 cups sifted all-purpose flour
1 tsp salt
10 tbsp butter
5 to 7 TBSP cold water
Sift flour and salt together. Cut in shortening with a pastry blender until pieces are about the size of small peas. (cut butter into small cubes before blending) Add water 1 TBSP at a time stirring with a fork until all the dough is moistened and forms a ball. Do not over mix, crust will be tough. Flour countertop. Flatten dough slightly with hand and roll with floured rolling pin until about 9x13. Gently lift the crust using rolling pin and place over peaches. Leave a little open boarder around crust so steam can vent. Place in 400 degree oven and bake until crust is light brown.
If you want to make a pie, divide dough ball in half. Roll out one ball and place in bottom of pie pan. Place peaches in crust, add butter and cinnamon. Roll out remaining dough ball and place over peaches. Crimp edges and make vent holes in top of crust. Bake at 400 degrees until crust is light brown.
This pastry recipe is from my Better Homes and Garden Cookbook I received as a wedding gift 41 years ago. I have always used this recipe. It is easy, really flaky and delicious.
This cobbler will keep for several days in the refrigerator. We take out a few scoops of peaches and crust, place in a bowl and warm it in the microwave for about 20 seconds, add some ice cream and devour! Ambrosia is the only fitting description I can think of for this heavenly, divinely delectable dessert. Give it a try. I truly hope you will love it. We sure do!
It's Wednesday afternoon and time for the East Nashville farmer's market. We are on the hunt for more summertime goodies. Can't wait! Will let you know what I find. Happy summer eating.
Everyday Donna
Things to Remember:
“One day your life will flash before your eyes. Make sure it's worth watching.” Unknown Author
Tuesday, May 31, 2011
What Can You Do With Tissue Paper and Glue? This!


We spent some time in Dallas recently with our oldest daughter and her three sons, the oldest of whom is seven. Her husband had to be out of town for a week long photo shoot and she needed some help. Having raised four children of our own, we knew she had her hands full. Grandma and Pawpaw to the rescue! Spending time with those three precious little boys is a chance we try to never miss. So, we packed the car and headed to Big D.
It's funny how inspiration can come from any place at any time. We were there the week before Mother's Day. Grandson #2 is 4 and goes to pre-school. He came up to me and whispered in my ear that he had wrapped his mother's gift at school that day. "Don't tell her grandma, but it's a picture of poppies that I made!" He was so proud and excited. Makes your heart want to burst. It was a super busy week of running children to school, going to karate lessons, cooking meals, playing games, doing mounds of laundry, giving baths and having a wonderful time all week. The baby, who is 9 months old worked hard all week at trying to crawl from one place to another "army" style. He hadn't quite figured out how to make it all work on his hands and knees yet. Brought back so many memories of how busy all those days were and why you can't remember so many things that happened because you are just trying to get through the general living of it all.
On Friday, we picked #2 up from pre-school and he came out the door with a lovely package in his hand. He got in the van and handed his mother her gift. It was a 5x7 rectangle wrapped in pink tissue paper (because they had run out of purple, his favorite) with ribbons and a card made by him. He jubilantly said "Open it!" Mom said it's not Mother's Day yet. Are you sure?" Oh yes, yes, yes! She carefully took the tissue paper off and inside was a lovely piece of artwork, mixed media of a red poppy done with paint, tissue paper and real poppy seeds. It was truly lovely and made with all the love a 4 year old's heart and hands can create. I LOVED it. Mom was so very touched and filled with love while #2 was overjoyed that mom loved his creation.
We moved to Tennessee recently after living my entire life in the same town. We downsized after 41 years of marriage and so many of the things I had used in our previous home just don't seem to fit in our little yellow cottage. I have spent time trying to make things work and figuring out new things to enjoy. When I saw his little piece of art work I was completely inspired. I needed something to go above our bed and had just not found the right thing. This I could do! I made a trip to Michael's and bought 4 canvases. They came two for $5.99. Then a trip to, where else but, the Dollar Tree for a package of multi-colored tissue paper which cost, what else but, a dollar. I buy Elmer's glue by the gallon and I have a set of acrylic paints so I was good to go. Oh, and a small bottle of Modge Podge.
First, I mixed a color of blue that I wanted using baby blue, blue lake and phthalo green. I base coated all of my canvases.

After letting that dry, I used different colors of green and black to make grass on the bottom of the canvases, each one different. Now for the fun part. I cut red tissue paper in approximately 4" squares. I applied Elmer's with a brush in a flower shape and put the tissue down. I squished it around, turning up some of the edges for a 3D effect. Next, I added another layer of glue on top of the tissue paper that was already down and put another layer of tissue paper on top of that. I made each canvas different.

After letting everything dry overnight, I added stems and leaves. To make the stems, I cut pieces of green tissue paper about 1 inch wide and 10 inches long and rolled them between the finger and thumbs of both hands making a long "snake." I put glue on the canvas and laid the stems on top of the glue, taking the stems over the edge of the canvas. Any remainder was cut off with scissors. Then, I used a brush and made leaf shapes with glue. Once again, I cut 4 inch squares of green tissue paper and squished it and manipulated it until I got a 3D leaf shape I liked. I let this dry overnight.

Now for the "careful" part. I loaded a 1inch brush with Elmer's and applied it to all of the tissue paper pieces on the canvas. Poppies, leaves and stems received a coat of glue. They had a bit of stiffness from the original glue used but I didn't want to ruin the 3D effect of the flower petals and leaves. I went slowly and carefully, making sure I got glue in all of the cracks and crevices. Again, they had to dry overnight. The fun part after this was peeling all the dried glue off my hands - almost as good as bubble wrap!
After everything was dry, I made centers in all my flowers with a little puddle of glue and added real poppy seeds to the glue. Again, let dry overnight. And now, the final step......Modge Podge! Cover the entire canvas and flowers, leaves, stems and poppy seed centers with a coat of Modge Podge. This gives everything a nice sheen and just the right stiffness so everything doesn't go flat. Let dry complete and your pictures are ready to hang.
There are so many possibilities for this application. You don't have to be Van Gogh (oh how I wish), you can be creative and create your own art work, even a 4 year old can do this. His didn't have the 3D effect, but it was beautiful. I already have a new project in mind. Will let you know how that goes. Thanks to his pre-school for your inspiration!
Everyday Donna
Things to Remember:
Anyone can create! Inspiration is everywhere.
Thursday, May 26, 2011
How About a Holiday Weekend Breakfast Treat?

Well, it's the first of the summer holiday weekends. Are we excited? Yes! After the long, cold winter everyone is ready for warm sunny days, cook-outs, swimming, boating, fishing, camping, sand volleyball, baseball, basking in the sun, flip-flops and fireflies. Back in our younger days, we looked forward to an evening at the drive in movies. Unfortunately, there aren't many of those left, but it sure was fun to load up the car with friends or family, fill brown paper grocery bags with popcorn, put a cooler in the trunk with your favorite soda and go to see a double feature. Remember those intermission cartoons with dancing hot dogs and hamburgers counting down until time for the next movie. Ah, those were the good old days.
Summer is a time when many of us will have house guests. The Memorial Day weekend can be the first road trip for many people. School is out and maybe your grandchildren will be spending weekends with you. If you have visitors coming this weekend, or if you just have a few extra days at home and would like a special breakfast treat, give these delicious cinnamon rolls a try. They are great for breakfast with a cup of coffee or a big glass of milk. Oh my, they are so good. There is no yeast so you don't have to wait for the dough to rise making this a very easy recipe. You could make them the night before and pop them in the oven for breakfast or brunch. We are having them for an evening treat. They are good anytime!
Dough
2 cups all purpose flour
2 TBSP Sugar
4 tsp baking powder
1 tsp salt
3 TBSP butter, softened
3/4 cup milk
Filling
4 TBSP butter, softened
1 cup brown sugar
3 tsp cinnamon
Glaze
1/2 cup powdered sugar
1/4 cup milk
Make the filling first by combining 4 TBSP softened butter, 1 cup brown sugar and 3 tsp cinnamon. Blend until crumbly. (I use my hands to get the consistency I want which will be like a struesel)
Sprinkle 1/2 filling mixture in bottom of 9 inch round non-stick baking pan.
To make dough, sift together flour, sugar, baking powder and salt. Cut in 3 TBSP of softened butter. (again, I used my hands). Stir in milk to make soft dough which will form a ball. Roll dough out on floured counter using a floured rolling pin. Roll to a 9x13 rectangle. Will be about 1/4 inch thick. Spread rest of filling mixture on dough, leaving 1/2 inch border around dough. Roll up rectangle using long (13 inch) side. Will look like a long cigar. Dampen fingers and press seam to seal. Using a sharp serrated knife, cut in 1 inch circles. (remember, tip of thumb to knuckle is 1 inch). Put each roll in baking pan, leaving small space between each roll. This makes 12 rolls.
Bake in 400 degree oven for 20 - 25 minutes until golden brown. Remove from oven. Let cool slightly. Drizzle with powdered sugar glaze. I made my glaze in a measuring cup, so all you have to do is pour it over the rolls. Remove the rolls from the pan with a spatula. Eat and enjoy!
Here's to a glorious holiday weekend and an even better summer. These cinnamon rolls will make your family and summer guests feel extra special. Enjoy!
Everyday Donna
Things to remember:
There is no greater power in heaven or on earth than pure, unconditional love.” - Wayne Dyer
Subscribe to:
Posts (Atom)