Thursday, June 9, 2011


Wednesday, June 8, 2011
Tyler's Favorite Cookies

Today is our youngest son's 24th birthday. Where has the time gone? I really don't know. He came into our life as a very big surprise, but he has been a joy and a blessing to us. We had two daughters aged 15 and 13, and a son aged 10 when Tyler was born. He always thought he was grown up because he spent so much of his time with his siblings and their friends. He was only one year old the summer of our hometown's first all city summer musical, Music Man. Dress rehearsal week, he sat in my lap ever so still. Watching, listening, learning. The next summer when he was 2, he could sing tidbits of the songs from Hello Dolly by the end of that first week. He was totally absorbed in all the acting, dancing and music that he was surrounded by. He was in his first show at age 3 as a child in a burning house in The Outsiders. That same year, he danced with the villagers from Anatevka in Fiddler on the Roof. He looked like a cricket up on the stage, dancing in a circle with everyone, but he knew the choreography! He was hooked.
Tyler played basketball, baseball and football. His grandpa took him to play golf and saw that he had lessons. He is blessed with natural athletic ability, but when it came time to decide which sport to play in high school, he chose acting, singing and dancing. What a surprise! He also is blessed with a beautiful voice and participated in the school choir. His athletic abilities give him a natural grace on stage.
Now, he is all grown up, working in Nashville, writing songs, singing when the opportunity arises, others are singing his songs. We went to lunch today, taking Tyler and his girlfriend to a terrific barbecue restaurant of his choosing. I watched his easy smile, listened to his wicked sense of humor and admired his good looks. How could it have possibly been 24 years ago. Where is that sweet little boy with the curly hair, standing on the hearth of the fireplace singing into the poker from the fireplace tools?
He is all grown up and his mother could not love him any more.
Because we were always on a limited budget, I did not buy many prepared foods - especially snack foods . Everything was baked from scratch. Not only was it cheaper, it was healthier if that is possible when it comes to sweets. At least there were no preservatives or corn syrup in what they ate. I did sometimes cheat on frosting because of time constraints. Tyler's favorite cookies are a from a recipe I found many, many years ago in a magazine. Could not tell you what magazine any more. The recipe is written in my book I started 41 years ago when we were first married. It is tattered, stuffed full of cut out magazine recipes, and pieces of paper. There are no empty pages to write on any more and haven't been for years. I keep a rubber band around it to keep it from exploding. Whenever it was Tyler's turn to choose what I was going to bake, he always chose these cookies.
Ingredients:
1 3/4 cups flour
1/2 tsp salt
1/2 tsp baking soda
1/2 cup unsweetened cocoa
1/2 cup vegetable oil
1 cup sugar
1 egg
1 tsp vanilla
1/4 cup milk
1/2 cup chopped nuts
1 pkg large marshmallows, cut in half with kitchen scissors, approximately 18 whole marshmallows for 36 1/2 marshmallows.
1 can fudge frosting mix.
To make:
Sift dry ingredients together. Beat well by hand vegetable oil, sugar, egg, vanilla, milk and add to dry ingredients. Do not use a mixer. Add nuts. Drop by spoonsful onto greased cookie sheet. After baking 8 minutes at 350, remove from oven and press 1/2 marshmallow into each cookie. Return to oven 2 minutes longer. Cool and frost. This recipe makes approximately 3 dozen cookies.
You can frost with homemade chocolate buttercream frosting, which I have done. I often use Duncan Hines fudge frosting. It's quicker and easier. This recipe doubles easily. These cookies were always requested by our friends at get togethers. They are really, really good! The cookie has a brownie like texture and there is the hidden surprise of the marshmallow when you bite into them.
Thanks for letting me walk down memory lane today. I hope you will give Tyler's favorite cookies a try, especially if you have a birthday celebration anytime soon. I know you will love them!!
Everyday Donna
Things to Remember:
There is nothing better than cookies and milk, unless it's cookies and a cup of hot coffee! Yum!! And, they will always make you think of someone you love.
Tuesday, June 7, 2011
Those Lazy Hazy Days of Summer

It's only June 7 and it's already 96 degrees here in middle Tennessee. Our average daytime temperature for this date normally is 85. We are way above normal (and not in a good way). The weather has been wacky up to this point, why should it change now?
The 13 year cicada invasion is finally starting to subside and now it's time for the mosquito invasion. Other than that, we welcome the long, warm days and evenings of summer. I will take them any day over shoveling snow and slipping and sliding on ice. Oh yes, long days and evenings, sun, freshly mowed grass and flowers are always better than snow in my book. It's not quite the same as when we were kids and could enjoy summer vacations from school, swimming, playing, evenings of kick the can and hide and seek with everyone in the neighborhood. Most of us work all day with only evenings and weekends to enjoy and maybe a couple weeks of vacation. So who wants to spend all their time cooking? No one, that's who.
This is a recipe for a quick and easy salad that requires NO cooking, just some chopping. You can use ANY vegetables that you like to eat raw. For the salad in the picture I used the following:
1/2 head cauliflower
2 crowns broccoli
1 cup baby carrots, cut in bite sized pieces
1/2 container grape tomatoes, cut in half
1/2 cucumber, peeled and sliced
1/2 red bell pepper
1/2 yellow bell pepper
You can use onions, mushrooms, yellow squash or zucchini also. Can't wait for the vegetable garden to start producing! We will be using all kinds of fresh goodness for this salad!
Cut all the vegetables into bite sized pieces and place in a salad bowl. Sprinkle liberally with dried basil and thyme. Toss the vegetables, making sure they all have some of the herbs on them. Now, pour 1/2 bottle red wine vinegar dressing over the vegetables and stir again. Make sure all vegetables are coated with the dressing. Tadah! You are done. You can make as much or as little as you want, just adjust the dressing accordingly.
This salad keeps well in the refrigerator and is a good one to take for a potluck dinner or picnic. It makes a wonderful side when you are grilling out. No worry about mayonnaise-based dressings going bad in the heat. When you have eaten all the vegetables, cut up all the ones remaining, add more herbs and dressing. Now, how easy is that? I made this all the time when all the kids were home. They loved it! They would get it out and eat it as a snack. It is so cool and refreshing and gets better as it sits. You can eat it as soon as it is prepared or save it for later in the week, just store it with plastic wrap covering the bowl. Give this salad a try, I think you are going to like it!
We are sitting on the deck, enjoying this lovely summer evening. The temperature has dropped and the humidity is low. Dan is playing his guitar while I type. We have the deck lights on and the fountain going, listening to all the summer sounds of nature. There are blooming plants all around us and there is a gentle breeze stirring the trees. How much better can it get? Wish you were here!
Everyday Donna
Sometimes your joy is the source of your smile, but sometimes your smile can be the source of your joy— Thich Nhat Hanh
Monday, June 6, 2011
Blackberry Winter and Soup
It has been really damp and cool the last two days. My grandparents referred to this as Blackberry winter. This cool weather is necessary to set the buds on blackberry plants so there will be juicy ripe berries to pick around the fourth of July. There are a lot of "winters" in our part of the country. Dogwood winter, redbud winter, strawberry winter and now blackberry winter. Every time you think warm weather is here, it is time for something else to bloom and we get a little cold spell. Hopefully, this is the end of them for this year. I am ready for some consistently warm weather!
Cool days always make me want soup. Soup is easy, nutritious, and goes a long way for little money. Today, I am making chicken tortilla soup. Yum. This is my own recipe, one that I invented after having chicken tortilla soup in a restaurant. It was really good and my thought was "I can come close to this!" I don't always use recipes, but I am going to share how I make this soup with you so I have been measuring ingredients as I prepare them. This makes a lot of soup, but we eat it for days. It is so nice to have something just to warm up when we get hungry and not have to prepare a full meal every time. Saves money too! When you make soup, make a lot. You can freeze some of it for later, you can take some in your lunch and you have a quick and easy dinner when you get home. You can always add a sandwich if you like, or a salad. We like jalapeno cheddar corn muffins with ours. (see recipe below)
I make this in a 12 quart pot. It makes about 6 quarts of soup or 1/2 pot.
Chicken Tortilla Soup
2 32 ounce boxes of chicken stock (I use Aldi's Fit and Active....low sodium, no msg and fat free)
8 cups water
3 boneless/skinless chicken breasts, I get 3 skinless breasts at Aldi's for around $5.00 (or you can boil a whole chicken if you want to pick it off the bone or use one of the roasted ones from the grocery, just remove the skin)
2 large potatoes, peeled and cut into 1 inch pieces (2 cups)
1 cup carrots peeled and cut into 1/2 inch medallions
l large onion cut into 1 inch pieces
1 28 ounce can crushed tomatoes
1 can rotelle with chilis
1 15 ounce can black beans drained and rinsed
1 cup frozen whole kernel corn
1 cup rice
cumin, to taste (I used 1.5 Tbsp)
salt if needed
Grated cheddar cheese
Your favorite tortilla chips
Boil chicken breasts whole in stock and water until done, about 30-40 minutes. They are done when white all the way through. Remove breasts. If the water/stock has gone down a lot due to cooking, I add more water at this point. I like the pot 1/2 full of liquid. Add the diced vegetables, crushed tomatoes, rotelle with chilis and let cook until potatoes and carrots are soft. Add black beans, corn and rice, let cook until rice is no longer hard. At this point, I add cumin and salt to taste. Cumin gives it that lovely smokey taste that makes the soup so good. Cut chicken into bite sized pieces and add to soup and let heat through. Time to serve!
Put chips and cheese on the table in serving bowls. Add the amount of grated cheese you want to your bowl of soup (it melts fast when soup is hot) and crumble tortilla chips on top of soup. Enjoy!
Jalapeno cheddar cornbread -- very easy!
Mince 6 or seven pickled jalapeno slices (these are about the size of a nickel, not whole jalpenos)
Grate your favorite cheese (we like cheddar)
1 box jiffy cornbread mix
1 can creamed corn
1 egg
Add 1 can creamed corn and egg to Jiffy Cornbread mix. Stir until mix is no longer dry and egg is blended in. Add jalapenos and about 1/2 cup cheese. You can bake these as muffins or in a round pan. We prefer muffins as they are easy to reheat if there are leftovers. They need to bake a little longer than the box calls for because of the creamed corn. Bake until golden brown. Remove. Delicious with some butter on them.
Our kitchen is filling with the wonderful smell of soup and it's making my mouth water. I can honestly say I am looking forward to this delicious meal and we will have a few lunches and dinners ready for the rest of the week. I only used one pot, and a few utensils and bowls. Now how easy is that?
It is supposed to warm up by the end of the week which will be very welcome, but for tonight, we will be enjoying a delicious, filling meal and I will have a few day's reprieve from meal preparation. That leaves a LOT more time for all my creative projects. Give this recipe a try. I hope you enjoy it.
Everyday Donna
Things to remember:
“You have not lived a perfect day, even though you have earned your money, unless you have done something for someone who will never be able to repay you.” - Ruth Smeltzer
Cool days always make me want soup. Soup is easy, nutritious, and goes a long way for little money. Today, I am making chicken tortilla soup. Yum. This is my own recipe, one that I invented after having chicken tortilla soup in a restaurant. It was really good and my thought was "I can come close to this!" I don't always use recipes, but I am going to share how I make this soup with you so I have been measuring ingredients as I prepare them. This makes a lot of soup, but we eat it for days. It is so nice to have something just to warm up when we get hungry and not have to prepare a full meal every time. Saves money too! When you make soup, make a lot. You can freeze some of it for later, you can take some in your lunch and you have a quick and easy dinner when you get home. You can always add a sandwich if you like, or a salad. We like jalapeno cheddar corn muffins with ours. (see recipe below)
I make this in a 12 quart pot. It makes about 6 quarts of soup or 1/2 pot.
Chicken Tortilla Soup
2 32 ounce boxes of chicken stock (I use Aldi's Fit and Active....low sodium, no msg and fat free)
8 cups water
3 boneless/skinless chicken breasts, I get 3 skinless breasts at Aldi's for around $5.00 (or you can boil a whole chicken if you want to pick it off the bone or use one of the roasted ones from the grocery, just remove the skin)
2 large potatoes, peeled and cut into 1 inch pieces (2 cups)
1 cup carrots peeled and cut into 1/2 inch medallions
l large onion cut into 1 inch pieces
1 28 ounce can crushed tomatoes
1 can rotelle with chilis
1 15 ounce can black beans drained and rinsed
1 cup frozen whole kernel corn
1 cup rice
cumin, to taste (I used 1.5 Tbsp)
salt if needed
Grated cheddar cheese
Your favorite tortilla chips
Boil chicken breasts whole in stock and water until done, about 30-40 minutes. They are done when white all the way through. Remove breasts. If the water/stock has gone down a lot due to cooking, I add more water at this point. I like the pot 1/2 full of liquid. Add the diced vegetables, crushed tomatoes, rotelle with chilis and let cook until potatoes and carrots are soft. Add black beans, corn and rice, let cook until rice is no longer hard. At this point, I add cumin and salt to taste. Cumin gives it that lovely smokey taste that makes the soup so good. Cut chicken into bite sized pieces and add to soup and let heat through. Time to serve!
Put chips and cheese on the table in serving bowls. Add the amount of grated cheese you want to your bowl of soup (it melts fast when soup is hot) and crumble tortilla chips on top of soup. Enjoy!
Jalapeno cheddar cornbread -- very easy!
Mince 6 or seven pickled jalapeno slices (these are about the size of a nickel, not whole jalpenos)
Grate your favorite cheese (we like cheddar)
1 box jiffy cornbread mix
1 can creamed corn
1 egg
Add 1 can creamed corn and egg to Jiffy Cornbread mix. Stir until mix is no longer dry and egg is blended in. Add jalapenos and about 1/2 cup cheese. You can bake these as muffins or in a round pan. We prefer muffins as they are easy to reheat if there are leftovers. They need to bake a little longer than the box calls for because of the creamed corn. Bake until golden brown. Remove. Delicious with some butter on them.
Our kitchen is filling with the wonderful smell of soup and it's making my mouth water. I can honestly say I am looking forward to this delicious meal and we will have a few lunches and dinners ready for the rest of the week. I only used one pot, and a few utensils and bowls. Now how easy is that?
It is supposed to warm up by the end of the week which will be very welcome, but for tonight, we will be enjoying a delicious, filling meal and I will have a few day's reprieve from meal preparation. That leaves a LOT more time for all my creative projects. Give this recipe a try. I hope you enjoy it.
Everyday Donna
Things to remember:
“You have not lived a perfect day, even though you have earned your money, unless you have done something for someone who will never be able to repay you.” - Ruth Smeltzer
One Thing Always Leads To Another


The Old Time Pottery had a big sale a few weeks ago and I purchased some new place mats in a beautiful sea blue color for the table for only $.88 each which was a great price. There were some napkins that I loved there in blues and tans which reminded me of the beach and ocean for only $.78 each (another bargain), so they all came home with me. They had been sitting in the sack since then waiting for an inspiration. The shell wreath was that inspiration.
Because we have to put a leaf in the table when we have company, I like my centerpiece to be something that can be moved easily without dismantling it every time and then having to put it back together. This is what I came up with for the summer.
Sea glass comes in lots of different colors and shades and is really beautiful. There will be another project with sea glass that I will show you later.

I placed the cylinder vase in the center of the tray, mixed the sea glass so all colors were represented and put some in the bottom of the vase, filling it about 1/3 full. Then, I set a tea light holder on either side of the vase. I put 3 of the orchids in the vase and filled it with water. The orchids were on a bush and I simply pulled three of the flowers off the stems. The "silk" flowers we buy are really polyester for the most part and will float in water and are MUCH cheaper than real orchids. Also, they do not have to be replaced every few days which is a plus. (If you were using this centerpiece for a party or wedding reception, you might choose fresh orchids.) Now, I mixed the shells and the remaining sea glass around the vase and candle holders on the tray. I added a tea light to each candleholder and put one to float in the water in the vase. Could that be any easier? Total cost for this centerpiece would be $8.00. This would also be great for a luau party, birthday party, shower or wedding reception. The orchids are available in several colors, but I chose yellow because it goes with our decor.
Now, I needed some napkin rings. Here is what I did - cheap and easy. My two most favorite words.


Now, wrap the left side over and under. Then, use your wire cutters like pliers and bend the end of the wires into loops like this:


I placed the shell napkin rings around the napkins and finished decorating the table. Two of the place mats were turned vertically so it gave the effect of a table runner down the center of the table. We turn them horizontally when we are having dinner. I just liked the way it looked. Now, we have a beach look for summer and it is one more thing to help tie the beach/cottage look of the room together.
We may not have an ocean view out the window, but this will be a reminder of all the wonderful times we have spent at the beach. Sure wish I was there now!
Everyday Donna
Things to Remember:
"Empty pockets never held anyone back. Only empty heads and empty hearts can do that."
- Norman Vincent Peale
Friday, June 3, 2011
Wishing I Was At The Beach - How To Make A Shell Wreath
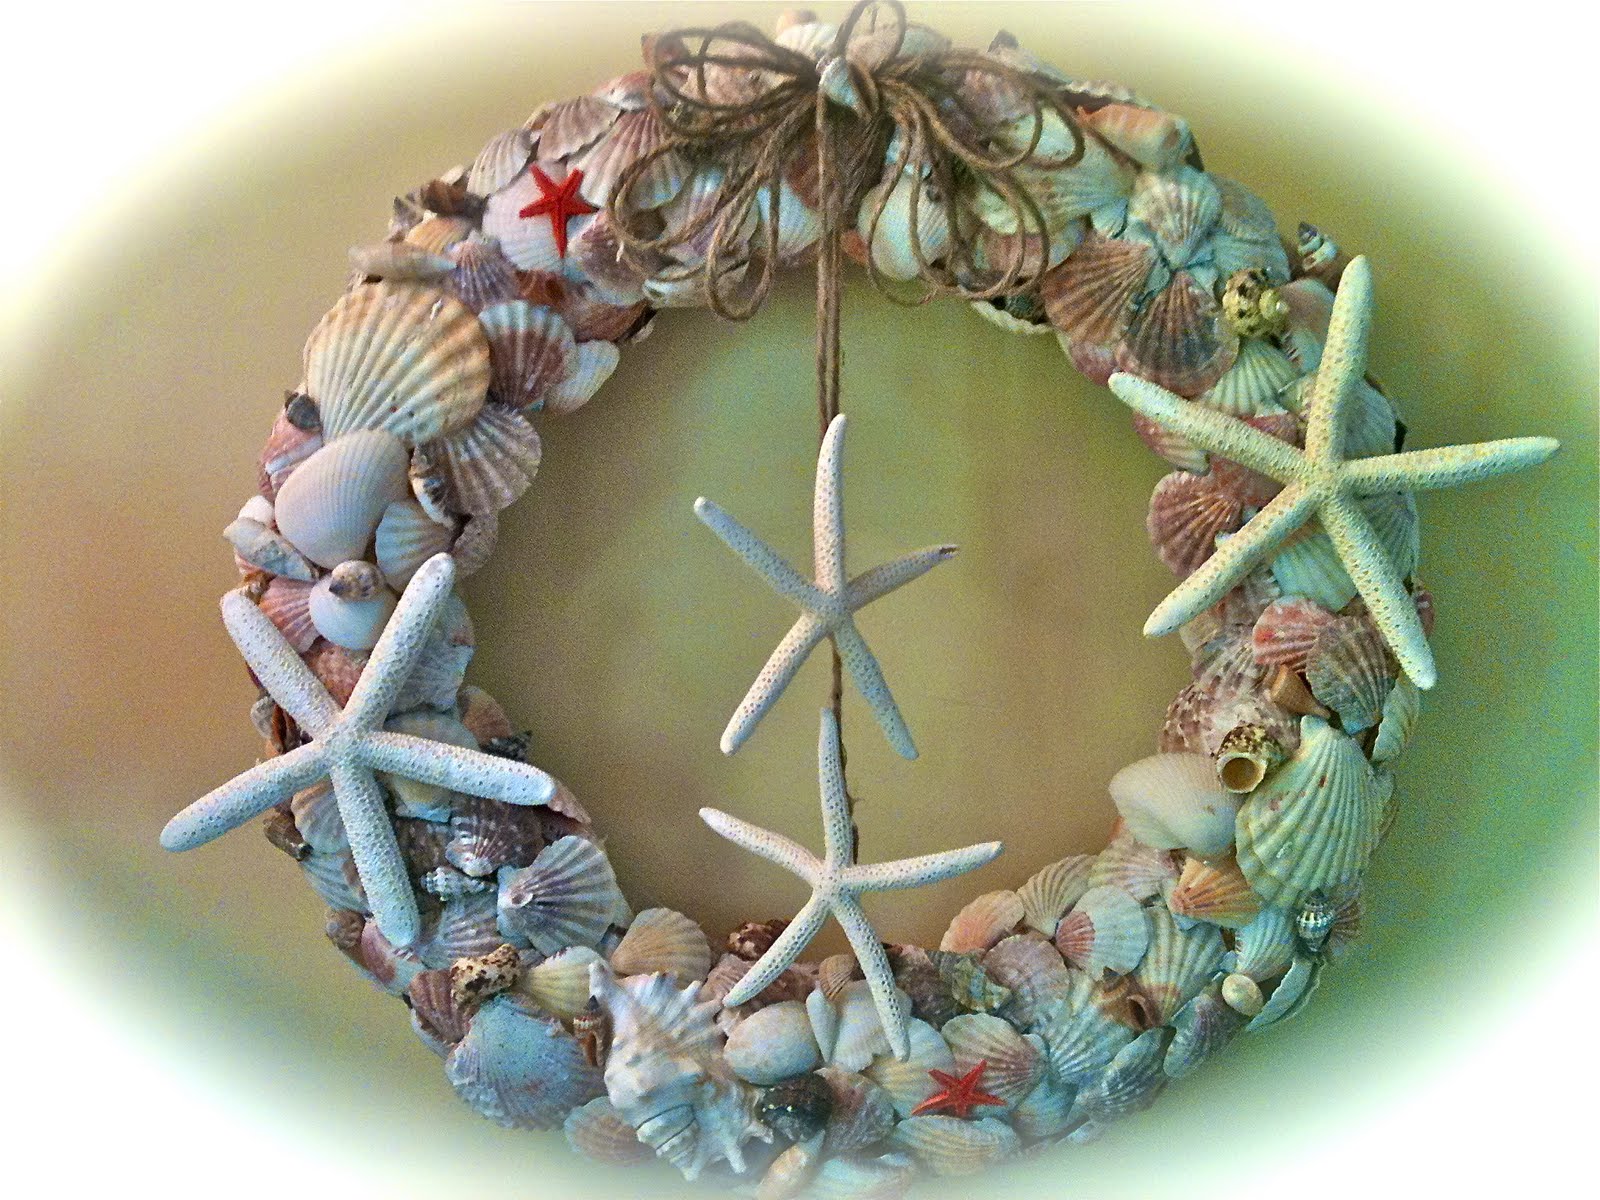

There is nothing better than sun, sand, and surf. Nothing. Did I say nothing? And that is how I feel. I would love to live on the beach with a front window view of the ocean. Unfortunately, that is not where I live. Summertime is here in middle Tennessee and it is plenty hot already, but it is not like being at the beach. So, I will do the next best thing and use a beach theme in the little yellow cottage. This season there are a lot of decorative accessories with a beach theme and many are very inexpensive. That is just my price range.
Thursday morning I was watching the Today show and there was a segment on how to make your house more cottage or beach like. Um hmmm. Just my style. I have been working on our little yellow cottage, making some changes in my decorating style and I have been adding some beach type items. As they panned the set, they showed a fabulous shell wreath that really made me sit up and take notice. The person doing the segment said they had copied it from a wreath costing $150.00. Excuse me? Did you say $150.00? Whoa. They had done a DIY and made their own. Well, the creative juices started flowing immediately and I knew exactly where I could get a lot of shells. Big Lots! Time for a road trip.


Here are my shell finds from Big Lots. I bought two of the $4.00 bags of shells and one of the baskets of six starfish for $6.00. I had an 18 inch straw wreath which cost about $2.00. Time to get out the glue gun, heat it up and start gluing! First, make a hanger on the wreath by putting a piece of wire around the wreath, twisting it and making a loop, twisting again. I visually divided the wreath into north, south, east and west. I laid down a patch of shells at each point and then filled in between the sections. I used as many of the flat shells as I could to cover the top, inside and outside of the wreath leaving no wreath "form" showing. Leave the back of the wreath open with no shells on it so it will lay flat against the wall.
Some of the shells were big and they covered a lot of area. I used the smaller shells to fill in the gaps. It took me about an hour and a half to make the wreath. Once all of the area was covered, I went back and filled in with all of the little decorative shells and added two starfish (as you can see in the picture). I made a "bow" by looping sisal back and forth and tied it in the middle, gluing it to the center of the wreath. I left two long tails on the bow. I cut the tails to different lengths and glued a small starfish onto each length. Below is a picture of what the shells look like close up so you can see how closely I placed them.

After I finished gluing all the shells on, I removed all of the glue "webs" and hung it on the wall. There were just enough shells in the two packages to cover the 18 inch wreath. Could anything make you feel more "beach like"? I don't think so. I had a few starfish left so I placed them in a small basket on the cabinet to continue the theme. One of these days I will post a picture of my mantle, which also has a bit of a shabby chic/beach theme. The wreath helps tie the room together. Things are looking very beachy here in the little yellow cottage and that puts a smile on my face.
For less than $20.00 and a little time, you can make a beautiful shell wreath that can be used year after year. Don't you love saving money? I sure do! Now, if only there were an ocean out my front window.
Everyday Donna
Things to Remember:
"We don't see things as they are, we see them as we are." Anais Nin
Thursday, June 2, 2011
Inexpensive Centerpieces You Can Do


It's finally the time of year when the fear of frost is over and we all rush to the garden center to purchase all the blooming plants we want to put in our flower gardens and various and sundry pots here and there. Do you spend countless hours planting, weeding and watering? How much do you really enjoy all this hard work? I find there is something so calming about getting your hands dirty, digging and planting. It is a very rewarding job to watch things grow and blossom, nurturing and fertilizing, turning your yard into a garden Monet would want to paint.
At our previous home, I had worked for years creating my secret garden, a place I truly loved. Since our move a few months ago, I find that I am basically starting over. I have done some planting of blooming things, done a vignette or two on our deck, planted our vegetable and herb garden. But gardens take time and thought, many years of planning and planting. It is somewhat like raising a family and it takes a lot of hard work.
To me, true luxury would be to have fresh flowers in our home every day, but that takes a lot of disposable income. Since we have a yard full of blooming flowers, why not take advantage of that and bring them into the house to enjoy? Don't just let them sit in the yard for you to look at from time to time. It's like saving the silver for company only, or the good china. Bring flowers inside for everyone to enjoy. Flowers bring so much color and texture to an interior. Their fragrance cannot be copied by any scented candle or air freshener. Whether you place them in a simple jelly glass or make an elegant arrangement, there can never be too many fresh flowers in your house.
This morning I went out and cut a couple of magnolia blossoms from the magnificent tree in our yard. The creamy, waxy flowers have a heady scent that is wonderful inside. I used my big glass salad bowl, put some black river rocks in the bottom, filled it with water and floated two of the beautiful blossoms with some leaves attached on the water. Stunning. Fragrant. Organic. Beautiful.
I keep glass cylinder vases in several sizes to use for flower arrangements. I have found a couple of great places to buy them for cheap! TJ Maxx usually has cylinder vases for $3.99 up to $6.99 depending on size. Old Time Pottery is another place to purchase really reasonable vases. The hobby stores and JoAnn's charge $20.00 to $40.00 for the very same thing. I check out TJ Maxx every time I go just to see what interests me. It is truly an excellent place for decorative items at a reasonable price. If you need things in quantity, Old Time Pottery is the place to go, since TJ Maxx may have only a few of each item. Dollar tree will order vases or rocks in quantity for you. You can have them shipped to the store for pick-up saving shipping costs as vases and rocks are heavy. Another good place to check is Gordman's if you have one near you. They usually have a great clearance section. I have purchased vases for as little as a dollar there. And, don't forget Big Lots as a great resource for many decorative things.
If you have a wedding reception in your future, a shower, or even a dinner party, consider some of these ideas to help ease the pain in your pocket book. Magnolia leaves are beautiful all year round, green and shiny. You can cut branches and lay them in the center of the table, staggering floating candles among the branches, or remove leaves and lay them around your vases. Dollar Tree has black river rock, multi-colored brown river rock, clear glass marbles, or even beautiful sea glass in blue, green or tan for only $1.00 per bag. One bag per vase should work. You can use these with fresh or artificial flowers. Or, Pier 1 has tea lights in clear plastic cups which will float. You get 30 in a package for $6.00, cheaper than WalMart, and they are unscented. Using small cube vases from Dollar Tree with a little water in them, or taller cylinder vases from Dollar Tree, you can have really inexpensive floating candles for centerpieces. Dollar Tree also has packages of sea shells for $1.00 which can go in the bottom of a vase, or use rocks of your choice, add water and floating tea lights. Beautiful, simple and inexpensive. You would spend less than $3.00 per centerpiece.
In the picture above, I have used two small tea light holders from The Dollar Tree, one on each side of the centerpiece. I buy bags of tea lights at Big Lots for $5.00 that contain 144 tea lights, or one gross. You can do a lot of centerpieces for $5.00 worth of tea lights and dollar candleholders.
Do you have hydrangea bushes in your yard or access to them? Why pay a florist or wholesale club $10.00 per bloom, when you can cut all you want from your own yard? Just have buckets of water ready to put the blooms in as soon as you cut them. Hydrangea comes from the word hydra meaning water and they will wilt almost immediately if not placed in water. You can float them in bowls or place a few blooms in vases for lovely, inexpensive centerpieces. Hyrdrangeas come in many color varieties and are very showy on a table. There are lots of options in the summer.
Don't leave all the beautiful flowers you work so hard to grow on the outside. Bring them in. Enjoy their beauty and fragrance while you can! Wish you could smell these magnolias. Simply amazing.
Everyday Donna
Things to Remember:
Love is that which is without condition, it requires nothing in order to be expressed. It asks nothing in return. And it is free. Love is that which is free, for freedom is the essence of what God is, and love is God, expressed. Neale Donald Walsch
Subscribe to:
Posts (Atom)