Showing posts with label napkins. Show all posts

Monday, December 16, 2013

2013 Christmas Table Setting


 It's Monday once again, the days are flying by and Christmas will soon be here.  We are busy trying to get all of our shopping done, projects completed, plans made for Christmas Eve and Christmas Day celebrations, and still have time to enjoy all the special moments with family and friends.

Our table is simple this year.  I used the beautiful red chargers my friend Don gave me several years ago.  The table runners are humble pieces of burlap that I cut and laid on the table.  The centerpiece is  made in a round silver tray we received as a wedding gift 44 years ago.  I just laid some fresh greens in the tray, along with some pine cones I spray painted gold.  Simple silver ornaments adorn the greens and a dark red candle in the middle is the finishing touch.
I had some gold lame' napkins that I folded and tied with some sisal twine.  It adds to the natural elements used on the table.  I tied a silver ornament onto the twine to make an easy and inexpensive napkin ring.

There is the honesty and earthiness of the burlap runners and the natural greens and pine cones contrasted with the beautiful dark red chargers and gold lame' napkins that creates a beautiful ambiance.  Simple, but elegant.
There is a big chalk board leaning against the wall that Dan and I made for the grandsons to write on when they are here.  I like to put messages on it to go with the season.  
It adds a little whimsy to the dining room.  We'll see how long it lasts before little hands smudge and smear the chalk everywhere.  The good thing about chalk is it's easy to write a new message.
Everything on the table are things that I already had.  It makes a really lovely, simple setting and it didn't cost me anything extra.  I like when that happens.  "Shop" your house before purchasing anything new.  You may have many things that can be used in a new or different way.
Most of the family will  be here on Christmas Day for dinner.  Our daughter's in-loves will also be joining us this year from out of town.  It's going to be a lot of fun.  Now, I have to plan the menu and do some baking and there are some projects to finish.  Things are starting to come together.

Everyday Donna

Things to Remember:

Christmas is coming, the geese are getting fat,
Won't you please put a penny in the old man's hat.
If you haven't got a penny, a ha'penny will do.
If you haven't got a ha'penny, God bless you.


Wednesday, May 23, 2012

Inexpensive Placemats, Napkins and Napkin Rings You Can Make

Since my summer decor theme is Americana, I needed place mats, napkins and napkin holders for our table.  By now, you know that I don't like, nor do I have, a lot of money to spend on things like this.    But, I still like things to look a certain way, so that means a little ingenuity.  I have had red place mats that I have used for several years, but of course this year I wanted to use blue and I wanted to put some kind of decoration on them.  On a recent trip to Dollar Tree, I found these round straw place mats just like my red ones that I paid a LOT more money for and they were only $1 each.  Now that is my kind of price.  They also had these tea towels in navy, red and white that I knew could be turned into napkins.  (I like to use fabric napkins when we have guests).  There were also bolts of #40 ribbon (#40 is 2.5 inches wide) in patriotic patterns that were 3 yards for a dollar which is a great price, so I picked up three bolts because there is always something that can be done with ribbon.

I purchased 6 placemats for our table, 4 tea towels that would make 8 napkins and my ribbon.  My investment was $13.00 total.  Not bad for table decorations.  I paid more than that for 4 red place mats, so count me happy.

When I got home, I had to decide how to decorate my place mats.  I wanted something simple, not too fussy.  We have white Pfaltzgraff Heritage dishes that we have had for 42 years that would be perfect with these colors and complement the Americana theme.  I had a stencil with stars on it that I used to make my flag banner, so I decided I would cluster some of the stars on one side of the placemat and that would be all that was needed.  All it took was some ivory acrylic craft paint that I already had, a stencil brush and a little time and the place mats were done.
The place mats went from this to this.  Done.  Now, to make the napkins.
All I did was take the tea towels and cut them in half.
I opened each towel up and simply turned the cut edge under 1/4 inch and then another 1/4 inch so that each napkin had a finished edge.  Since three sides were already hemmed, I only had to hem one side on each napkin -  fabulously easy and two napkins for $1.00.  Now, I needed napkin holders.  Hmmm. What was I going to use?

I had just finished a roll of paper towels to clean up some paint brushes and I stood there looking at that cardboard roll, when I thought why not?  I simply cut the cardboard along the glue marks where the first towel is attached to the cardboard.  The are evenly spaced and I got 7 pieces of cardboard.  I used a piece the same size from an empty toilet paper roll and I had 8 potential napkin rings.  Cost?  Zip, zero, nada.  Yes!

I simply cut a 12 inch piece of ribbon and used a hot glue gun to run a bead of glue on the inside of the tube near the top edge.
Now, place one end of the ribbon, right side out, on the glue and press it down flat.  I used a pencil so I didn't burn my finger.
Next, wrap the ribbon around the tube making sure it overlaps and completely covers the cardboard tube.  When  you get to the end, run another bead of glue on the ribbon and press the ribbon end onto the glue and trim.
Eight napkin rings for $1.00 is not a bad price if you have priced napkin rings.  They can be quite expensive and these will get us through the summer season.

Fold your napkins however you want and slide your napkin ring down over the napkin.  How easy is that?  You now have place mats, napkins and rings for six place settings.  Napkins will normally cost $2.99 each even in discount stores, so 50 cents per napkin is a great bargain.  If you don't sew, you can use stitch witchery or fabric glue to finish your napkins.  A little paint, ribbon and hot glue will finish the napkin rings and place mats.  Easy Peasy Lemon Squeezy and the cost can't be beat!

Everyday Donna

Things to Remember:


“Life is the greatest bargain - we get it for nothing."    Yiddish Proverb

Monday, April 2, 2012

Bunny Napkin Folds For Your Table

Well, it's Monday again.  Hope you had a wonderful weekend!  We sure did.  The weather was spectacular and we enjoyed every moment of it.  All of the in town family came over for breakfast on Saturday morning and I did an egg craft with the two older grandsons that turned out really cute.  The two toddlers played in the yard and the baby ate and slept as babies will do.  We had a grand old time.  We were just sorry our New York Grandson did not get to join us.

Since it's countdown to Easter Sunday, Grandma has a lot to do here at the little yellow cottage.  We will have a big old egg hunt on Sunday followed by dinner.  That means I started preparations today!  I wanted to finish things for the table first, so I did my bunny napkin folds.  There are lots of directions on the world wide web, but I found Martha Stewart's to be the easiest to follow.   Fortunately, I found some lovely pink napkins at World Market last week.  Whew, that was a close one.  Thought I was going to have to make them.

Before we moved to Nashville, I worked at the local casino at home as the floral designer and event decorator.  Therefore, I have folded LOTS of napkins.  The difference between a nice table and an outstanding table can sometimes boil down to the napkin fold.  It always made me so happy when a bride walked in to her reception room and was overwhelmed with joy at the sight of her beautifully decorated room.  It was lots of work, but well worth it.

Grandma likes to do things for all the grandsons to enjoy, especially for holidays.  We are making memories here.   Don't you have things you remember with great fondness?  That's what we are doing.  Someday, they will tell a story about a time at Grandma and Pawpaw's house and remember all the good times we shared.  Let me show you how to do these cute little bunny napkins.  You might want to make some memories too.

First, press all your napkins.  Then, lay one out flat on a table.

Grasp the two bottom outside corners and fold the bottom up 1/3 of the way.
Grasp the top two corners and fold them 1/3 of the way down, making a large rectangle.
Now, you need to find the center.  Fold the rectangle in half and "press" with your hand.  In sewing terms, that is called finger pressing.  This is where you find out your square napkin isn't very square.  So tug around until you get it as even as possible.  Good luck.
When you open the rectangle up, you will see a center fold.
Grasp the right upper corner and fold the napkin down along the center line.
Repeat on the left side.
Grasp the right lower corner, and fold the napkin up along the center line.
Repeat on the left side.
Grasp the right corner of the "diamond" shape and fold to center.
Repeat with left side.
Grasp the napkin tightly and rotate and flip.  Bottom to top and turn over.
See how you have two separate "ears" at the top and then a fold about 1/3 of the way down.  Perfect.  Now, fold the bottom point up.
Grasp the napkin tightly and turn over.  Martha suggests placing one fold inside the other.  We would have done that at the casino and that would have been fine.  We, on the other hand, have lots of little hands, so I have a trick to show you.
I have a package of colored hair pins from the Dollar Tree that I use to make hair bows.
I took the pink hair pins and placed one between the folds on the back of each napkin.
Push it all the way up, flat with the edge of the napkin.  Now, if a curious little hand grabs one, it won't come all apart before we eat dinner!   Turn the napkin over and turn the two ears to face you, instead of each other.  Now, Little Bunny Foo Foo is read to sit on the table.
Isn't he cute?  Adorable.  This may seem really complicated to you, but once you fold one, the others will be easy.  If you need further instructions, go to Martha Stewart and type in bunny napkin fold in the search.  They have sketches that show the folds.  This is how the table looks at the moment.
There are hand painted place mats with the Peep tree in the center sitting on an egg shaped platter.  Bunny napkins sit all around the table and just WAIT until I show you how to make those cute little "egg chicks" that are in the first picture.  They will be our Easter favor this year.  Come back tomorrow to find out how.  Talk to you later.

Every Day Donna

Things to Remember:

Thought you might find this interesting.


Why Did Jesus Fold The Napkin?
Why did Jesus fold the napkin?
Why did Jesus fold the linen burial cloth after His resurrection?


The Gospel of John (20:7) tells us that the napkin, which was
placed over the face of Jesus, was not just thrown aside like the grave
clothes. The Bible takes an entire verse to tell us that the napkin was
neatly folded, and was placed at the head of that stony coffin.

1. Early Sunday morning, while it was still dark, Mary Magdalene came to the tomb and found that the stone had been rolled away from the
entrance. 

2. She ran and found Simon Peter and the other disciple, the one whom Jesus loved. She said, "They have taken the Lord's body out of the tomb, and I don't know where they have put him!" 3. Peter and the other disciple ran to the tomb to see. 
4. The other disciple outran Peter and got there first. 
5. He stooped and looked in and saw the linen cloth lying there, but he didn't go in. 
6. Then Simon Peter arrived and went inside. He also noticed the linen wrappings lying there, 
7. while the cloth that had covered Jesus' head was folded up and lying to the side.

Is that important? Absolutely! Is it really significant? Yes!


In order to understand the significance of the folded napkin, you have to understand a little bit about Hebrew tradition of that day. The
folded napkin had to do with the Master and Servant, and every Jewish boy knew this tradition. When the servant set the dinner table for the master, he made sure that it was exactly the way the master wanted it. The table was furnished perfectly, and then the servant would wait, just out of sight, until the master had finished eating, and the servant would
not dare touch that table, until the master was finished. Now if the master was done eating, he would rise from the table, wipe his fingers,
his mouth, and clean his beard, and would wad up that napkin and toss it onto the table. The servant would then know to clear the table. For in
those days, the wadded napkin meant, "I'm done". But if the master got up from the table, and folded his napkin, and laid it beside his plate, the servant would not dare touch the table, because.......... 


The folded napkin meant, "I'm coming back!"

Thursday, December 8, 2011

Remember those $1.38 plate stands I showed you yesterday?  Well, here is what I did with them.  This is the big reveal.  If you look really close, you will see that I used a candlestick, a sherbet dish and a martini glass to achieve different heights for my candle holders.  The variety is also very visually appealing.   The picture simply does not capture how pretty they look on the table.  

This is the way our kitchen table looked this morning before I began setting it for Christmas. 
 Nice huh?  Guess you would never know I have been crafting on the kitchen table.  Why you ask?  Because my craft/sewing table is also buried in projects.  At least, I resolved this table today.  The other one is going to take some more work.  

After I cleaned off the table and put everything away (sort of), I put down my new hand painted table runner.  It looks like this.
I made it from a painter's drop cloth.  I will give you a tutorial on how I did it later.  I have to say I love it!   Next, I placed three of the plate stands in the center, added three of the sparkly candles I made and some cedar and holly from our bushes outside.  (Remember, use what you have.)  The holly has really beautiful red berries on it and it makes a nice little pop of color on the elevated plates.  Then I added one of my beloved acrylic stars.  Yes, more stars because it goes with the star in the center of the table runner and it WAS a star that guided the wise men to the nativity.  
The same treatment was done on the other two plates.  Next, I added 5 mercury glass votives, and hung some stars from our light fixture.
Then, I put out my red chargers which were given to me by my dear sweet friend Don and added a festive red holiday napkin that is embroidered with gold holly.  I have some beaded napkin rings, but didn't want to use them so I searched around and decided to cut a branch of artificial berries apart that I had and twisted them around the center of each napkin and then added a sprig of fresh holly leaves.
The backs of the chairs have red velvet bows tied on them with a crystal snowflake and some red and white string.  Here is a close up.
Because we use our table every day (we don't have a dining room) I will have to move the chargers for daily use, but I just love the way the table looks.  It is simple but festive.  Smashing actually and that is what I was aiming for.  There will be so much ambience when all the candles are lit. 

These pictures were taken with my phone because I don't have a camera at the moment.  They are not the best, but will give you an idea of what you can do with little expense.  Here are a few more pictures.
I also used some of the plate stands on the trunk I use for a coffee table in the living room.  There is a new hand painted tabled runner on it also.  Instead of candles, I used some of my Dollar Tree mirrored trees that I got a year or two ago.  Here is what the coffee table looks like.  I LOVE this look.
So I have $1.38 in each plate stand and $1.00 in each mirrored tree for a total of $5.76.  Not too shabby for a great looking arrangement.  Greenery is from the yard.  Now that makes me happy.  Here are a few more pictures for you.
At last, I am at the end of my decorating spree.  Everything has come together quite nicely and I will be sharing some more tutorials with you and pictures of all of my efforts.  I LOVE when the sun starts going down and all the lights are on and everything looks so beautiful.  It's a lot of work, but so worth it.  Can't wait for the grandsons to see all the trees! Our New York grandson won't make it here this Christmas  because his dad (our son) will be performing and we will really miss him.  Otherwise, it's going to be such an exciting Christmas and we are counting down the days.  

Everyday Donna


Things to Remember:

Christmas waves a magic wand over this world, and behold, everything is softer and more 
beautiful.    Norman Vincent Peale


Wednesday, June 15, 2011

Creative Storage 101

After 41 years of marriage, 24 of them spent in our last home, we moved to a different town and downsized.....considerably.  We have a lot less cabinet and storage space in this house so I had to think creatively about ways to store items we use on a daily basis.  Things like bath towels, tea towels and dish cloths -  necessary items unless you don't bathe or wash dishes.  

Years ago I saw someone on a talk show demonstrate how to pack a suitcase in the most efficient way.  He rolled the t-shirts, underwear and socks that he placed in the suitcase and it saved considerable space enabling him to pack many more items.  We have been doing that for years with clothing items we put in drawers.  Why wouldn't that work for our bath towels and tea towels?  So, I gave it a try and it is one of the smartest things I have ever done.  

Our kitchen has much less cabinet space than our former kitchen and I lost our big double pantry.  I have had to do Creative Storage 101.  There are not many drawers for me to store my tea towels, dish cloths and potholders in.  What to do, what to do?  My first thought was to get a small kitchen island for extra storage.  Our kitchen is a galley type design and there was not a lot of room for anything big.  The search was on.   

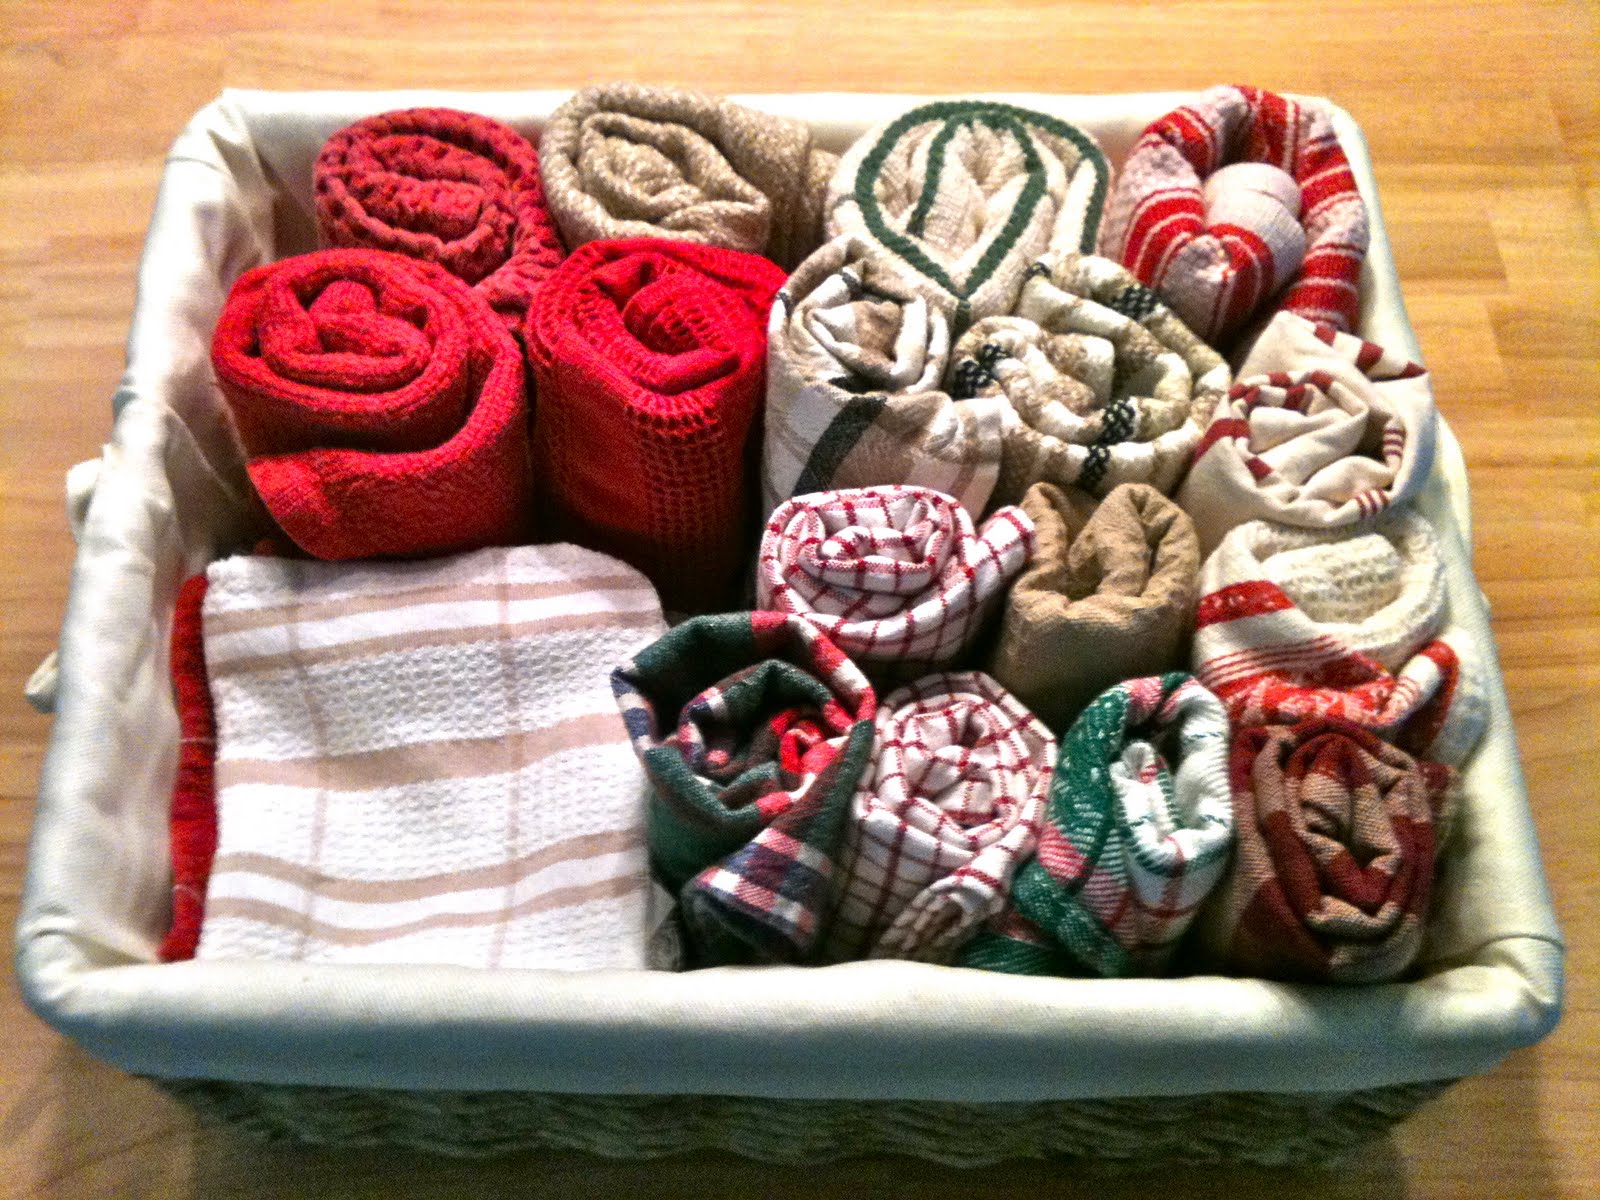
I was talking with my best buddy Don from back home explaining my dilemma.  Well, he is a super shopper extraordinaire and he was on the hunt.  Low and behold, he called me in just a few hours and said he had seen something at Target that might work and it was brand new.    I thanked him profusely and I was on my way.   There are serendipitous moments in life and this was one of them.  The cart he had told me about was perfect and it was only $29.00!  We made our purchase and hurried home.  Actually, the cart is for a microwave, but I planned to use it as a small cooking prep station and for storage.  I already had a few baskets and I used one to store my tea towels and dish cloths in and all my cloth napkins and napkin rings are in another.  There are potholders hanging on the end of the rack on the hooks provided.  Trivets and a basket of paper napkins are on another shelf.  There is cutting board on the top that is movable.  Absolutely perfect for my needs.  

I roll my towels in the following fashion to maximize the space in the basket.  We do the same with our bath towels and store them in a big basket in the bathroom as you can see in the picture above on the right.  Here is how you roll the towels:

Lay your towel out flat like this.   Then fold the towel in half, short ends together.  
Next, fold the towel in half again.
Start to roll the towel from the short side, rolling tightly.
The towel will look like this when finished.

You will not believe how much room this saves.  So much better than storing them flat.  This is what the basket looks like up close.
I don't roll my cloth napkins because I press them (yes, I really do iron) and fold them in different ways when I place them on the table.   This is how the basket looks up close.  There are 24 napkins in this basket.
Now, everything is within easy reach when I am in the kitchen.  It is all tidy and organized.  Same for the bath towels.  We lost a cabinet and a huge linen closet in the move, but  now everything works.  

If storage is an issue for you, I hope you will give these methods a try.  It is easy, inexpensive and saves a lot of space.  Also, try rolling t-shirts, underwear and socks in your storage drawers.  Oh, and don't forget to try it when you pack your suitcase.  You will be amazed!  

Everyday Donna

Things to Remember:

The creative is the place where no one else has ever been. You have to leave the city of your comfort and go into the wilderness of your intuition. What you'll discover will be wonderful. What you'll discover is yourself~Alan Alda