Monday, November 12, 2012

Santa's Belly and Harvest Angel Candles Made For Cheap!

Happy Monday one and all.  Today is the official day to celebrate Veteran's Day, although yesterday was the actual date of the Armistice ending World War One on the eleventh day  of the eleventh month at the eleventh hour.  Thank you to all who have served and are serving so that we may live free.  I pray peace on our world that war shall be no more.

Now, for a really scary update in case you haven't thought of it in these terms -- THANKSGIVING IS NEXT WEEK!!!  EEEEEEEEEEEEEEEEK.  That means Christmas is right around the corner  (actually 43 days from today) and if you are working on project for gifts, it is time to  get with it.  Since I have been busy making Halloween costumes for the grandsons, and crafts for the Elves' Faire at their school, I am a bit behind on my own projects.  So yesterday, I began in earnest.

If you have neighbors, co-workers, friends, or distant family that you like to remember at holiday time but don't have a huge budget (that would be us), or you like to have a hostess gift to take when going to parties, here is just the project for you that will cost you very little!

These are made using saints (or devotional) candles that I bought at The Dollar Tree.  Saints candles are usually decorated with the likeness of Saints and are very colorful.  These candles come in plain glass and you can do innumerable things with them.  They are only a dollar each.  My.  Kind.  Of.  Price.
This is a blank slate, a palette you can do anything with.  I decided to make "Santa's Belly's" out of these candles.  When I say Santa's Belly, what do you think of?  Red coat, black belt, big buckle - right?

You can buy 9x12 sheets of felt for $.25 or $.35 at JoAnn's or Michael's.  I had two red sheets and one black that I used for this project.  That is a total of $.75 for felt.  Cheap enough, right?  You need a little hot glue, some cardboard (like from a cereal box), white glue, some glitter and I decided to use these cute little snowflakes from a garland that I bought at Hobby Lobby for half price at $1.50.  I got ALL these snowflakes which is so much cheaper than buying them in small individual packages.  You just have to cut them apart.  Easy peasy.
Fold the sheet of felt in half long ways and cut.  This will wrap around the candle with some left over and you have enough for two candles from one sheet.   Place the felt in the middle of the candle, leaving some of the glass exposed at the top and the bottom.  Run a bead of hot glue down the glass, and press one end of the felt to it.  Now, tightly wrap the felt around the candle holder so that you have a bit of felt overlapping your original glued edge.  Trim any excess felt, run some glue down the edge of the glued felt and press the seam down until it holds.  You want a very slight overlap.

Cut across the 9" end of the black felt sheet about 1 inch from the end.  This will be the belt for your Santa. Place the black felt strip in the middle of the red felt and glue one end over the seam.  Wrap the strip around tightly, cut off any excess and glue the felt so it overlaps the first edge you glued down.  If you have some black ribbon on hand, feel free to use that in place of the felt.

Now, to make the belt buckle.  Cut a rectangle of cardboard about 1.5 x 1 inch.  Spread some white glue or Mod Podge on one side of the cardboard and sprinkle with glitter.  Glue the "buckle" to the center front of the belt.  This is when I decided to add one of the small snowflakes for a little extra decoration. I put a little hot glue on the back of the snowflake and center it on the belt buckle.

I plan on giving these to everyone who comes for Thanksgiving.  I also made some burlap angels that look like this.

I used some burlap ribbon that I had left from my Thanksgiving decorations.  I did the same thing with the burlap that I did with the felt.  After you glue the burlap to the middle of the candle, make some wings.  Cut a 10 inch piece of burlap ribbon and twist it in the middle like this.
I put some hot glue on the inside of the twist to hold the shape of the wings.  Put hot glue in the center of the "twist" and press the wings to the top of the burlap in back over the seam.  Now, shape the wings using your scissors.  I kind of cut an arch from the bottom, angling in to the top so they look like wings.  Use your judgment.
Wrap some sisal twine around the middle and tie in a bow.  I glued a couple of snowflakes to the bottom of the twine for weight and decoration.  Look how pretty this havest angel looks on my mantle. Here is another on the book case inside our front door.
These harvest angels look so beautiful with my thanksgiving decorations.  I will be giving these on Thanksgiving also as they will transition to the Christmas holiday season with ease.

Now, lets talk economy here.  The candle cost a dollar, half a piece of felt was 17.5 cents maximum, a little hot glue, glitter, and cardboard, say 10 cents.  The snowflake cost about a penny.  Same for the angel.  For less than $1.30 you have a beautiful hand made gift to give and everyone loves candles (these are unscented by the way).  All you have invested is a minimum of money and a little time to let someone know you are thinking of them.  How awesome is that?

If you want to buy these candles, they are in the section with all the vases and candle holders at The Dollar Tree.  I am sure they can be found elsewhere, just not positive where.  If you find them other places, please let me know so I can tell my readers.

Have fun with these projects, and maybe you will come up with some ideas of your own.  Let me know how it goes.

Everyday Donna

Things to Remember:

A handmade gift says I was thinking of you.


Thursday, November 8, 2012

Cut Paper Snowflakes - Inexpensive and Beautiful

After a hiatus of almost two weeks because I was busy, busy, busy.....I am back and here it is November the 8th already.  Christmas is only 48 days away.  EEEEEEEEEEK!  There are so many projects to do and gifts to make.  It is time to get with it Grandma!

Our grandsons attend a Waldorf school and their biggest fundraiser of the year is called The Elve's Faire which is this Saturday.  Every family is supposed to donate 12 hand made crafts to the faire.  They also have vendors who rent booths, live music and food.  I am SO excited to go and see all the beautiful things people have made.  Our daughter has 3 young sons, a writing career, an online book club on education that she hosts, she is a representative on the parent council at school and has a home to care for.  I took pity on her and told her I would make her crafts (I think I heard a large sigh of relief when I said I would do that for her)!

Waldorf schools encourage children to use their imaginations when it comes to toys and games.  They highly discourage electronics which is okay by me.  Many of the people in Silicon Valley send their children to Waldorf schools which I find highly interesting.  The children begin doing crafting in Kindergarden which is wonderful and they craft all the way through school.  They start by finger knitting.  It is amazing to see all the little ones knitting away and they easily progress to knitting with pencils and then needles.  They do woodworking and all kinds of really beautiful art.

All crafts for the faire are to be made from natural materials, nothing synthetic.  Now that puts a whole new light on the subject of craft making.  That means no acrylic felt, nothing plastic, nothing polyester and that eliminates a lot of crafting materials.  What to do, what to do.

Last year, I made these cut paper snowflakes with the boys and Holly fell in love with them, so she asked that these be one of the crafts.  That was okay by me because I have tons of book pages and music pages from another craft project that I had done.  These are a little time consuming, but oh so beautiful.  They can be made in any size depending on the size squares you start with.  Last winter we made huge white snowflakes using some 100% cotton paper that I had.  Holly loved my book page wreath that I made so much, that I decided to use book pages and music pages for this project.  Here is what you do.

First, choose the paper you want to use.  I chose these pages.
These really are not hard and you will find if you do each step as written, it will be much easier than you think.  If you simply look at it and read it, you may be confused.

You will cut out 6 or 8 squares for each snowflake.  I used a box lid that is 4 inches square for my template.  (Remember, this will give you an 8 inch snowflake because you are going to glue two sets of sections together.)  Trace around your square, whatever size you are using, and cut out 6 or 8 squares.

Fold each square corner to corner, to make a triangle.

Fold again corner to corner to make a smaller triangle.
If you are right handed, keep the fold to the left and cut through all the layers 3 times.  I started on the outside and cut toward the middle.  Using your scissors, you are going to cut about 3/4 of the way up on the first cut and then graduate down slightly on the remaining two,  leaving about 1/2 inch of space between each cut.  If you are left handed, simply reverse the process placing the fold on your right.
Open up all the squares after you have cut them.
Now, the fun part!  This is where the gluing begins.  I used a glue stick and the brand I use is from Big Lots (it is their brand) and is called Bridgeport and has a blue wrapper.  Best glue stick I have ever found and the only one I use.  It sets up immediately.  No waiting.  Hot glue can work, but you risk burning yourself and you may have lumps in the folded over sections left from the glue.  The choice is yours. 

 This is what you do first. 
Place some glue from the glue stick on the inside of the bottom cut piece and fold it over the top piece.  I put a pencil in while doing this so I don't mash the center.  Remove the pencil after a couple of seconds.  

Here is how I do the glue.
I place my thumb against the outside of the piece I am gluing so I have something to press against.  Rub the glue around a couple of times on the tip of the cut piece.  Be careful not to tear the paper (and yes, you will have glue all over your thumb like in the picture). Pull up the same cut piece from the other side,  fold the glued piece  over the bottom piece, pinch between your fingers and hold just a couple of seconds.
When you are making each piece of the "flake", you will fold one piece forward, the next piece back, the next piece forward and the final piece back.

The biggest piece will get folded last and it will look like this from the top.
It's really pretty cool how it works.  Once you get the hang of it, it will go faster, but it does take some time to cut, fold and glue all the pieces - just warning you.  Once you have 6 or 8 pieces glued, put half of the pieces together (3 or 4) making two sets.  Make sure the pieces are all going the same way.  I like my biggest piece to go to the left.  It's your choice.  Put some glue on the top of the piece and glue to a second piece, repeat with the third and fourth piece.
Now, put glue on the top of one side of a set of flakes and glue on the opposite side on the other set.  Press them together.  This takes a little dexterity to get your fingers in there and hold them until the glue sets.  Just be careful not to tear the paper.  Once you have put the two sets together, go around the snowflake and glue the pieces together at the "touch points" where all the pieces naturally touch each other.
Here is the finished product.  This is where I realized that I have a set of threes and a finished picture of 8.  Duh.  Sorry.  You do the same thing either way.
I made a hanger for the top by hot gluing a loop of white embroidery thread to the tip.  I didn't want to tear the paper by putting a hole in it or thread through the cut pieces.  I also brushed the flakes with white glue and sprinkled them with Martha Stewart fine glitter in crystal and silver.  I'm sorry it doesn't show up in the pictures, but they are beautiful "in person."

Here is my final bunch of snowflakes.
They are really lovely for hanging on the tree, in windows, on mantels, or anywhere you choose.  These would make lovely gifts for teachers, neighbors, co-workers, or anyone you would like to remember with something that doesn't cost a fortune.  One used book will make lots of snowflakes.
These would be fun for an afternoon or evening crafting project with your children or grandchildren - even in a class room or Sunday school class.  It doesn't have to be expensive to be beautiful or thoughtful.

Keep this project in mind for the upcoming holidays.  I used them in my windows after Christmas last year during that gloomy January/February part of the winter before Valentine's day.  Have fun with this one!

Everyday Donna

Things to Remember:

Memories of making things for Christmas are some of my fondest childhood memories.  Don't forget to make some memories with those you love.


Thursday, October 25, 2012

Make A Wreath Using Deco Mesh


Yesterday, I enjoyed a beautiful fall play day.  Did what I wanted to.  Shopped, bought things for fall and Christmas projects.  Enjoyed lunch out with Dan and took in the beauty of the foliage.  It's a good thing we did, because tomorrow we are getting storms and the temperature is going to drop a LOT.  That means a lot of that beautiful foliage will be on the ground and the trees will be much more bare than they are now.  Guess I actually made a good decision, at least that's what I try to tell myself.

Today, I did not procrastinate any longer since Halloween is next Wednesday.  From this pile of cut fabric, there will rise (like the Phoenix?) a Bugs Bunny, Daffy Duck, and Marvin the Martian costume.  There is also a bowling shirt and a bowling pin costume.  Will happily show you the finished products later.  Grandma has got to get busy!!

After I finished cutting out all the costume pieces, I was itching to make a new wreath for the front of the house with some lovely Decor Mesh that I found yesterday during my shopping spree.  The colors that I bought were a chocolate brown and a rust with gold metallic threads running through it.  I know, I know, I should be sewing.  It only took a few minutes.  Honest.

Last week while on Pinterest, I came across a wreath type gadget that can be purchased to use with the decor mesh.  It was metal with prong like projections that you twist around the mesh.  It had to be ordered online and was about $20.  Too much for my budget when I can create something similar from things I had in my craft room and I don't have to pay shipping.  Here is what I did.

First, I made a 16 inch circle from some wire that I had.
Next, I cut a bunch of chenille stems in half (pipe cleaners) and started by placing them at 12, 3, 6, and 9.  Then filled in with two more chenille stems between each mark at equal spaces.
Just put the chenille stem under the wire and twist it over the top to hold in place.

This is what the Decor Mesh looks like.  It comes on spools and this is 14 inches wide.  It also comes in 21 inch widths.
Here is how I made my wreath.

Start with the Decor Mesh by making a big loop, like half of a bow, and lay it on top of a chenille stem. Twist the chenille stem around the loop to hold it in place (like closing a loaf of bread) and make another big loop and continue around the wreath frame until you come back to the beginning.

Next, I used the chocolate brown and did the same thing, kind of alternating left and right between the rust colored loops.  Did I take a picture?  Oh of course not.  Got in a big hurry.  Sorry.

I had some fall leaves and weeds in silk that I added for a little color.  I just laid them between the big loops and used the chenille stems to hold them in place by twisting them around the stems.
Here is the finished product.  Unfortunately, the pictures don't show all the detail the way I would like, but it is a really gorgeous wreath.
Fluff your pouffes and pull them back and forth to get the arrangement you want.  This makes a really nice, big, fluffy wreath that has lots of texture and color.  It would be lovely on an indoor wall as it is very light weight.


I've already got my Christmas mesh and will begin my Christmas projects soon.  Remember, Christmas is exactly 2 months from today.  TWO MONTHS!  Yikes.  I have to get some costumes made so I can start on Christmas.  I swear every year that I will not be down to the wire finishing projects.  Of course, we all know better because "Procrastination" is my middle name.  If you plan on making your gifts, time to get busy!  Then again, you may already be finished because you don't need a 12 step program for procrastination.  I try, I really do.

Everyday Donna

Things to Remember:

"Gifts of time and love are surely the basic ingredients of a truly merry Christmas."
Peg Bracken


Wednesday, October 24, 2012

Fall Foliage And Joseph's Coat of Many Colors


Procrastination - my middle name.  I acknowledge it.  I declare it to you in all honesty.  But, I wish it wasn't so.  I need a 12 step program.  Perhaps it's because I spent so many years doing "production" type work with serious deadlines that could not be missed.  There were weddings that depended upon me, receptions, holidays with hundreds of deliveries waiting to be made that let people know there were those who loved them and sent flowers as an expression of their love.  I swore never again would I work that hard. Aching back, aching feet, aching brain, sometimes 40 straight hours without going home.

So what was my next career choice?  Costuming.  Seriously.  Talk about deadlines.  Measurements, fittings, plotting the script, choosing fabrics, building costumes, deliveries, more fittings, dress rehearsals, and productions.  Wash, rinse, repeat.  Many times, there were three or four productions due at the same time.  Ten long years of hard grueling work, 14 hours a day, 7 days a week - but there were so many fantastic results.  Happy students who were proud to wear their costumes.  Lifetime friendships made.  So many wonderful productions that brought joy and happiness to so many, including me.

Now, I hate deadlines.  I procrastinate which only makes my life more difficult.   Why?  I guess it's because I want to play, to be able to enjoy each and every day my way.  But, I make promises that have - guess what? - deadlines.  Today, I should have been cutting Halloween costumes for our grandsons.  Did I?  Of course not.  Dan asked if I wanted to go out for a bit.  Uh, yes I did!  And we enjoyed one beautiful fall day that will never come this way again.  Happy?  You bet!

We headed to Cool Springs where they have the best Dollar Tree ever!  And a Michael's Craft Store, and lots and lots of places to lunch.  As we made our way around Briley Parkway, I took in the beauty of the trees, the azure sky, the sunshine, the joy and perfection of this beautiful day.  Yes, I will cut those costumes tomorrow and work into the night sewing them.  Taking this play day was worth every minute.

If you know our family, you know our children performed in many, many musicals and plays.  We are a musical family.  I costumed innumerable musicals and one of my favorites is Joseph and the Amazing Technicolor Dream Coat taken from the Biblical story of Joseph and his brothers in the book of Genesis.  The song Joseph's Coat ran through my head as we headed down Franklin Road where there are such beautiful hills and trees.  Here is the last verse of the song sung by Joseph about his beautiful coat given to him by his father, written by Andrew Lloyd Weber and Tim Rice.  If you don't know this song, look it up on YouTube.  It's awesome.

Joseph:

I look handsome, I look smart,
 I am a walking work of art.
Such a dazzling coat of colors,
How I love my coat of many colors.

It was red and yellow and green and brown, and scarlet and black and ochre and peach, and ruby and olive and violet and fawn, and lilac and gold and chocolate and mauve, and cream and crimson and silver and rose, and azure and lemon and russet and grey, and purple and white and pink and orange and blue.............

Just like the hillsides in Tennessee today.  These pictures were taken from the car as we drove.  Sorry for the streaks in the windshield.  Enjoy this tour of fall foliage.


How can this not make your heart happy?  Fill your soul?  Make you appreciate the Universal creativity that gave us such beauty.  Look at that sky!  The vibrant flames of oranges, yellows, and reds in the leaves that are so reminiscent of Joseph's beautiful dazzling coat.  If I could paint, this is what I would paint.  Instead, I will sing.  Who says life is not like a musical?  That no one spontaneously breaks into song for no reason?  With inspiration like this, we should all sing together....

It was red and yellow and green and brown....

Everyday Donna

Things to Remember:

I'm so glad I live in a world where there are Octobers.  L. M. Montgomery, Anne of Green Gables

Tuesday, October 23, 2012

The Ocean Beckons

 Perhaps in a former life I was a mermaid, or a fish, or a sea turtle.  Maybe I was a sea captain or lived on the craggy northeastern banks near the ocean.  There is something about the sea that beckons me, calls me, requires me to return just to look at it.  Study it.  Listen to it. It is primal and wild, soft and sultry, gentle and uneasy all at the same time.  The sea awakens emotions from deep within my soul and restores it like nothing else.  The vastness of the waters makes me know there is a universal connection of all things.

This has been a great year for visits to the ocean.  We were fortunate to be able to visit the Atlantic in June and last week we spent time on the Florida Gulf.  The waters contrast in many, many ways as far as temperature and wave action go.  But, they fill me with awesome wonder and appreciation for the beauty this earth possesses.

Our daughter, son in love and two grandsons rented a house in Sea Grove Beach, Florida,  last week and graciously invited us to join them for a week of rest and relaxation.  We did not have to think twice about making the trip.  After all, it was time with family and precious grandsons and The Gulf.  The sugar white beaches are also a major contrast to the hard brown sand of Maine.  Do I have a preference?  No, not really.  Sand, sun, and water are agreeable any time.

We have been to Florida many times, usually for spring break or the hot, hot part of the summer in late July or early August.  July and August are so hot that you must spend your time in the water and you PRAY for a breeze from the Gulf.   Yes, we have even been through a hurricane - Hurricane Erin.  It's okay if that never happens again.

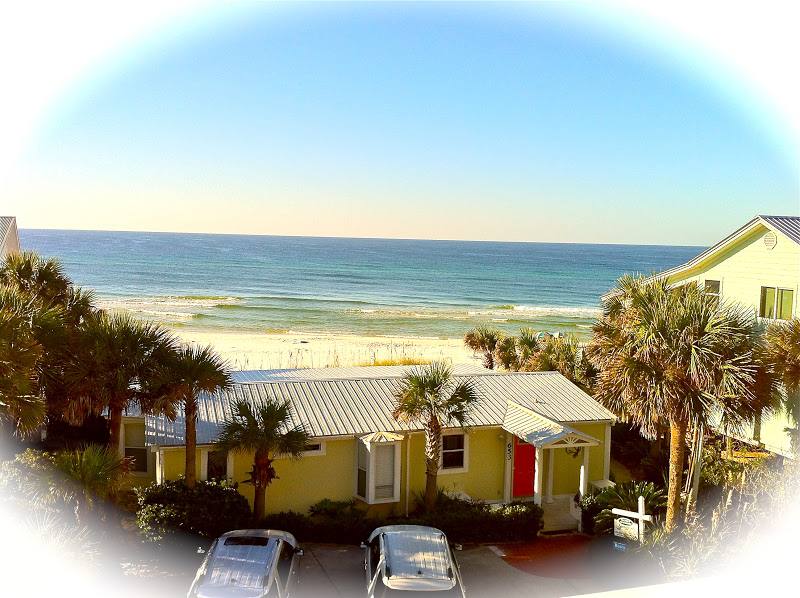
I have to say, October seems to be THE month to spend in Florida for perfect weather.  Beautiful warm days, not the kind where you must be in the water or perish like in early August.  Cool evenings - the kind where you can wear a light sweater or jacket.  The cerulean sky was unbelievable.  I mean look at the color in this picture (it has not been photoshopped)!
This picture was taken from the little balcony off our bedroom about 9 am.  Stunning isn't it?

A friend asked me if we did anything special or were we just slugs.  My reply - S. L. U. G. S. and it was awesome.  I spent most of my time on the porch on the third floor watching the water, loving the feel of the sun on my face, meandering to the kitchen, or down the stairs to the beach.  I fixed breakfasts, lunches and dinners.  I pretended to read a book, but mostly I watched our grandsons in their glory, playing and laughing, singing, dancing, digging in the sand, and being little boys.  Living in the moment.  Loving the sun, sand and water.  Being the perfect little creations that they are.

On Thursday, it rained all day.  That was okay too.  How do you love the sunny days without a little rain?
The waves increased in size, the wind blew, the rain fell in rivers of water, and we could watch it from the covered porch.  I held my book and pretended to read, but I was watching the water.  Always, the water.

Friday was bright and sunny and we spent time on the beach.  The boys have clothes that protect them from the UV rays of the sun and we didn't have to keep slathering them with sun screen.  Where was that when our kids were little?  Incredible.
Our daughter Annie and baby Van under the umbrella.  What a fabulous day.

One of the neighborhood pools was across the street from where we stayed.  The boys loved the water so much.  Gus wore himself out paddling up and down in his swim vest.

My constant view from the third floor porch.  What's not to love?  Really?  I am always glad to get home and return to our daily routine.  We will always have memories of the lovely times spent on the beach with those we love.  And the sea will beckon again, and hopefully we will be able to return.

Everyday Donna

Things to Remember:

This song kept running through my head while I watched the ocean.

For the beauty of the earth,
For the glory of the sky,
For the love which from our birth,
Over and around us lies.

Lord of all to thee we raise,
This our hymn of grateful praise.