Showing posts with label tutorial. Show all posts

Wednesday, February 5, 2014

Make A Custom Mug For Someone


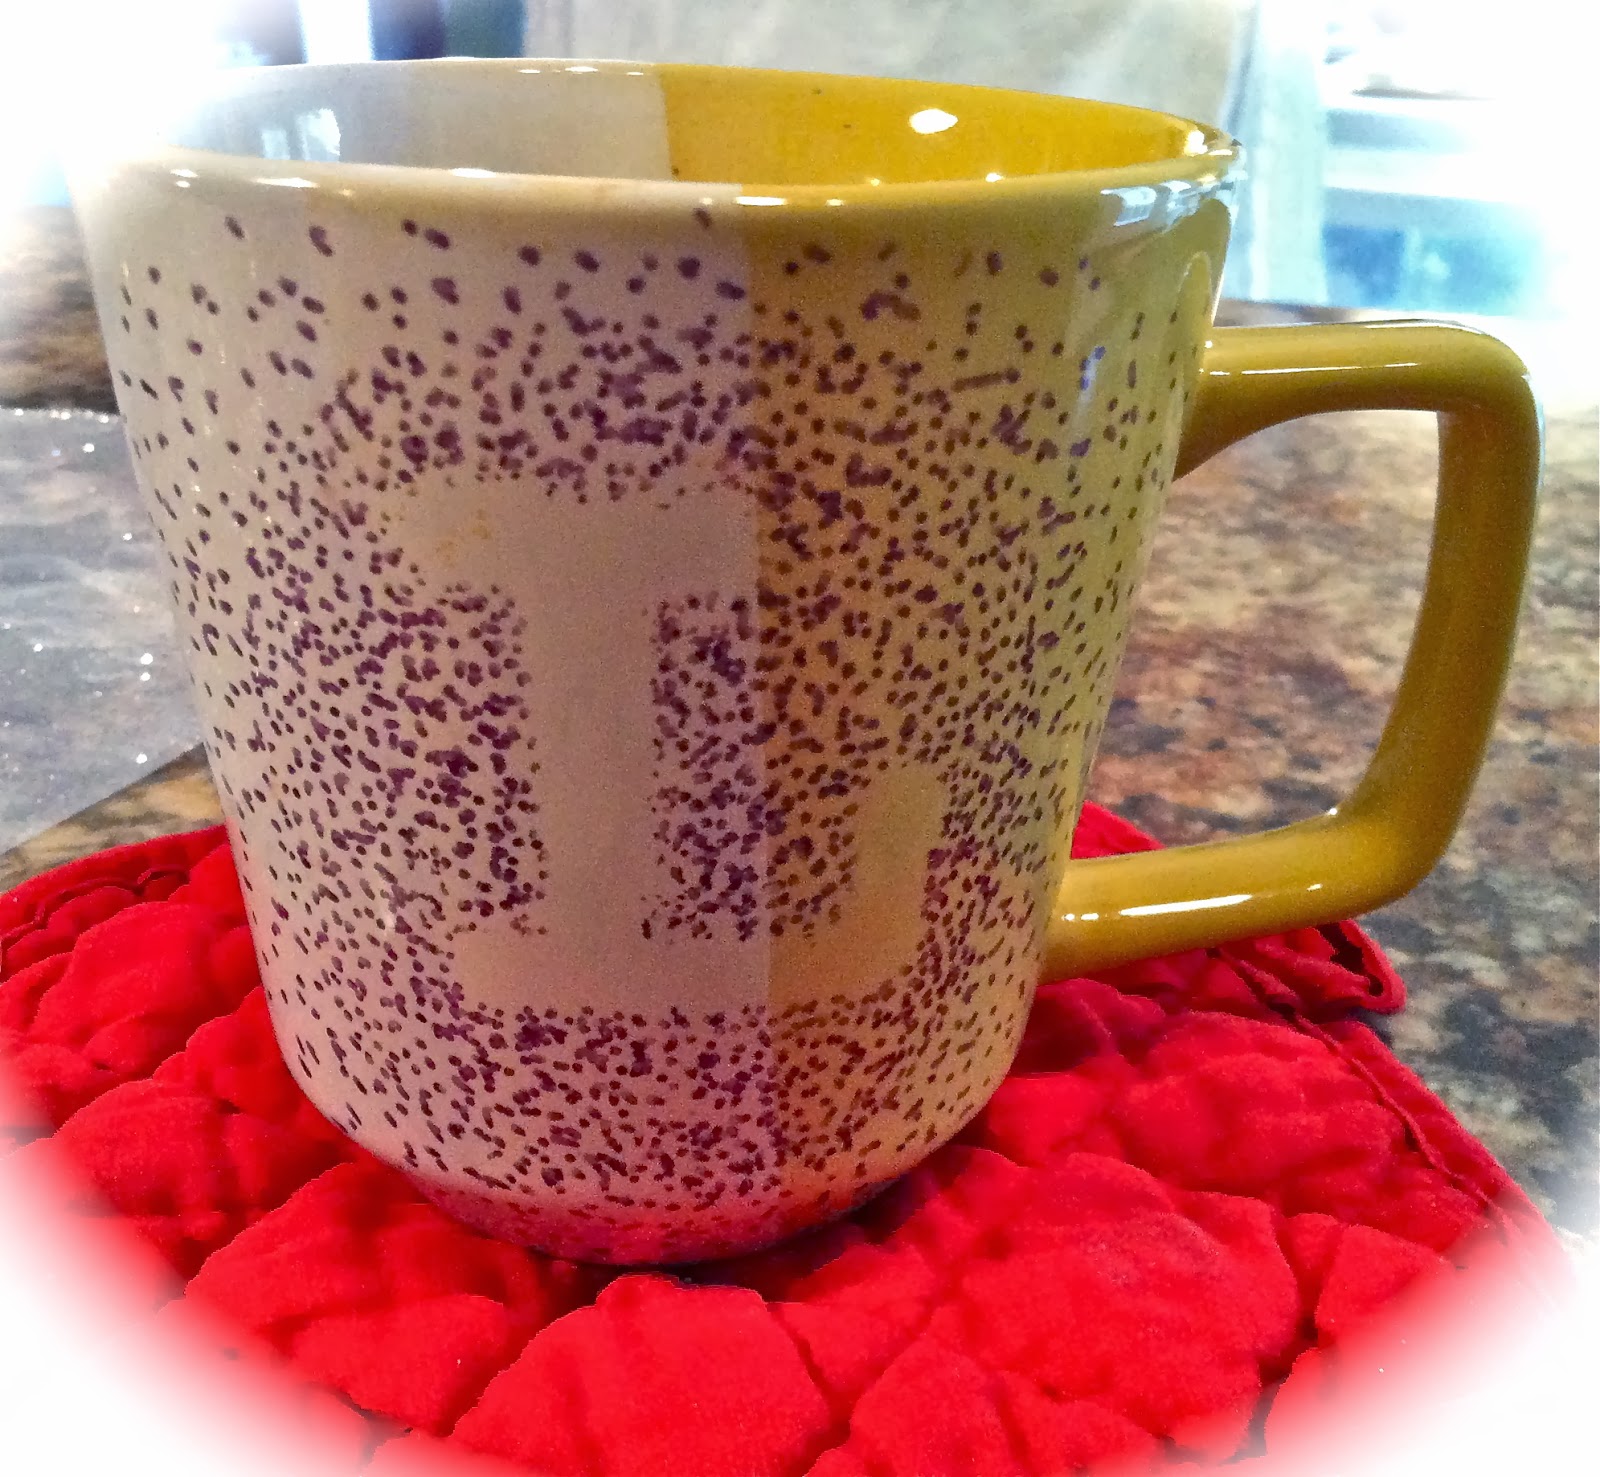
Thought I would share another easy Valentine idea with you today.  I made this cup for my friend Linda as a Christmas gift.  She loves yellow and purple, so guess what colors I chose?  This mug caught my eye because it was yellow and cream which was perfect with purple accents.

To make these mugs, all you need is an inexpensive mug, something for a pattern - you could use a heart for Valentine's Day, a cupid, or an initial.  Anything could work.  I even made some with mustaches on them which are so cute - and a sharpie in a color of your choice.

To make the initial, I used a letter from this package I found at Big Lots .
The entire package was only a couple of dollars and I have found all kinds of uses for them.  There are different fonts in different sizes with numbers and letters.  I punched out a large "L" and taped it to the front of the mug using tiny pieces of 2 sided tape.

Using the sharpie, I simply made random dots all around the letter, then removed the letter and put it on the other side of the mug and did the same thing.

Next, the sharpie has to be heat set, so I placed it in a cold oven directly on the wire rack and set it to preheat to 450 degrees Fahrenheit.  When the buzzer went off at 450, I turned the oven off and let the mug cool in the oven.  Make sure the mug is not hot before picking removing it from the oven!

You should be able to wash the mug by hand without removing the design.  I am not sure you can guarantee it to be dishwasher safe, although our sons in love have had their mustache mugs for a couple of years and they put them in the dishwasher.  From what I have read, it sometimes depends on the glaze on the mug.

These mugs could be filled with candy, the pink popcorn I posted last night, or someone's favorite tea or coffee.  I sent Linda some boxes of tea that she could enjoy in her mug along with some coasters I made for her.  She really liked it.

Handmade gifts are always special for gift giving.  These would also be super for teacher's gifts, friends, or co workers.  Gift recipients appreciate that you took the time to make something with your own hands and that it came from your heart.

Dollar Tree, TJ Maxx, Big Lots, or Target are good places to look for inexpensive mugs.  The inexpensive mugs seem to work better because their glaze is more porous - it's not about being cheap.

Give this project a try the next time you need a gift.  You could even make sets of them for wedding or shower gifts.  The options are endless.

Everyday Donna

Things to Remember

Gifts have ribbons, not strings.  Vanna Bonta


Tuesday, January 28, 2014

Swedish Woven Hearts To Hold Your Valentine Treats


 Hey, everyone.  I'm here to show you how to make those containers for the cinnamon sugared nuts I talked about last week!  I hope you had a great weekend.  I am a little under the weather with a very runny nose, but that's okay because it's too cold to go out anyway!  Hope you are all staying safe and warm during this winter siege.

Valentine's Day will be here in just a few short weeks, so I thought it was time to get busy making some things and decorating the house.  I know it's just a one day holiday, but who doesn't love some colorful hearts to cheer things up during these wintry doldrums?

The containers I am making are made from paper - you can use card stock, construction paper, or some of these cute acid free papers I found at Target in a package for $1.  Yes, you read that right.  There were 10 pieces of 12 x 12 papers in a package for uber cheapness.  They were in the front of the store in their dollar bin and they are adorable.  The package even showed the paper patterns inside.
I also have some 8 1/2 x 11 paper that I found at Michael's for $3.  That paper is a little heavier and a little harder to work with just in case you are interested, but is also perfect for Valentine's Day.

These are called Swedish woven hearts and you may have made them in elementary school, who knows?  I just discovered them on Pinterest a while back and knew they would be perfect for our grandsons for Valentine's Day.  There are endless options to making them.  They even learned how to make them last weekend.  Our 7 year old grandson liked them so much, he is going to make them for his first grade class at school.  Here is how one of the hearts looks "filled."
How cute is that?  You can also put handles on them for hanging.  Just cut some thin paper strips and use a glue stick to attach them to the inside of the paper hearts.
These are made by weaving the paper together and it is not hard once you get the hang of it.  You will want to work slowly so you don't tear the paper as you weave it together.  I say that because you weave the pieces through the centers, not just over and under.  The last row is tight and requires a little dexterity.  Don't be scared off by that last statement, it just means take your time.

First, you need to cut your paper strips.  They need to be 3 to 3 1/2 times longer than they are wide, so mine are 3.5 inches wide by 12 inches long.
The handy dandy paper cutter makes the job go faster.  If you don't have one, simply use a ruler and mark your strips and cut with scissors.

Fold the strips in half, end to end so they are half as long as they were.  
You need to make a curved top, so I used a tuna can placed on the OPEN end (not the folded end) and traced a semi circle.   Trace one on both pieces of paper and cut with your scissors.  I made a template to make things easier.
This became my template because I cut the strips on the open end instead of the folded end.  Duh.   You will want to mark the folded end in thirds, for 3 strips.  I put a small pencil dot at the appropriate places on the folded end.

Now, this is important and I learned this myself.  None of the tutorials I looked at told me this, but it makes weaving the hearts together so much easier if you will lay one strip on top of the other in a heart shape and mark the edge of the piece so you know how far to cut up.  If you don't cut far enough, you cannot weave the strips together and you will tear your paper.
Just make two pencil dots approximately 1/3 from the top and bottom.  Then, reverse the papers and do the same so you can cut both strips the same length.  See the pencil dots on the folded edge and the marks at the top?

Now, cut from the FOLDED edge toward the open edge.  You should have 3 strips.  Now the really fun part - weaving the two together.  I started with over/under/over because I think it's easier to do.  You will do this twice and under/over/under in the middle.  REMEMBER:  YOU ARE GOING THROUGH THE CENTER OF EACH STRIP WHEN YOU WEAVE, OTHERWISE IT WILL NOT LOOK LIKE THIS WHEN YOU ARE DONE.
This is a closed woven container that will hold something.  If you just weave over/under/over it will not hold anything.

To start, put the top strip on one half of the heart piece inside the first piece on the other half.
This is another picture of how it should look.  See how the strips go through the centers?  That's what you want to do.

This is easier to follow once you start doing it.  I know this makes no sense, but it really will and it should look like this when  you finish the first strip.  Over/under/over.
The weaving should look the same on both sides.  If not, you missed going through a center somewhere.  Take it apart and start over.  The next piece will go under, over, under.  You may have to bend your paper a little to make it work.  Just take your time.  Push the pieces to the top as you work, or you will not be able to weave your last piece through.  Go back to over/under/over and you are done.  Easy Peasy.  If a 7 year old can do it, you can do it.  If I can do it, you can do it!  
This is how I bent my paper to get it through the last section.  The center is a little tricker.  When finished,  it will look like this.
I know it sounds hard and I was confused when reading the directions the first few times.  Once I had the strips in my hand, it made sense.  It will for you too.  I can't figure a way to write it that is not confusing, if you get my drift.  

If you want to jazz up your hearts some more, cut thin strips of contrasting paper,  ribbon, or lace, and weave it through the strips.  I used a little dab from a glue stick to hold the pieces in place.  
See the difference?  The options are endless!  You can also cut a narrow strip, wide strip, narrow strip for your weaving pattern instead of 3 equal sized strips.  You can do all kinds of fancy things with these.

I used some pieces of nylon tulle and filled it with M&Ms (grandsons LOVE them) and tied a ribbon around the top because I didn't have any cinnamon sugared nuts at the time.  This will keep the nuts or candies from falling out of the hearts at gift giving time.  
  

Be imaginative and create all different kinds of hearts.  You could use sheet music.  If you use book pages, make sure they are really long ones or you could use magazine pages - the list is endless.  Felt is also a possibility.  How cute would those be?

Have fun with this project.  We sure did.  You can make a plethora of these hearts for next to nothing and everyone will love that you made them by hand.

Everyday Donna

Things to Remember:

All you need is love.  But a little chocolate now and then doesn't hurt.  Charles M. Schulz


Tuesday, December 17, 2013

My Different Burlap Christmas Trees

 Oh Christmas tree, Oh Christmas tree, how lovely are thy branches.  There are many representations of the traditional Christmas tree.   You may have a huge evergreen tree decorated with lights and ornaments, or it may be a Charlie Brown tree.  It could be shiny aluminum with a color wheel that rotates casting different colored lights on the tree.  Perhaps, you have improvised something on your wall because you have no room for a full tree.  I have seen trees made from old ladders and decorated that are amazing.   Everyone likes something different.

One of the most beautiful trees I ever saw was years ago when I was doing direct sales and was conducting a party in a home where their tree was a sapling that had been cut in the woods.  The tree was totally wrapped in cotton so that it looked like a completely snow covered tree.  There were lights and ornaments hanging from the limbs and lots of icicles.  The sapling reached the ceiling and it was so beautiful I wish you could have seen it.  The hostess told me this has  been her family's tradition for as long as she could remember and she had continued it.  I know it was a lot of work to do all the wrapping, but it was one beautiful tree.

One night I was about to doze off, when a vision of some burlap Christmas trees came into my head.  It may sound strange to you, but things like that happen to me right before I go to sleep, or when I am in the shower and not thinking of any particular thing.  The trees were simple and lovely.  This is my interpretation of what I envisioned.   They are very primitive which is something I really, really like.

I didn't know how I was going to make them because they needed a form - a support.  So I went to Michael's and wandered around.  I found some wooden squares in the craft section that were $1.00 each.  I bought 3.  Then I found some dowel rods for $.59 each.  I bought two because I knew I could cut them to different lengths.  I had a package of styrofoam cones at home that I thought could work to complete my "form."  I found a package with cut dowel rods at Wal Mart that would make the final shape work.  There were 8 in a package, so I bought two because I didn't know how many I would need.  I used them all.
Dan drilled a hole in the center of each base that would hold the biggest dowel rod for the center of the tree.  To find the center, simply draw a straight line from corner to corner that intersects like an X.  That is  your center.  I held the big dowel rod up and marked where I wanted them cut to make different heights.  Dan cut those for me.

I hot glued the big dowel in each base.  Then, I cut a styrofoam cone in thirds and placed a piece on the top of each dowel.
This is what the first one looked like.  Then, I painted the cones with some brown paint so the cone wouldn't show through the burlap.  I pushed the shorter dowels into the bottom of the styrofoam at quarters of the styrofoam and then filled in between with more rods.  I put hot glue at the base of each dowel so it would hold in the styrofoam.  I painted the base, center, and all rods with some light brown paint.
For the first tree, I cut two long rectangles of burlap.  Make them at least twice as long as the width of the tree and long enough to cover the spokes of the tree when gathered at the top.   Add several inches.  You can always cut it off if it is longer than you like.  Next, I  stitched the side seams together with a tapestry needle and some yarn using a running stitch.
Now, you have a big circle of fabric that is open at the top and bottom.  Using the needle and yarn, I gathered the top edge of the circle using the same running/gathering stitch pulling it as tight as I could get it until I reached the beginning stitching.  I wrapped the yarn tightly around the gathered top several times to hold the "tree" shape and tied it.  I then dropped the burlap over the wooden form.    It was a big puff of fabric with a top knot.  

To make the tree shape, I did an overhand whip stitch with the yarn by attaching the bottom few inches of the burlap to the wooden spoke, then continued the rest of the way up catching only the fabric.  You will have as many seams as you have spokes as well as the two side seams.  Now it looks like a primitive tree.  
It took a little time, but it is so precious and worth every stitch.  Charlie Brown's tree has nothing on this one.

The next tree was made by cutting strips of burlap and tying each piece to a spoke until the dowel was covered.  Next, you progress to each additional spoke until they are all covered.  Continue by cutting longer pieces of burlap and wrapping and tying it around the styrofoam cone.  The last few pieces are hot glued to the top of the styrofoam so that it stand up like the top of a tree.  I folded each strip in half and ran hot glue along the fold, then pushed it against the styrofoam.  Remember, hot glue will come through the burlap, so I used a glue stick to push the burlap so I didn't burn my fingers.  
Oh how I love this tree.  Don't ask me why.  It's kind of pathetic looking, but it has character and to me it is representational of our indomitable spirits.  We are all beautiful in our own way.  

The last tree was made with a piece of burlap ribbon.  I hot glued it to the top of the styrofoam and just swirled it around the wooden dowel rods, adding a little hot glue in places to help it keep it's shape and not all fall to the bottom of the tree.  

This tree was fast and easy.  The other two took a little time, but they were so fun to make.  They all have their own personality just like each of us.  If you made 10 or a 1,000 of these trees, each one would be slightly different.  That is the part about crafting and handwork that I love.  Everything is unique and individual.  Manufactured things can be beautiful and they will certainly have much more uniformity.  That is not what I wanted.  These trees were a vision.  I could no more explain to you where that vision came from than I could explain the universe, but it is more than a joyous occasion when it happens.

I am going to enjoy these trees for years to come and they will always be a reminder of inspiration, how it comes, and the result of such inspiration.

You could use colored burlap to make these trees or you could add some paint with a brush keeping the primitive look, spray snow, lights, whatever you wanted to make them "yours."  I thought about wrapping lights under the trees and letting them shine through the burlap.  Maybe I will do that next year for a different look.  The options are endless.

Give this project a try and see what you can create.  These could be made very small using toothpicks or as big as you want.  Be creative.  Use your imagination.  Let me know if you make some of these trees.  I would love to see pictures.

Everyday Donna

Things to Remember:


Oh Christmas tree, Oh Christmas tree,
You'll never be unchanging!
A symbol of goodwill and love
You'll ever be unchanging
Each shining light
Each silver bell
No one alive spreads cheer so well
Oh Christmas tree, Oh Christmas tree,
You'll ever be unchanging


Monday, December 9, 2013

Sheet Music Trees and Rolled Book Pages Make Beautiful Decorations


 Happy Monday friends.  Hope you managed to escape the worst of the weekend weather.  If not, I hope you are safe and warm.  There was a lot of wicked weather around the country this weekend.  It got very cold here, but we managed to dodge a big bullet and missed the two ice storms that came our way.  If we had been just a few miles further west or north, we would not have been so lucky.  There is another one coming our way tonight and hopefully, it will dodge us two.  We are keeping our fingers crossed.

The house is all cozy and decorated for Christmas festivities.  We have a tree in every room, although they are all small trees.  Since we are in a new place this year, I tried to do some different things with the trees and other decorations.  Nothing major, just some inexpensive changes.

I was talking to my friend Linda today (she lives outside of Dallas) to make sure their power was still on.  They were really clobbered by an ice storm and were without power for several days.  Fortunately, it has stayed on.  She said they had gotten their tree out and she was going through her decorations.  Like many of us, she had most of them for years and she said she was tired of them and wanted something different.  We all know how that feels.  So, I thought today I would show you some inexpensive things you can make to change things up a bit using some wooden skewers, book pages, and pages from a piano book.

These are  simple.  Easy.  Inexpensive.  But, they are quite lovely.  I must say I am very happy with the way they look.  The picture at the top shows a saint's candle that you can get for $1.00 at The Dollar Tree.  They are white candles in a clear glass holder.  To decorate this one, I simply rolled some book pages and used just a tiny dab of hot glue to hold them to the glass of the candle.  Then, I tied some sisal twine around them.  Super easy, but very decorative.


The little Christmas trees are made from pages from a piano book I bought for a few dollars at our local used book store.  It is so much cheaper than individual sheet music.  I looked for a good sized book full of mostly piano music because there are lots of notes and no words.   This one was all classical music so there is music on both sides of the pages which is even better.  If you look real closely, you can see some penciled notes between the bars that some diligent student penciled in as a reminder from their teacher.  I loved that about this book.

Anyway, all you have to do to make these trees is cut triangular shapes the size you want your "trees" to be.  Next, accordian fold them from the wide end to top (narrow end).  I have a tiny hole punch that I used to make the hole in the center of the fold.  Use the punch while the tree is still folded and make a hole in the center of all the folds at the same time.  One quick easy punch.  Now, use a wooden skewer like you would make kabobs on, and run it through all the little holes.  Instant tree.  How easy is that?

For this tree, I broke the bottom of the skewer off to make it shorter.  These trees are on some old boards that are hooked together by cross pieces.  I found this board some time ago at a local thrift store and I liked it.  Didn't know what I was going to do with it, but it was cheap so I bought it.  I have been wanting something to use behind one of my wicker chairs in the dining room and it popped into my head to use this board.  It is absolutely perfect and I can hang things on it without making lots of holes in the wall.
I hung my wire wreath with the yarn balls at the top and added two of the music page Christmas trees on the little board ledges.  It's perfect for this space.  It makes me happy to look at it.


A REALLY easy way to dress  up a saint's candle is to simply wrap a book page or music page around it and tie it with some sisal twine.  You can see it behind this tree.  They are so pretty, yet so simple and easy.  They would make great inexpensive gifts for teachers, co workers, or neighbors.

These music page trees are part of the decorations on my china cabinet.  I simply stuck them in the greenery and lights that are on the top of the cabinet.  I added a few mercury glass votive cups, and a couple of white stars.  Below, there is some of the grapevine ribbon with some of the rolled up book pages and more candles.


 I added the rolled book pages after I took the picture above.  They just fill in the whole thing, adding more texture and drama.
These are just some simple ideas that cost next to nothing and add a lot of interest to your Christmas decor.  The rolled book pages and music page trees could also be hung on a Christmas tree like ornaments.  You could make tiny trees and use toothpicks in place of the skewers.  Children could make them, they are that simple.

Hope these simple ideas have inspired you to try some different things with your decorations.  Perhaps you could have a craft night with your children or grandchildren letting them help makes some new decorations for your tree or to use elsewhere throughout your home.  The trees would be pretty to use on a wreath, or to hang in windows.  There are so many possibilities for these simple yet beautiful decorations.  Give these a try and let me know how you use yours if you make them or send some pictures.  It's great to share ideas.  One idea can lead to another.  That is called creativity.

Everyday Donna

Things to Remember:

Decorations do not have to be expensive to be beautiful or meaningful.  Include your family in the joy of spending time together creating things they will remember for years to come.   donna


Tuesday, November 26, 2013

No, It's Not A Slinky! DIY Wire Wreath

 Don't know what the weather is like where you are, but it's a very gray, gloomy day here in Nashville. We are two day's away from Thanksgiving and I have my menu planned and shopping done.  Whew!  That is a big relief.  It gets downright crazy at the grocery during the holidays and I am all about relieving any and all stress if and when possible.  How about you?

Since it is gloomy, I thought I would share something bright and cheery with you today.  Yes, we know that Christmas is coming.  I have not begun to decorate, but I have begun making things for this year.

I saw this wreath on a site called patinawhite.com.  She was showing her studio (which is amazing and gorgeous if you want to go sneak a peek) and all the things she had for sale for Christmas.  One of the pictures was a wreath made of wire and my heart jumped for joy when I saw it.  Do you ever see things and just immediately know you want one?  Must have one?  Will do most anything for one?  Sadly, there were no instructions for how to make it because it was for sale.  I looked at the picture and in my usual fashion thought "I can make that."  Yeah, right.

Oddly, I had bought a package with 50 feet of anodized wire one day at the Habitat Re Store for $3.00.  I just liked the way it looked and thought I could make use of it some day.  Well, someday arrived and I knew it was the perfect thing to use for making this wreath.  The wire was coiled in it's package so I knew it would uncoil like a big slinky - hopefully.  The wire did not let me down.
I needed some kind of heavy wire to make the wreath form so I went on my proverbial hunt to Home Depot.  In the electrical section I found this 16 gauge dark annealed wire.  It was the right color and weight that I needed.  It cost $10.00 which was not too bad because I can use it for a lot of projects.  I didn't use much at all for this wreath.   This is how it looks.
There have been many, many wreaths in my past since I worked as a floral designer for many years.  I had never made one like this, but I jumped in with both feet (and hands) to see if I could conquer this one.  There were moments of sheer frustration while I "figured" it out, but I know how to do it now and will be making more.  Here is what you do if you would like to make one.

First, make a round wreath shape the size you want.  My base shape is 18 inches which may be a bit big because it is heavy when you put all the stuff inside the wire and it caused the wreath to droop a little.  But, I have a solution for that!  Fourteen or 16 inches may be a bit more workable.
Twist the wire together where it meets to form a ring.  I made a fancy little hanger, but ended up not using it, so that is your choice.  *When the wreath was finished, it was too heavy for one ring of wire, so I went back and added another ring.  For safety, just make two rounds of wire to start with and attached them together with thin wire.*  (see instructions below)

Next, pull the wire coil out and start attaching it to the wreath form.  It took almost the whole 50 feet for the 18 inch wreath because of the coil.  I attached the coils to the base by using 30 gauge floral wire and twisting it around the coiled wire and the wreath form like this.  Use the same process for attached two rings of wire together to make the wreath form.
Do this every 4-5 inches to make sure the coil does not come loose from the wreath form.  It takes a little time, but is a must!  Go all the way around the wreath form and attach the coiled wire where it meets.
Now, it's time to fill in the coiled wire.  I made balls of yard by starting with a styrofoam ball and wrapping it with yarn.  It does not take as much yarn as if you were making a solid yarn ball and is not as heavy as a whole ball of yarn would be.  Just hot glue one end of the yarn to the styrofoam ball and then wrap in different directions until the ball is covered.  I used white, cream, tan, and dark red yarn.  You could use all one color or any colors you like.

Now for the fun part.  Using some different sized ornaments and the yarn balls, place them inside the coiled wire by separating the coils and pushing the yarn and ornaments inside.  I worked with mine until I got a look I liked.  Now for the "be careful" part.  I hot glued the ornaments and yarn balls together because the small ones will slip through the coils.  After they were all glued together, I used the 30 gauge wire and put it through the backs of the yarn in the yarn balls and wired them to the wreath form.  Just another "safety precaution" to keep them from falling through the wire.

I had some burlap ribbon that I used to make a bow and thought I was done.  I hung the wreath up to admire it and it sagged slightly causing it to pull out of round.  OH NO!  My OCD kicked in.  That was not acceptable, so I needed a quick solution.  It was really quite simple.  All that anxiety for nothing.  I used the 30 gauge wire and wrapped it around the center bottom of the wreath form and pulled it taught leaving a few inches more than needed and wrapped that around the center top of the wreath form.  The wire is behind the bow and not visible in any way. The wire is super thin.  The wire goes from top to bottom and holds the wreath in shape.  Ta Da!  Whew!  I was getting anxious there for a minute and that is why I think a slightly smaller wreath would not be as heavy.  Feel free to do whatever you want since there is a remedy to the saggy wire dilemma.

I plan to hang this wreath in the center of my tobacco basket during the Christmas season.  It is going to look awesome there.  I would not recommend this wreath for outdoor use because of the yarn and styrofoam balls and hot glue.  Hot glue will contract on the ornaments when they get cold and they will fall out of the wreath.  It's probably better as an indoor kind of wreath.  Just sayin'.  Do whatever you like.

This is a lovely wreath with a slightly industrial look or country vibe and appealed to my "down home" side.  It has many possibilities for year round use by using all yarn balls instead of some Christmas ornaments, or wrapping the styrofoam balls in different colored twine. Hmmm.  Another idea!

 I am making one of these wreaths for my friend Joyce for Christmas as a gift.  Try making one for yourself or as a gift.  Let me know how it turns out.  I'm ready to make some more!

Everyday Donna

Things to Remember:

You can't use up creativity.  The more you use, the more you have.  Maya Angelou


Monday, November 11, 2013

Make An Adorable Deco Mesh Turkey


 Happy Veteran's Day to you all!  Hope your weekend was spectacular.  Ours was lots of fun.  We had three of the Nashville grandsons spend the night with us Friday night and Saturday we all went to the Elves' Faire at their school.  The weather was beautiful and everyone had a great time.

We all know that Christmas is coming because ALL the stores are playing Christmas music and have their decorations out.  Ugh.  I hate that we almost completely skip over Thanksgiving now.  The holiday has become Hallowthanksmas.  It's like was start celebrating at the end of October and it all runs together.  Yes, I am old and I miss the days of very separate holidays.  There was  a time when no Christmas decorations went up until the day after Thanksgiving and I have to say I truly preferred it that way.  I love Christmas, but it seems to be featured about 1/3 of our year now.  I think it's too much and it looses it's meaning, becoming just a retail holiday.  That's my rant for today.  Sorry.

Now, let's talk about Thanksgiving which will be celebrated on the last Thursday in November.  President Abraham Lincoln  proclaimed Thanksgiving would be celebrated on the last Thursday in November in 1863 and ever year thereafter.  There had been celebrations since President George Washington, but it was celebrated at different times.  President Lincoln's proclamation is the one that we use to this day.

A sweet friend of mind sent me a picture of this adorable turkey and asked me how hard it would be to make.  Well, I looked at it and it didn't look too hard.  It seemed to be made on cardboard with strings for legs and the feathers were made from deco mesh.  It was really cute.  So, of course, I decided to make one for our dining room, but I did it my way.

If  you have been making deco mesh projects and have a lot of extra laying around like I did, the expense of this project is very small.  I bought a styrofoam ring at The Dollar Tree that is 7 7/8 inches by 1 15/16 inches thick.

I covered the ring with a piece of 9 x 12 brown felt and anchored it with greening pins that I always have on hand.  You can buy small packages of greening pins at most any craft store with a floral department.  They are metal two pronged pins that are U shaped.  You just push them through the felt into the styrofoam and it will hold it in place.  Easier than trying to hot glue it.

Next, I cut out the head from a piece of glitter craft foam that you can buy in packages at The Dollar Tree.  I just googled images of turkeys to get an idea for the shape.  I hot glued it to the brown felt.  I cut two small circles from some white felt and hot glues a rhinestone in the middle of each "eye."  You can use google eyes if you have them.  I cut a beak out of gold felt and the red waddle from a scrap of felt and hot glued them to the head.

For the "feathers," I cut strips of deco mesh about 2 feet long.  Then, I laid the strip on the counter and pulled on opposite corners to make it curl up.
Twist the middle of the strip and cut it in half.  Using a greening pin, I started at the bottom of where I wanted the Turkey's tail and pinned each half on either side of the turkey's body.  I continued with different colors until I reached the top.
You can use any colors you want.  I happened to have green, orange, gold, red, and brown, so that is what I used.

For the legs and feet, I wrapped two brown pipe cleaners around a pencil and poked them through the felt into the styrofoam ring using a dab of hot glue to hold them in place.  For the feet, I used two little felt sun flowers that came from a package of table scatter.  You could just cut a couple of pieces of felt and hot glue them to the bottom of the pipe cleaners.

To give the edge of the body a more finished look, I hot glued some orange sequins around the felt next to the feathers.  Done.  

I hung it in the middle of my big tobacco basket and it looks so cute!  Makes the dining room feel very festive and ready for a big Thanksgiving celebration.
If you don't want to rush right in to Christmas, try making one of these adorable turkey's for your wall or door.  You could also make smaller ones using small semi circles of styrofoam and use them as table decorations or place card holders. The bottom with just sit on the table with the legs extended to the front.   Hmmmm, may have to give that a go.

You've still got several weeks until we have Thanksgiving day to remember how thankful we are for all the blessings we have been given.  Try making your own turkey and let me know how it turns out.

Everyday Donna

Things to Remember:

Not what we say about our blessings, but how we use them, is the true measure of our thanksgiving.  W.T. Purkiser


Wednesday, September 18, 2013

When Life Gives You Burlap


 Everyone has some rough patches in their life - just like burlap.  Some days are satin, some days are burlap.  Know what I mean?  Burlap is a rough fabric, unpleasant to feel, it ravels apart, just like life.  When you work with it, little fibers fly everywhere, they get up your nose and in your eyes, irritating them both.  BUT, it is a very utilitarian fabric used for many purposes.  It is breathable, can get wet over and over and dry out to be used again.  Know what that feels like? Have you had days like that?   I sure have.

Burlap is used to make bags for carrying, for shipping goods like potatoes and coffee, to cover the roots of trees for planting, to cover cement so it doesn't dry out too fast, and to make sandbags to use when rivers threaten to overflow their banks and floods cities and towns.  Burlap is strong and resilient, just like we can be when needed.

Burlap is made mostly in India and Bangladesh from the covering of jute and hemp plants.  No one seems to know the origin of the word burlap.  Burlap is a term used in the United States and Canada for what is known as Hessian cloth to the rest of the world.  The term Hessian cloth comes from the fact that Hessian soldier's uniforms were made from what we call burlap.  Oh, those poor men.  I cannot imagine the misery of wearing this cloth.  I have used it in costuming and it is not pleasant for the costumer or the wearer of said costume.  My first memory of burlap is bulletin boards covered with it in school.

Burlap is inexpensive and that is why it is so useful for many, many things.  Today, burlap is the darling of the craft world.  You will see it made into so many things.  While working on this project yesterday my thought was ---- When life gives you burlap - CREATE!  We don't have to settle for the rough patches, for the irritations, for the unpleasantness.  If we put our hearts and minds to work, we can make truly beautiful things from the "burlap" in our lives.  Yes, we can and that is what I did yesterday.  I had some burlap to use and I made fall pumpkins.  As I worked on them, the more beautiful they became.  I did not fight the burlap, I let it show me where it wanted to go and what it wanted to become.  I cleared my mind and let the creation happen.  We can do that with out lives.  Accept things for what they are, don't fight it, go with the flow and the result can be something totally unexpected and beautiful.

So, here is how I made these pumpkins.  I had a yard of natural burlap and I wanted some fall pumpkins to use around the house.  Many years of sewing experience help and I was going to sew them when I realized that most people don't sew.  To make it easier, I hot glued them together so anyone could make a pumpkin if they so desired.  Here is how I did it.

First, I doubled the burlap and cut out a pumpkin shape the size I wanted.  Make it bigger than you want the finished pumpkin to be because the seams will make the finished product smaller than what you started with.
Next, I cut sections through both pieces that look like the sections of a pumpkin.  You can draw them if you like, I just cut.

Then, I separates the two pieces leaving them in the order they were cut.  Now you can make 2 pumpkins.  You will be working with an inside curve and an outside curve.  No, we are not talking baseball, but a sewing term.  Think of a smile and a frown.  The frown is the outside curve, the smile is the inside curve.  You are going to glue the sections together in this manner.  You may think they won't fit, but be patient and ease the two pieces together, gluing a little at a time and working the pieces together.

I started at what would be the top of the pumpkin and worked in about 4 inch sections.  Place a bead of hot glue about 1/2 inch down on the left piece, or inside curve.  Ease the outside curve to fit.  Let your glue sit just for a few seconds so it is not too hot.  Remember, burlap is porous and the glue will come through the fabric and burn your fingers.  Keep a bowl of cold water handy to dip your fingers in should you burn yourself.

When you finish, the pumpkin will look like this.
Then, you need to stretch it and pin it to a flat piece of burlap.  This will be the back of the pumpkin.  Cut it about 1/2 inch bigger than the seamed piece.
Now, hot glue the edges together about 1/2 inch in working your way around the pumpkin.  Leave an opening big enough for your fist to fit through at the top and bottom.

For the standing pumpkins (mine are 10x12 finished), you will need to weight them for them to stand so you will cut a gusset (another sewing term) about the size and shape of a big baked potato.  If you are making smaller pumpkins, cut the gusset a size that will fit.  Then, you are going to glue them to the opening on the bottom of the pumpkin.
It will look like a puppet's mouth.  Now, paint the pumpkin.  I used orange acrylic paint and a sponge brush.  I literally just scrubbed some paint roughly between each section of seams and on the back and bottom.  I didn't want it to look too perfect, but with more character.  The paint dries quickly.

While the paint dried, I made the stem by cutting a piece of burlap and rolling it, gluing the seam down and the top of the piece.  I made it about 4 inches long.  Then, I twisted some wire around a paint brush handle and glued it to the "stem."

Now, it's time to "stuff" the pumpkin.  First, I filled a quart sized ziplock bag about 1/3 full with dried beans for weight.  You could use rice also.
Be sure and let all the air out of the bag and then zip it shut.  Put the bag in the top opening of the pumpkin and let it drop to the bottom.  For stuffing, I used plastic bags.  Do you have mountains of them that you save from the store and never know what to do with them?  Well, they make great stuffing for projects like this.  Just wad them up one at a time and push them into the pumpkin until it is full to the top.

Now, you are going to glue the stem on and glue the opening shut.  Time to decorate the pumpkin.

I got the berries and the raffia at the Dollar Tree.  I cut some raffia and tied a knot in it and glued it to the top of the pumpkin.  Then, I pulled a leaf off the berry bush and hot glued it over the raffia.  Next, I pulled some of the berries off and glued them to the leaves.  Done.

Here are some of the sitting pumpkins.


I also made a hanging pumpkin for out back gate that is 14x16.  For this, you don't need to make the gusset on the bottom and use only plastic bags to stuff it.  No beans necessary.  Just glue all the way around leaving an opening at the top to stuff it.  I made a hanger for the back with some floral wire.
This is very light weight so it doesn't take much of a hanger.  Here is how it looks on the gate.

And that was my day of creating with burlap.  I didn't know where I was going (just like life), but I stopped and got quiet and the ideas began to flow.  The answer came.  I went from a piece of burlap to these gorgeous pumpkins that made me so very happy.  I love the texture of them, the color, the seams, the fact that they represent fall and all things beautiful.  They can be used again and again.  They are burlap, not satin, but they are beautiful just like every life on this earth.  They irritated my eyes and nose, covered me with fibers and made a mess, but the result was so worth it.  Everyone should work with some burlap.

Everyday Donna

Things to Remember:

When life gives you burlap, you can make something beautiful from it.  donna