Wednesday, May 16, 2012

Succulents, succulent gardens and terrariums are ba-aaack - like an apparition from my younger days.  Whoever said what goes around comes around certainly knew what they were talking about.  Perhaps there really is nothing new in the world, just do overs in a slightly different way.  Maybe it's new containers, different colors, but in the end it's the same.  Really.  It's just the same.

Like riding a bicycle, it all comes back in a hurry.  The how to's that is.  Two weeks ago I was making macrame hangers, something I thought I would never do again.   Today, I planted succulent gardens.  Yes, I did.  The methodology, it's still the same.   Succulents don't change, but I certainly have.   Almost 40 years have passed since I did some of these things.  Unbelievable.

Anyway, I have always had a real passion for the desert since my first visit to Arizona at the age of 11. There was something about the whole look of cacti, sand, rock and mountains that stole my heart.  At one time, I had a yard full of prickly pear cactus, yucca plants and lots of succulents.  And then of course, we moved and things changed.  Now, it's almost full circle and I am back to succulent gardens only this time for table tops.  They are much easier to plant.

Any of you out there fans of West Elm?    Their store is full to the brim with terrarium projects, succulent plants and all kinds of interesting pottery and beautiful containers.   It makes my heart skip a beat to go in there, but everything is waaaaay over my budget.  So, I cruised the store, studied what was there and headed out to where I knew I could find some more affordable items that would fit my budget and still give me a look that I wanted.

First, check out your local garden centers, Home Depot and Lowe's garden centers for succulent plants.  One small plant was over $7.00 at West Elm and I was able to buy a 4 pack at Lowe's for $4.97 which made each plant about $1.25 instead of $7.00.  That is a major score and savings for the old pocket book.  You can also get a bag of play sand to mix with your potting soil for very little at Lowe's or Home Depot.  

Containers were the next thing on my list.  I really wanted a long, narrow zinc type tray to make my garden in.  Could I find one?  No way.  So, I was combing through Pier One and I found this metal candle holder that I knew would work.   I simply had to drill some drainage holes in the bottom before planting.  Drainage is very important for succulents.

Next, I mixed potting soil and play sand in a 50/50 ratio to give the soil good drainage.  Remember, most succulents grow naturally in very arid conditions.  They don't like wet feet.  Shallow containers also work very well for succulent gardens.

Fill the container with the soil mixture leaving room so that the soil will not overflow when watered.  Carefully remove the plants from their pots and place them where you want them.  Make sure to fill in between  and all around the plants, slightly pressing the soil down to hold them in place.  Then, you want some kind of "top dressing" like rocks, shells, or sea glass.  You can buy bags of river rock, shells or sea glass at the Dollar Tree.  I also had some pea gravel left from landscaping my "secret garden."
Top dressing makes the garden look more professional and interesting.
There are a wide variety of plants with different kinds of leaves, textures and colors.  Don't be afraid to mix them for interest.

I used a clear bowl that I already had for this garden.
First, I put a layer of pea gravel, then a layer of sand and then the 50/50 soil mixture before planting these lovely "hens and chicks."  The bowl was finished with some top dressing.  I love the colors of this one.
I used 3 red ramekin bowls I found at Big Lots for $1.00 each.   I planted them and placed them around the umbrella pole on our patio table.  Excellent.
I had a good sized jade plant that I had gotten some time ago and planted it in a white zinc pail that I had.  I left the plant in the pot, put it inside the pail and covered it with the 50/50 soil mixture and some pea gravel for top dressing.
Now, here's the important part.  Succulents like very bright light, but full sun can harm them.  All of mine are under tables, eaves or an umbrella where they are protected from full sun.  Also, in the summer you want to lightly water them often because that is when they store water for the winter season.  In the winter, bring them in and give them bright light but only water them about every other month.  Succulents should never stand in water!

After I took this picture, I decided I didn't like the round bowl on top of the table, so I moved it under the table with the jade plant.  I put the jade plant to the back left, and the bowl to the front and right.  That left the long garden on the table top and I liked it much better that way.  Don't be afraid to move things around until you like what you see.  That's part of the fun.

The deck is just about finished.  The wrought iron table and chairs need their annual coat of paint and there are probably some new cushion covers to be made and then I am done.  Well, I say that but somehow I am never done.

Next, I will give you an update on some new additions to the "secret garden" I recently posted about which I LOVE, LOVE, LOVE and maybe give you an idea or two for your garden.   These beautiful spring days make my mind whir non-stop with ideas.   Does spring do that to you?  Gotta love spring!

Everyday Donna

Things to Remember:

"Gardening is the purest of human pleasures." -- Francis Bacon

Tuesday, May 15, 2012

Who doesn't love cookies?  Adults, kids, everybody loves cookies especially if they are home made.  Is there anyone who loves cookies more than Cookie Monster?  I think maybe our grandsons do, and Dan, and maybe even me - especially if it's a good home made cookie like these oatmeal cookies in the picture.  The really spectacular thing about these cookies is they stay soft, they don't get hard like oatmeal cookies often do.  

Summertime is upon us and it is the season of cookouts, picnics and children home from school who are always hungry.  If you want to give them a special treat, let them help you bake the cookies they can have for their treat.  Not only does letting them help give them life skills, baking can be a math lesson and it lets them enjoy the fruits of their labor.  Baking is one of the easiest ways to start kids in the kitchen.   Kids may not eat broccoli, even if they cook it, but they will almost always eat a cookie.

For our recent May Faire picnic at our grandsons' school, I knew I would take cookies for dessert.  They are easy to put in a zip lock bag, you don't need a plate or utensils for cookies and they are just plain good.  The kids certainly thought so!   

Our kindergarden aged grandson had a friend who joined us for our picnic because his mom had a meeting to attend.  His name was Ted and he was adorable.  Ted loved these cookies.  He just kept asking if he could have another and I certainly didn't mind.  After cookie number 8, I asked him if his mom cared if he ate that many cookies.  Guess what?  According to Ted, she didn't care one bit.   I lost count of how many cookies Ted finally consumed, but it was quite a few.   I am quite sure mom would have frowned on that many cookies, but Ted gave me her permission.  

Here is what you need for this easy recipe:

1 cup butter
1 cup white sugar
1 cup brown sugar, packed
2 eggs
1 tsp vanilla
2 cups all purpose flour
1 tsp baking soda
1 tsp salt
1 1/2 tsp cinnamon
3 cups quick cooking oats

First, cream the butter and both sugars until light and fluffy.  Add in 1 egg at a time, beating to thoroughly incorporate.  Add the vanilla.  Mix.

Sift the dry ingredients (except oats) together.  Add to the wet ingredients, mix thoroughly.  Add the oats and mix.  Refrigerate the batter for at least an hour.  

Preheat oven to 375 degrees.  Grease your cookie sheets.  Remove batter from the refrigerator.  Roll the batter into balls, placing them 2 inches apart.  Bake 8-10 minutes until lightly browned around the edges.  Remove from oven.  Let cool slightly, remove from pan with spatula.  

The size of the ball you make determines the size of the cookie.  I made mine about the size of a walnut which made about 4 dozen cookies.

Oatmeal cookies are one of our favorites, but I don't like anything in them like raisins or nuts.  If you do, feel free to add them to the batter.  You could also drizzle the tops of the cookies with chocolate or powdered sugar glaze if you wanted to.  Since these were going to be outside in the heat, I left them plain and they were just "plain" delicious.

Memorial Day will soon be here and that is usually the "official" kickoff for cookouts and picnics.  If you want a simple and easy dessert to take along, always think about cookies.  They are easy to make, easy to take and easy to eat.  Here's to a spectacular summer!

Everyday Donna

Things to Remember:

If ants are such busy workers, how come they find time to go to all the picnics?
- Marie Dressler


Monday, May 14, 2012

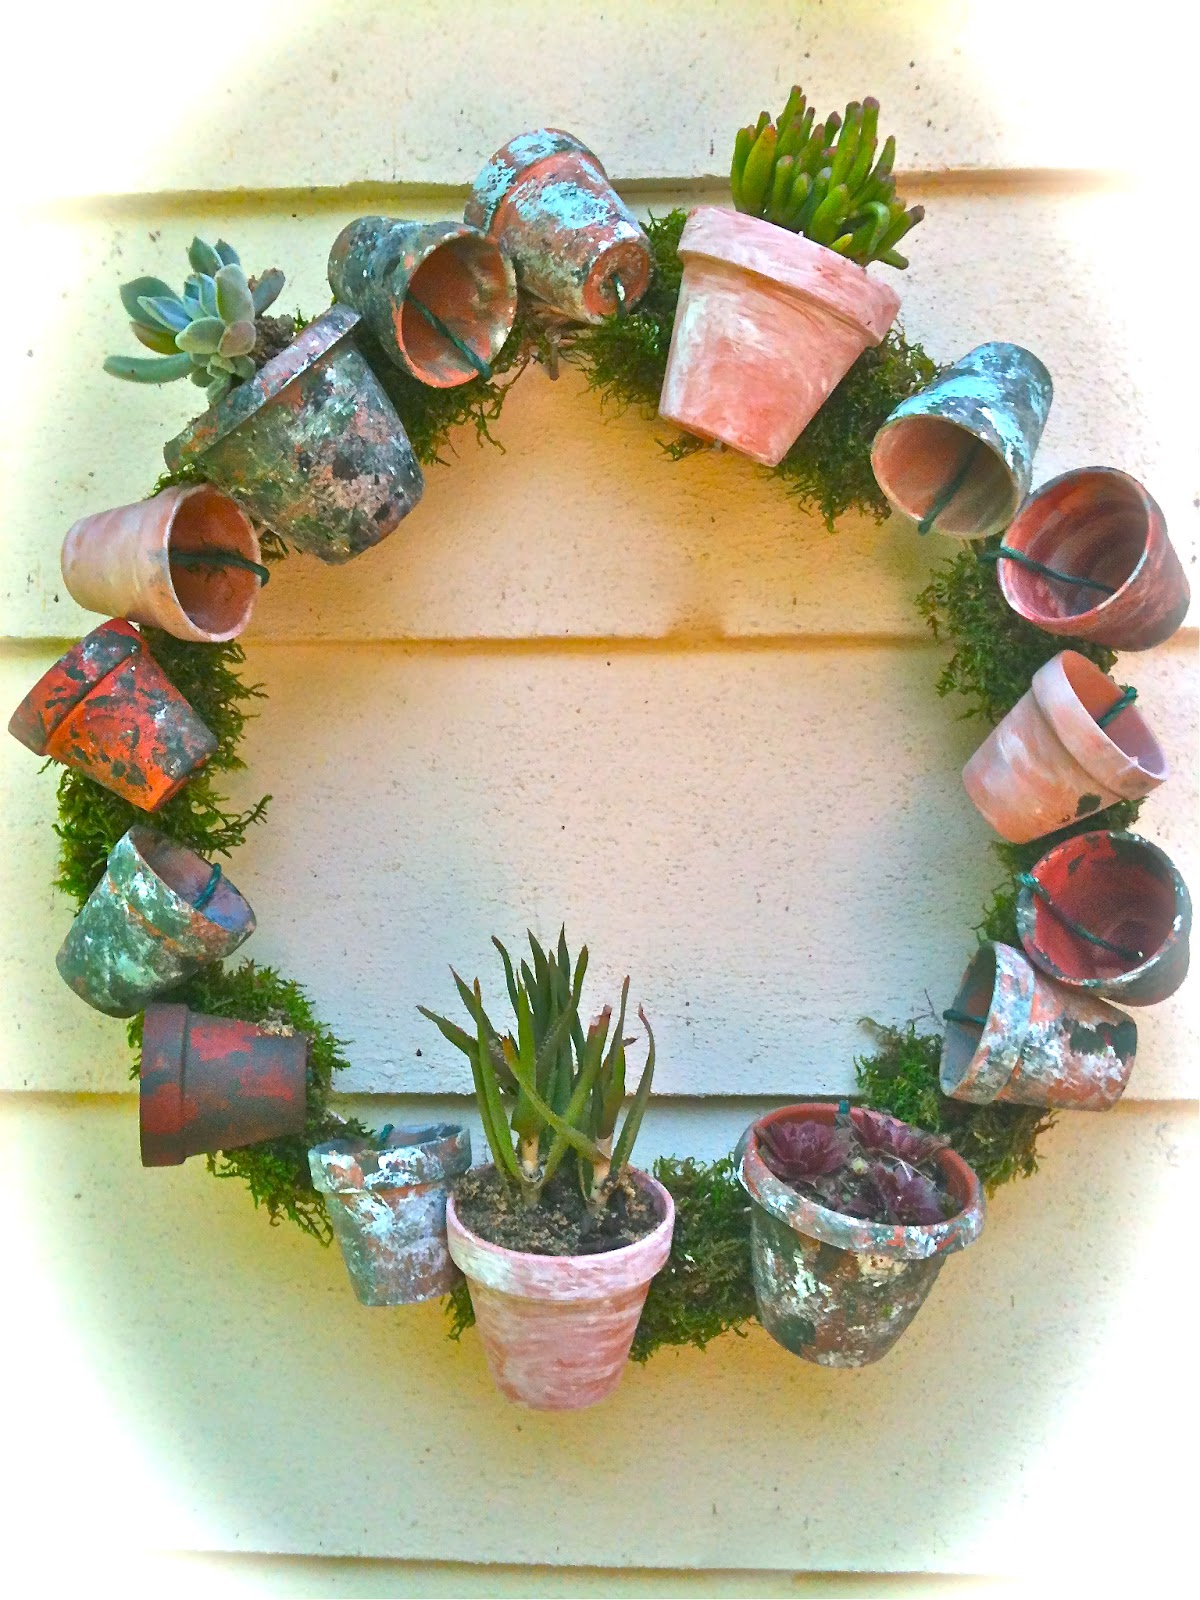
How To Make Your Own Flower Pot Wreath To Plant With Succulents

Here it is again - Monday.  The days seem to have wings and are going at such speed I can hardly keep up.  Since I don't officially go to work any more, I sometimes forget what day it actually is.  Since yesterday was Mother's Day (and a lovely one I might add), I know that today is Monday once again.  I hope you all had a great weekend and a super Monday.

Today, I wanted to share a project that I have been working on.  My friend Karen from high school (talk about a long time friend) recently became a master gardener.  Congratulations Karen!  She posted a picture on Facebook from a website called Two Women and a Hoe.com.  It was a picture of a wreath made from flower pots and some of them were planted with succulents.  Be still my heart, I fell instantly in love.  But, sadly it was only a picture and there was no tutorial on how to make such a divine creation.  So, I had to put my thinking cap on and study the picture and figure out a way to make one of these awesome wreaths for myself.  Upon close examination, I could see that the flower pots had been attached with some green wire, like the kind you use to tie up tomatoes and plants.  I knew that glue would never hold them, so that was my first major discovery.  The second issue was they had used what appeared to be a lot of lovely old flower pots that had been painted through the years and I had none of those since we just moved last year.  Most of my pots went by the by as they say, so I had to make up my own "aged" flower pots.  That, I could figure out.  So, it was time to make a trip to the Dollar Tree, my home away from home.

Dollar Tree has packages of 2.5 inch clay flower pots that come three in a package, like pots you would use to start seeds in.  And, they had some 3.5 inch pots that are plastic which I knew I could make work.  I also purchased an 18 inch rattan wreath for $1.00.  Now, all I needed was wire and moss, so I made a trip to JoAnn's.  I got a package of moss for a few dollars and a roll of paper covered wire for a few dollars more.  I have tons of acrylic craft paints in my stash,  so I was good to go.

First, I spray painted the wreath a bronze color because it was a very light blond color and I wanted it to be darker.  I used some left over spray paint I had from another project.  After the paint dried, I set up a work station on our patio table so I could work in the glorious sunshine.  Sunshine inspires me.  I started by applying hot glue to the wreath and pressing moss on the hot glue.  BE CAREFUL when doing this so you don't get burned.
Moss is messy, so I put down a plastic trash back to work on so that clean up would be easier!  If you do this in your house, be prepared to have moss everywhere.  It's just the way it is.  After I covered most of the wreath with moss, I started painting flower pots to give them an aged and weathered look.  I used mostly shades of green, some dark red, aqua blue and white.  I painted and dabbed all over the pots giving them different looks.  Here are a couple of examples.
Some pots were painted with greens, some were white washed, and some have reddish colors.  Don't be afraid to experiment and try different combinations.  There is no right or wrong.  After the pots dried, it was time to wire them to the wreath.  This is the wire I used.
I ran the wire through the hole in the bottom of the flower pot first.
Leave a long piece so that it will fit around the wreath and can be twisted tightly to hold the pot in place.  I started at 12, 6, 3 and 9 for the first pots and then began fitting other pots in between the first pots, making them go in different directions for interest.
You will need a pair of needle nosed pliers to use for twisting the wire.  Doing it by hand just doesn't get the wire tight enough and then you can use the pliers to cut the wire once the pot is in place.  Make sure the pot is very snuggly in place before cutting the wire.

Continue placing pots all around the wreath making sure several are facing "UP" so you can plant your succulents in them.

When all the pots are in place, you can plant your chosen succulents.  Mix some sand with an equal amount of potting soil and place it in a pot.  Add your succulent plant and fill in with the potting soil mixture.  Succulents don't require much water so don't water when potting.  This is how the finished wreath looks up close.
I used 4 different plants.  It's hard to see the dark red "hens and chicks" in the bottom right pot because they are small, but they will get bigger.  I LOVE this wreath.  I hung it on the back of our house under an eave where it won't get rained on.  Rain will destroy the moss on the wreath, so you might want to consider a front door under an overhand or covered porch for a place to hang it.  You could even hang it in a sunny room indoors.  Here is where mine is hanging by the back door that leads out onto our deck.  I have a variety of blooming plants for color, a big boston fern for texture and greenery,  and a lovely little fountain for the sound of running water (which we love).
The wreath just looks fabulous in this grouping.  See how the mandevilla is starting to vine over to the shutter next to the door?  Love, love, love when it climbs up the shutter.

This project takes a little time if you have to paint pots, but if you have a lot of old pots on hand it won't take that long to make.  Just be sure and use small pots so the wreath doesn't get too heavy.  Use your imagination, get creative and have a blast making a wreath for yourself.  Now, I am going to make one for each of our daughter's here in town.  They both have covered porches that will be just perfect for this wreath!  Guess I better get busy.

A special thank you to Karen for posting that inspiration picture!  You might want to check out Two Women and a Hoe.com.  It's a great gardening inspiration site.

Everyday Donna

Things to Remember:

A variety of plants makes for lots of interest.  Don't be afraid to experiment.

Thursday, May 10, 2012

How To Make Out Of Door Flags Cheap!

World Market is one of my most favorite stores to go into and browse because they have so many interesting things.  Pier 1 is another favorite.   Both stores give me lots of ideas and inspiration and of course it's almost impossible to leave without purchasing something for our home.  We made a trip the other day with the intention of buying an indoor/outdoor rug that I had seen there.  Of course, I had to peruse the store while I was there and what did I spy?  Some outdoor flags that were on bamboo poles and the flag was made from simple cotton which would fade out of doors in no time.  They cost $49.00 each which was way out of my budget because I wanted three of them.  But, they certainly caught my eye and that little light bulb in my head came on and my thought was  - I can make those.

That meant the next trip was to JoAnne's where I knew I could find nylon rip stop fabric that would hold up much better out of doors.  I purchased a quarter yard of the three colors that I wanted to use, red, yellow and orange. ( Our new rug is bright orange and yellow.)  A quarter yard would make two flags of each color.  Then, there were the poles.  I new I had seen bamboo poles at Home Depot so that was our next stop.  Unfortunately, they did not have any sturdy enough to withstand strong wind, but they did have these 8 foot tomato stakes that are steel on the inside and plastic on the outside.

 Perfect!  I knew they could be spray painted, so we purchased three of them and a can of Krylon spray paint in hammered metal finish that works on plastic - no priming needed.  This is how the poles look painted.
Now, all I had to do was make the flags which would be a simple project.  First, I drew a pattern on some brown craft paper.  After measuring the pole, I knew I would need a 3 inch pocket on the flag so it would fit snuggly over the pole.  The pole is 8 feet long and I wanted the flag to be half the length of the pole, so it had to be 4 feet long.  I drew the pattern like the flag at World Market which was triangular shaped.  It is 5 inches at the top and 12 inches at the bottom, with a length of 4 feet.
I pinned the pattern to the fabric and cut it out.  By reversing the pattern, I will be able to get another flag out of this piece of material.  I also cut a 2.5 foot strip of fabric to make a decoration for the top of the flag that can blow in the wind.  The flag at World Market had a leaf on the end of the strip, but I wanted a star.  I used a cookie cutter I had and traced it on a piece of fabric folded double so it would be thick enough to withstand wind and then cut out the stars.
Now, it was time to sew.  I use clear nylon thread for sewing so I don't have to keep changing thread which saves a lot of time.  Because I needed a 3 inch pocket to fit the flag pole, I folded the long straight edge of the flag over 1.5 inches so that I would have a total pocket of 3 inches and stitched from top to bottom.  I went back and zigzagged over the straight stitching to reinforce the seam.
Next, I stitched the top closed so the flag would not slide down the pole.  I double folded a seam 1/4 inch wide and zigzagged it closed.  The outside angled edge was then folded over twice in a 1/4 inch seam and zigzagged all the way down to the bottom edge.  Time to make the decoration for the top of the flag.  I had cut a strip about 1/2 inch wide in each fabric color.

I folded each strip in half long ways and zigzagged all the way down the edge.  Next, I zigzagged the two pieces of each star together, leaving a small opening between the edges.  I placed the strip of fabric in the opening and stitched it closed using a zigzag stitch.
To finish the flag, I folded the bottom edge of the strip over about an inch and zigzagged it to the top of the flag.  Done.  It took about an hour to make all 3 flags.  I took the flags outside and slid them over the flag poles.  Now, it was time to attach them to the deck.

Dan and I discussed how to accomplish this feat and I suggested zip ties, mainly because I had a bunch of them in my craft stash.  They are easy to use and can be removed in the fall when we want to take the flags down.  So, zip ties it was.  I held each flag pole while Dan placed a tie in two places to secure it to the deck.
Zip ties are inexpensive and easy to use without leaving holes in the wood.  I have used gazillions of them for outdoor decorating.

I was hoping for a good breeze after we got the flags in place so you could see the decorations when they float on the breeze, but we had no luck in that department today.  But, I can say I LOVE our new deck decorations.  They are bright, cheerful and colorful.  The grandsons are going to enjoy watching them fly as much as we do.  Flags rank right up there with kites in my book.

Now, here is the real kicker.  These flags cost less than $10.00 each to make so I saved a lot of money by making them and the nylon will hold up much better than the cotton fabric used in the World Market flags.  The poles were $5.97 each at Home Depot and the Fabric actually came to $2.00 for one flag.  A quarter yard was $4.00 and I have enough left to make another flag out of each color.  The can of Krylon was $4.97 and there is lots of paint left for another project.  How is that for a major savings coup?  My pocketbook likes it, that is for sure.

There are many ways you could make outdoor flags using nylon fabric.  I didn't want our flags to be so big they blocked our view of the yard.   Nylon fabric comes in lots of bright colors and holds up well in the weather.  Today's post will hopefully inspire you to liven up your out of door space.  We spend as much time outside as we can this time of year and this just makes it a little more enjoyable.

Everyday Donna

Things to Remember:

Spending time out of doors ads fun to your life.


Wednesday, May 9, 2012

Grilled Salmon With Herbed Lime Butter

What an absolutely glorious day we had today with a perfect temperature of 75 degrees and a nice breeze blowing all day.  Wow, I will take a day like this any time!  It is just warm enough to be invigorating and not so hot that you feel exhausted working outside.  We are planting our garden and doing lots of yard work and soaking up lots of essential Vitamin D in the process.  I have to say, I love these beautiful spring days.

This was a day where I really didn't want to spend a lot of time slaving over a stove inside when I could be outside.  You know what that's like right?  So, I decided it would be a meal fixed on the grill and that means very few dishes to wash afterward.  Yes!

I had a craving for salmon - grilled salmon.  I had some fresh spring asparagus from the farmer's market and I always have potatoes that can be fixed in some way or the other.  So, I sliced some potatoes and onions and made what we call a veggie pack in aluminum foil.  I drizzled the potatoes with some olive oil, added about 10 pats of butter, salt and pepper and put them on the grill to cook until done.  Oh, there is nothing like the smell of onions grilling.   I cook the potatoes first because they take longer than the salmon or asparagus.  They will stay warm in the foil until the salmon and asparagus is done.

Next was the salmon, which was sustainable wild caught salmon, not farm raised.  Wild salmon is better for you and the environment.  Salmon is so good for you as it is very high in Omega 3 acids and is very low in calories.  Our bodies do not make Omega 3s, so salmon is an excellent source for us.  Salmon also contains a lot of good vitamins and nutrients like selenium.  It helps lower blood pressure and helps with the absorption of insulin.  The other thing is, it just tastes so good which is why we like to eat it and it is an outstanding source of protein.

To grill the salmon, put a piece of aluminum foil on the grill.  Salt and pepper the salmon and spray the foil with some cooking spray.  Start by cooking the skin side of the salmon first until the fish starts to get sort of white next to the skin.  You can see how it looks in the picture.  Cook for about 10 minutes or so, then turn.  Cook this side for about 10 minutes or so, depending on the thickness of the filet, until it gets sort of white on the outside, but still pink in the middle.  You don't want it too be too dry.  Remove from the grill.
Cut the woody ends off the asparagus, drizzle with some olive oil.  Place the asparagus directly on the grill.  Wait until the salmon has cooked about half way because it doesn't take very long for the asparagus to cook.  You just want some color/grill marks on it and remove it.  I like it nice and crisp, not soggy.

To make the herbed lime butter, simply melt a stick of butter and add the juice of one whole lime.  Mince one small clove of garlic and add to the butter along with 1/2 teaspoon of fresh dill, chopped and 1 to 1.5 tsps of fresh thyme, stripped from the stems.  Stir and pour a couple of tablespoons of the butter over the cooked salmon and asparagus.  Outstanding is all I have to say!

This is a perfect meal for a warm day (any day actually) and you have practically no clean up - just a couple of dishes and that is it.  Everything else was done on the grill except the herbed lime butter.  Now THAT is my kind of dinner.

Next time you need a quick and easy meal or want something different for dinner, this is a great one to try.  It is also nutritious AND delicious.   The herbed lime butter is just like "icing on the cake."  It takes the salmon and asparagus to a whole new level.   All I can say is yum, yum, yum.  Give it a try, it's delicious.

Everyday Donna

Things to Remember:


The discovery of a new dish does more for the happiness of mankind than the discovery of a star.
Anthelme Brillat-Savarin

Tuesday, May 8, 2012

Jicama Lime Tuna Salad - A New Twist On Tuna Salad

Friday was May Faire at our grandsons' school and parents, siblings and grandparents were invited to join in the festivities which included a picnic on the grounds, but you had to bring your own picnic.  Our second daughter and her sons were going to join in the fun also.  Since both daughter's have their hands full with small children, I told them I would make the picnic lunch to relieve them of the additional stress of preparing food.  Because, you know, I have lots of time now and I have been where they are.   Nothing like getting kids ready for school, getting there early, little ones to deal with AND having to prepare a picnic lunch.  That can put a stressful start on your day and Grandma likes to help them avoid that whenever possible.  It just makes life easier and the day more enjoyable for everyone.

The two older boys can be picky eaters and I knew I would have to prepare sandwiches for them that they would eat.  But, what about the adults?  I wanted something really good for us to eat.  There is a deli in our neighborhood that makes fantastic sandwiches and they are consistently voted best deli in Nashville.  One of the sandwiches they make is a jicama lime tuna salad and it is ever so good.  We all like that sandwich and I thought that I could replicate it.  

Do you like tuna salad?  I LOVE it and always have.  One of my fondest childhood memories is of riding the bus downtown with my mom and getting to eat at the Kresge's lunch counter.  It was really long and had stools that swiveled (awesome).  They were shiny chrome and had fancy decorative backs and red seats.  Everyone stood waiting for seats to open up and the lunch counter happened to be right next to the jewelry counter.  Now, if you don't know me well, you may not realize my great love and admiration for sparkly things - like cheap birthstone rings in all colors like they had at the Kresge's 5 and 10 jewelry counter.  We are not talking precious gems here, but costume jewelry that started at the cost of one thin dime back in the early to mid fifties.  There was nothing better than getting to peruse all the fabulous jewelry while you waited for a seat at the lunch counter.  I loved pressing my nose up against the glass, walking up and down taking in all the wonderful colors of the "glass" gems in that counter.  They could have been the crown jewels for all I knew.  Talk about a treat for a little girl with glitter in her veins, that was a great one!  Then, when seats opened up for all of us, we would get to sit at the counter and swivel back and forth while we waited for our toasted tuna fish salad sandwich - at least that is what I always ordered.  I can still see and taste it.

The sandwich came on square white sandwich bread (which we never had at home) and was toasted a lovely golden color and was sliced on the diagonal.   It was filled with wonderful tuna salad with a nice piece of leaf lettuce on it.  Don't ask me why tuna salad sandwiches at home were never quite as good as Kresge lunch counter tuna salad sandwiches, but I think it had something to do with the swivel seat and all that wonderful jewelry behind me.  Makes my heart swell just to think about it.

 I don't think kids today could ever understand the wonder of it all.  A trip downtown was so special, it was not like going to the mall.   We only went a few times a year, not every week.  We hardly ever ate out, so the Kresge's lunch counter was a really special treat and looking in all the windows of the stores downtown was unforgettable.   Riding the bus was the best ride ever, especially if I got to drop the money in.   How many of you have memories like that?  They are some of the best.

Anyway, I have always loved tuna salad and my goal was to replicate the jicama lime tuna salad they serve at Mitchell's.  It is not the tuna salad we grew up on, but it is so good with so many textures and flavors that are especially great for warm weather and a nice change from the "same old same old."

If you don't know what jicama is, it is a tuber that comes from Mexico and the taste and texture reminds me of a sweet water chestnut.  It has that awesome crunch that is a great alternative to celery.  You can find it in the produce section of your grocery store and it looks like a big brown turnip with white flesh inside.  I got one that was about the size of a big orange.  They can be quite big, just make sure they have a dry root and no soft spots.  You peel the jicama (pronounce the J like an H and the i like a short e - hecama), cut it into matchsticks and then dice so you have pieces of similar size.  I kept eating little pieces as I diced because it is so good.  Yum.

Here is what you need for this salad.  I  used 4 cans of albacore tuna because we had so many eating,  but you can reduce the amount to make less, just adjust the amounts of the other ingredients.

4 cans albacore tuna
1 medium/large jicama, peeled and diced
1 lime
chili powder
1 large shallot
cumin
mayonnaise  (I used mayonnaise with olive oil)
salt to taste

Dice the jicama and place in a bowl.  Squeeze the juice of one lime over the jicama.  It keeps it from turning brown and gives you some of the flavor for the tuna salad.  Sprinkle with chili powder and toss, making sure all the jicama pieces are coated with chili powder and lime.  Set aside.

Open and drain the cans of tuna.  Place in a bowl.  Dice the shallot in small pieces and add to the tuna.  Add the jicama.  Add 1/2 to 1 tsp of cumin.  I used about 3 heaping TBSPs of mayonnaise, use more if you want.  Mix all together.  Taste to see if you want to add more of any seasoning or salt.

I used whole grain pita pockets for our sandwiches because I have a thing about soggy bread - not a fan.  I put a couple of pieces of leaf lettuce in the pita pocket, filled it with tuna salad and added some chopped tomatoes and thinly sliced radishes to the top.  Just let me say, this is one fabulous sandwich!  What an awesome alternative to the tuna salad we grew up on.  There is a delicious depth of flavors that have a southwestern twist to them - chili powder, cumin, a hint of lime and crunchy, sweet jicama.  YUMMM!  Everyone agreed this salad was as good as Mitchell's!  Hooray!

Try this fabulous twist on a golden oldie, I think you will really like it.  I know we are going to eat a lot of it this summer.

Everyday Donna

Things to Remember:

A trip to nostalgia now and then is good for the spirit.  Unknown


Monday, May 7, 2012

Wendy's Frosty Knock Off To Make At Home

Here's hoping your weekend was enjoyable.  Ours was fantastic.  Friday was spent at our grandson's school enjoying their lovely May Faire with a beautiful processional led by students playing recorders and drums while all the other children danced.  Then we all had a picnic on the grounds while every class did a maypole dance or another renaissance type dance which was so touching and beautiful.

The rest of the weekend was spent with my BFF from home who was here visiting and I was SO happy to see her and spend time with her.  We had a cook out on Saturday evening and family and friends joined together enjoying the beautiful out-of-doors.   The weather this time of year is just lovely and there aren't many flies or mosquitoes yet which makes it even better.

We also got to go to our grandson's baseball games and enjoy the beautiful sunshine and breezes while so many memories came flooding back of time spent at the ball park when our sons played baseball.   There is just something unexplainable about going to the ball park, whether it's t-ball or major league baseball.  If you haven't been to a good baseball game lately, put in on your list of things to do.  It's an awesome way to spend a few hours in the great out of doors.

For our Saturday evening cookout, I made a really special treat.  Dan and the grandsons LOVE Wendy's Frostys.  I mean LOVE them.  We make trips to get a Frosty at least once a week if not more often.  Well, lo and behold I found a recipe online at Food.com for a knock off Frosty you can make in your ice cream freezer at home and it is outstanding!  It is also easy which is the best part and it tastes just like a Wendy's frosty - maybe a little better because it's made with love.  Awesome!   I decided I would give this recipe a try for our cookout Saturday night and it was a major hit!  We will be making these often during the warm summer days ahead that is for certain, especially when the grandson's come to visit.  Here is all you need:

A gallon of chocolate milk
1 16 oz container of Cool Whip
1 can sweetened condensed milk

An ice cream freezer  - ours is a  6 quart electric.
Ice and ice cream salt.

Thaw the Cool Whip and place it in the ice cream freezer container.  Pour in the sweetened condensed milk.  Add chocolate milk to the fill line on your freezer container.  Stir to mix.  Place freezer container in bucket and add ice and salt.  Turn (or plug in if it's electric) until frozen.  Unplug if electric, cover with a thick towel for a couple of hours until ready to serve.

When I was a little girl, we used to get together with family friends and make home made ice cream in the summer.  We had a "crank" type ice cream maker.  When the handle got really hard to turn,  the bucket would begin to twist and turn.  An adult would place a pile of newspapers on the top of the freezer and one of us kids would sit on the top of the bucket so an adult could continue to turn the crank until it just wouldn't turn any more.   That was to make sure the ice cream was really good and frozen.  That is a real summertime memory for me.

Back to this Frosty recipe, this is really, really good!  Dan had at least 3 helpings and the grandsons ate a second helping before going to bed.  (They were spending the night with us)  We put the left over ice cream in a tupperware container and placed it in the freezer and enjoyed some again last night and I am sure we will have some more tonight!  Wow, what a great internet find!  Thank you Food.com.  The recipe had a 5 star rating and I know why.

If you have favorite chain restaurant foods you love, you can find a knock off recipe for just about any of them online.  I have tried a couple that I liked better than others, so there may be a bit of trial and error, but when you find one you like you can enjoy it anytime you want!  That is one of the things that makes the internet so amazing!  As for this recipe, it is absolutely a keeper!

Give this recipe a try the next time you want a fantastic treat on a warm summer day or evening!  Summer is just around the corner and everyone will be so happy you made this recipe, just try not to over indulge.

Everyday Donna

Things to Remember:

Celebrate Summer - Sun drenched days and starlit nights...
-- Gooseberry Patch