Showing posts with label butter. Show all posts

Thursday, October 2, 2014

Pumpkin Dump Cake - Easiest Recipe Ever


Oh happy day, it's really finally going to be fall tomorrow.  It has been almost 90 degrees here in Nashville for the last week.  It's going down to a low of 40 tomorrow night.  Yahoo!

Fall means all things pumpkin.  Do you like pumpkin?  We love it in our house (me particularly) and our youngest so is also a big fan.  When he was younger he could eat a whole pumpkin pie at one sitting.  He didn't like most sweets, but pumpkin and pecan pie sure made him happy.

He lives in Denver now and yesterday was his fiance's birthday.  We are so excited that she is going to be joining our family.  He called and said he wanted to bake her a cake but he didn't have a lot of extra money and did I have any ideas.  Hello!  How many do you want?

He said he didn't have a mixer, or milk, or eggs, or much sugar.  I suggested a recipe I had seen on Pinterest for a pumpkin dump cake that only took a can of pumpkin, a yellow cake mix, pecans, and a stick of butter.  That was the ticket!  Easy.  Not many ingredients.  No mixer needed.

He said he had the pumpkin, pecans, and butter.  All he needed was the yellow cake mix.  That's doable when you are lacking ingredients, equipment, and money.

I sent him a text this morning and asked him how the cake turned out.  He said it was delicious!  I trust his judgment when it comes to pumpkin desserts.  Since it is going to get cool tomorrow, I had to make vegetable soup and the pumpkin dump cake for dinner.  It's called anticipation  - and vegetable soup is always better the second day.

He was spot on about the cake.  It's delicious.  Our son in love ate several pieces and asked if he could "borrow" the rest of it to take home with him.  hahaha  I told him how easy it was to make and I made it gluten free by using a gluten free cake mix.  Even better!

Here is what you need:

1 can pumpkin (I used a 14.5 ounce can, but after I baked the cake I realized it called for a 28 oz can - it worked fine)
1 yellow cake mix (gluten free works)
1 1/2 cups chopped pecans
1 stick butter melted

My addition:  1/3 cup sugar, 2 Tsps ground cinnamon, mixed together

First, spray a 9 x 13 baking pan with cooking spray.  Spread the pumpkin evenly in the bottom of the pan.  I thought it might be a little blah, so I sprinkled 1/2 of the cinnamon mixture over the pumpkin.  I love cinnamon with pumpkin.

Next, sprinkle the entire dry cake mix over the pumpkin and evenly distribute.

Cover the cake mix with the pecans.

Melt the butter and pour over the pecans and cake mix.

Sprinkle the remaining cinnamon sugar over the entire pan.  This makes a nice streusel topping when baked.  Yum.

Bake at 325 for 30 minutes or until the cake mix lightly browns. (If using gluten free cake mix, it will not get as brown as a regular cake mix)  The pumpkin should be set, so wiggle the pan to make sure it is done.  If the pumpkin is not set, it will wiggle like jello.  You don't want that.  Put the pan back in the oven until set.
When the cake is done, remove it from the oven and let cool before cutting.  It cuts in nice squares and is SOOOOOOOOOOOO good.  Pumpkiny, nutty, cinnamony, streusely.  Oh my.

I made fresh whipped cream to go with ours.  I could have eaten the whole pan.  I don't eat many desserts anymore because of the whole gluten issue.  Our daughter, who is also gluten free, was so excited to have dessert and know that she could make this to enjoy at home.  She's going to have to make it because her husband sure did like it!

Now that it's finally getting cool and because it's the season for all things pumpkin, you need to make this as soon as possible.  Really.  It is easy to make, has very few ingredients, and you won't be able to resist it.  There's no sifting or mixing.  What could be better than that to have a fabulous dessert?  I say go for it!  You won't regret it.

Everyday Donna

Things to Remember:

"Fall colors are funny.  They're so bright and intense and beautiful.  It's like nature is trying to fill
you up with color, to saturate you so you can stockpile it before winter turns everything muted
and dreary."  Siobhan Vivian, Same Difference


Wednesday, October 1, 2014

Caramel Popcorn with Dark and White Chocolate and Nuts - Oh My!

Hey friends, how are you?  Are you as happy as I am that October is here?  That means beautiful fall weather, colorful leaves, Halloween, The World Series, football, bonfires, sweaters, and all kinds of fall celebrations.  Don't know about you, but I am more than ready for it all!

Do you like popcorn?  I'm really not a big fan, but if you decorate it up enough I will eat it.  I found a recipe on Pinterest that looked SO good, so I gave it a whirl.  It was the consummate Pinterst fail.  If you have never had one, count yourself lucky.  I HATE wasting ingredients.  Even more, I hate taking the time to make something AND wasting ingredients.  Grrrrrrr.

I made the caramel recipe for the popcorn and followed the rest of the instructions.  The caramel never set - it was so gooey that you could not eat it.  I tried putting it in the freezer and it was okay as soon as you took it out, but within 10 minutes it was back to a total goo ball.  It was completely inedible.  I tossed it.  Insert sad face here.

So, I went to my tried and true caramel popcorn recipe from a Gooseberry Patch recipe book that I have had for years and started over.  I added the white chocolate and dark chocolate and nuts called for in the Pinterest recipe.  The original recipe calls for cashews (yum), but the person I was making this for doesn't care for cashews so I added peanuts.  You could add any nut of your choice because they are all good in my book.  Here is what you need:

2 cups brown sugar, packed
1 cup butter (2 sticks)
1/2 cup corn syrup
1 tsp. vanilla
20 cups popped popcorn


3/4 cup white melting chocolate
3/4 cup dark melting chocolate
nuts of your choice

Pop your corn however you like.  I use an air popper.  Measure 20 cups and set aside in a large bowl.

Combine the first 3 ingredients in a saucepan (I use nonstick) and bring to a boil; boil for 5 minutes stirring constantly so it doesn't scorch.  Remove from heat and stir in vanilla.  Pour over popcorn, stirring until thoroughly blended.  Spoon on a baking sheet (I use a roasting pan cause I like the deeper sides when stirring) and bake at 250 degrees for one hour, stirring every 15 minutes.  Remove from oven.  

Melt the white and dark chocolate according to directions.  I used about 3/4 cup of each and melted it in the microwave.  Drizzle over the popcorn while still in the pan.

Sprinkle the nuts over the popcorn.  Let sit until the chocolate hardens.

Now, dive in.  This is so good.  Oh my goodness.  This would be a great treat to eat during a football game, while watching the world series, or for a Halloween party.  You could pass this around a bonfire and it wouldn't last 10 minutes.  Better make a double batch.  Don't even put it in front of kids.  It's gone in nothing flat.

I know this recipe works as I have made it for years.  I make the plain caramel corn at Christmas time and give it as gifts.  Everyone always loves it and asks for more.  It is also gluten free for all of you who have to watch your gluten intake.

Give this recipe a try.  You are going to love it.  Actually, I like just the plain caramel corn.  It's a real sweet treat.

Everyday Donna

Things to Remember:

"Fresh popcorn is near impossible to resist, second only to fresh doughnuts."
Shannon Wiersbitzky, What Flowers Remember


Thursday, September 18, 2014

Bacon Jam is the Jam!

So sorry I have not posted in a while, but I have taken up painting and it is occupying a lot of my time.  It is my new passion.  Anyway,  this weekend, we are hosting an engagement party for our best friend's daughter and future son in love and I have been busy in the kitchen preparing things that I can do in advance.  They all look so good.

The house is all spit shined and polished and fall decorations are all in place.  It is supposed to be a beautiful day (yahoo), so we will put tables and chairs out under the trees for guests to enjoy a beautiful Tennessee September day.  The patio is another option for guests.  I love having options, don't you?

Today, I made this spectacular recipe for Bacon Jam that I found on Pinterest from The Kitchen Wife.  When we hosted our son's engagement party on July 4th weekend, I made fresh fig jam.  Sadly, there are no figs available here now, so I had to go with something different.   Well, finding this bacon jam was the answer and let me tell you, IT IS THE JAM!  WOW!!

The fig jam was served with goat cheese and crackers.  It was beyond delicious.  Hopefully, this will be just as successful - and I'm pretty sure it's going to be!  I mean, bacon?  Seriously?  Cooked with onions and wonderful spices?  It smelled so good while I was cooking it down, I could hardly stand it!  Oh my goodness!

The Kitchen Wife said it is good spread on a hamburger,  on a BLT, or as a pizza topping.  I can only imagine, because I could eat it by the spoonful.  It is amazing.  Here is what you need.

1 pound bacon (actually most bacon comes in 12 ounce packages now instead of a pound, but that             works)

2 medium yellow onions, or l large onion, peeled and sliced
2 TBSP Butter
2 TBSP rendered bacon fat
1/4 cup brown sugar
1 TBSP vinegar (she called for white, I used apple cider and it worked great)
1 1/2 tsps thyme
1/2 tsp cayenne
1/2 cup water
1 TBSP balsamic vinegar
1 TBSP extra virgin olive oil
salt and pepper to taste

Put the package of bacon in the freezer for about 15 minutes to make it easier to slice.  (I just took a package out of the freezer and sliced it, worked great).  First, remove the bacon from the package and cut across the bacon in 1/2 inch slices to make lardons.  I had nice big strips of sliced bacon because it was frozen together.  Don't be concerned, as it cooks it quickly falls apart into separate pieces.

Put the cold bacon into a cold skillet to help render the fat from the bacon.  Turn the heat on to medium and allow the bacon to cook until all the fat is rendered.  It takes about 30 minutes.  The bacon will foam as it cooks - that is the fat being rendered.  It will look like this.
When I read the directions, I wondered if I knew when it was foaming.  It's like being in labor, you will know when it happens.  :)  You want to cook the bacon until all the fat has been rendered and the bacon and the fat are deep, dark brown - about the same color.  Watch the bacon, because when it gets to this point, it can burn VERY quickly.  As soon as it got very dark, I started removing the bacon to a bowl lined with a paper towel so it would drain.  Work fast, you don't want to ruin this lovely concoction!

While your bacon is cooking, peel and slice the onion very thin.  I cut my onion in half first, and then sliced it.  That way, it doesn't roll all over the place while slicing.

After you have removed the bacon from the pan, pour the excess bacon fat into a separate bowl (there was a LOT).  Do not discard.

Add 2 tablespoons of butter to the pan and 2 tablespoons of the bacon fat.  Add the sliced onions and cook over medium heat until they are translucent and soft.  They will be very brown.

Add the brown sugar, vinegar, half of the thyme, cayenne, a little salt and pepper.  Stir into the onions.

Chop the bacon very fine and add to the pan.  Stir all together.  Add 1/2 cup of water and let simmer until the water is almost gone.  She said 30 minutes, but mine was done in 20.  I have a gas stove, don't know if that makes the difference.  Just watch and don't let it burn.

Now, add 1 tablespoon of balsamic vinegar, 1 tablespoon of extra virgin olive oil, and the rest of the thyme.  Cook another 15 minutes, or until the liquid is almost gone.  Mine was done in 10 minutes.  The jam should be very dark like in the picture.  Yum.

Taste for seasoning and add a little salt and pepper if needed.

When you are finished, you have this beautiful, dark brown pan of bacon and onions that smells absolutely divine from the spices that have been added.  When I tasted it, it was sweet and savory and smoky all at the same time - with BACON!  Did I say bacon?  Oh yeah.

My BFF was here and I had her taste it.  She declared it divine and I looked at her and said "One jar won't be enough, will it?"  I had better make another.  And, so I did.  This should keep in the refrigerator up to 2 weeks  - if it lasts that long.  (Bring the jam to room temperature before serving.  There will be white spots of fat in it otherwise.) I can see more of this in my future.

One recipe makes 1 pint jar of bacon jam.  We are going to have this with goat cheese and crackers on Saturday.  I will let you know the crowd reaction.  I think it's going to be good.  Really, really good.

This would be a great housewarming gift, hostess gift, teacher appreciation gift, or Christmas gift.  In a basket with other goodies?  Wow!  Give it a try.  I think you are gonna love it.

Everyday Donna

Things to Remember:

My grandmother ate bacon every day of her life and lived to be 96.  How bad could it be then?


Tuesday, January 7, 2014

Cold Weather Means Soup!

Happy New Year everyone.  I have finally rested and recouped from the holidays.  How about you?  Hope yours was as much fun as ours.  There were good friends, gifts, grandsons, and lots of fabulous food.  What more could you ask for?

We received a marvelous gift from our children that brought us into the present century - a flat screen television!   Yes, we still had a big old dinosaur television.  The funny thing is, we had bought one for ourselves as a Christmas gift to us the morning of Christmas Eve.  We decided it was time.  (Ya think?)  As our two daughters and I were preparing to put food on the table for Christmas Eve I casually said, "Hey, guess what we got today."  They both turned and looked at me and asked, "What?"  They had that look on their face.  You know the one - like something's up?  Anyway, I said a flat screen television.  They looked at each other and then looked at me and one of them said, "Well, now you have two I guess."  We laughed hysterically.  It was a truly funny moment.  Our second daughter said, "We waited until yesterday to get it for you because we were afraid this would happen.  When you hadn't gotten one by yesterday, we went ahead and got it."  Oops.  How did I know?  The good thing is, we took the one back that we had bought and now we can get something else with the money.  That, my friends, is a good thing.  We have a new television and a choice to get something else.  We're still thinking.

The other spectacular gift we received was a Keurig coffee maker.  We have really come into the present century, let me tell you!  Coffee on demand, one cup at a time and a flat screen television.  Could life get any better?

I suppose you all are experiencing the polar vortex (a new weather term for me) just like the rest of us?  Cold?  No thanks.  Not a fan at all.  It can leave and not return for the rest of the winter and it will not hurt my feelings in the least.  It  was 2 degrees this morning.  Ugh.  Hasn't been this cold in Nashville for 20 years.  It's supposed to be 60 on Saturday.  Now that's what I'm talking about!!  I'll take  all of that I can get.  Maybe a sweater in the evening, no heavy coats, hats, gloves, scarves, boots and whatever else you have to put on to stay warm.  I.  Am.  Over.  It.

In case it's not going to warm up that much where you are, I have a great soup for you that I made for dinner tonight.  To us, cold weather means soup - really hot soup.  Do you like your soup really hot?   Please, don't serve me luke warm soup.  Ew.  Hot.  Hot.  Hot.  The only way to eat soup.  Sorry, I digressed.  Actually, I could eat soup every day - even in hot weather.  I know.  I'm weird that way.

We had chili on Sunday and Monday, because I make lots of soup when I make it.  It gets better each day AND you don't have to cook again.  That is a super benefit for making a big pot of delicious soup. Tonight, I was going to make potato soup.  Yum.  One of our favorites.  I peeled the potatoes, and chopped an onion.  When I got the onion out of the fridge (yes, I keep my onions there), I noticed there was a pound of breakfast sausage that needed to be used.  Okay, I'll throw it in the soup.  So, I browned it up in a saute pan.  Oh, and there was a 10 ounce box of spinach I had thawed for another recipe that I didn't make.  It needed to be used.  Okay, I'll throw it in the soup.  Why not?

I didn't want the soup to be bland, so I added a can of Ro-Tel for a little zip.  Well, why not add some cannellini beans too?  Sure, drain and rinse a can of cannellini beans and throw them in.  Yes, there was a parmesan cheese rind in the fridge too.  Toss it in.  Add a box of chicken stock and enough water to cover everything.  Add a couple pinches of red pepper flakes, and let it all cook until the potatoes were done.   Dynamite!

When I was ready to serve the soup, I poured a drizzle of olive oil over the soup and added some freshly grated parmesan cheese.  For the coup de gras, we had big pieces of crusty garlic bread drizzled with olive oil to mop up that delicious broth.  If I do say so myself, it was one fantastic meal!  Yum.  Yum.

If you wanted to make this soup vegetarian, just leave out the sausage and use vegetable stock instead of chicken stock.  It is also gluten free for all of you who have to watch your gluten intake.  Don't you love one pot meals?  I sure do.  Here is what you need to make this soup.  I really don't know what to call it.  If you have an idea, let me know.

1 large onion, chopped
2 garlic cloves, minced
3 TBSP butter
1 pound breakfast sausage, hot or mild, or 1 pound Italian sausage, browned
1 10 ounce box frozen spinach, thawed and squeezed dry*
1 14 ounce can cannellini beans (or you could use kidney beans)
as many potatoes as you would like, peeled and cut in chunks - I used about 2 pounds
1 32 ounce box low sodium chicken stock
1 can Ro-Tel
parmesan cheese rind optional

salt and pepper to taste
a couple pinches crushed red pepper flakes
olive oil for drizzling
freshly grated parmesan cheese

*If you don't want to use spinach, you could use chopped kale or swiss chard.  Either one would be delicious.  I used the spinach because I had it.


In a large dutch oven, melt the butter and saute the onions until translucent.  Add the minced garlic.  While you are cooking the onions, brown the sausage in a saute skillet and drain.  Add the sausage, cannellini beans, spinach, Ro-Tel, and chicken stock to the onions and garlic.  Use enough water to completely cover all the vegetables.  Add a couple pinches of crushed red pepper flakes.  Cook until the potatoes are fork tender.  Taste and season with salt if needed.  I used freshly ground black pepper in each bowl when served or you can add it to the soup pot.

When you serve the soup, drizzle a little olive oil over each bowl and grate some fresh parmesan cheese on top.    Serve with some crusty bread and ENJOY!

This soup was so hearty and delicious and really good for a "throw together" soup.  I really wish you could have shared a bowl with us because it sure hit the spot on this frigid arctic night.  And then, you should have seen what we had for dessert.  Oh my.  Come back tomorrow and I will show you and give you the recipe.  It's fantabulous.

Everyday Donna

Things to Remember:

Winter is the time for comfort, for good food and warmth, for the touch of a friendly hand and for a talk beside the fire:  it is the time for home.  Edith Sitwell


Monday, December 23, 2013

Creamed Greens With Shallots - Yum!

It's HERE!  It's officially crunch time.  Today is Festivus ( you know, for the rest of us) and tomorrow is Christmas Eve.  Do you celebrate on Christmas Eve or Christmas Day or both?  I mean presents, you know. We usually do presents on Christmas Eve so our children can do "Santa" on Christmas morning with their children.  We will have dinner tomorrow evening at our daughter's home.  She is preparing traditional Lebanese food and I am so excited.  If you have never eaten Lebanese food, it's so good. Christmas dinner will be at our house on Christmas Day.  Our youngest son is bringing several friends who could not go home for Christmas.  It should be pandemonium and so much fun.

On Thanksgiving, I tried a Martha Stewart recipe for creamed greens that was simply spectacular!  It was a major hit so we will be having it again on Christmas Day by request.  Do you like greens?  You know, turnip greens, kale, collard greens, mustard greens, spinach?

Growing up there was always a controversy in our house.  My dad loved turnip greens and my mom didn't.  Mom liked spinach and dad didn't.  We were just confused.  No kid can understand why anyone would like greens of any kind.  Seriously?  Yuck.

Things change when you get older - hopefully.  I happen to love greens of all kinds, especially with some vinegar added and some hot sauce, braised with some bacon, ham, or fatback.  Yummmmm!

Kale seems to be the new food darling right now and it is so good for you - full of antioxidants and nutrients.  The only thing with kale is it is kind of chewy if not cut in really small pieces before cooking.  Other greens wilt down a little more and are easier to chew.  The upside is all greens are full of iron and vitamin B12 which are hard to get in most other foods.  We benefit from eating as many greens as we can, unless you are on medications to thin your blood.  Then  you should consult your doctor.

Here is what you need to make this recipe:

2 large bunches turnip greens
1 large bunch kale
1 large bunch collard greens
6 TBSP butter
2 large shallots, peeled and thinly sliced
3 garlic cloves, minced (1 TBSP)
2 TBSP AP flour (I substituted 1 TBSP cornstarch for gluten free)
1 1/2 cups milk
1/2 cup heavy cream
pinch of nutmeg
pinch red pepper flakes
3/4 cup dry white wine or chicken stock
coarse salt

First, remove the stems from the collard greens and kale.  Chop the leaves into bite sized pieces.
Heat a large saute pan over high heat (I used my electric skillet to saute the greens).  Add kale, collard, and turnip greens, 1 tsp salt and wine or chicken stock.  Cover and cook until greens wilt, about 2 minutes turning occasionally. (You will start with a huge mound of greens and will end up with what looks like a small amount.  Don't be alarmed.)   Reduce to medium and cook, turning greens until almost tender - about 15 minutes.  I used long tongs to turn the greens.  Remove cover and transfer greens to a bowl.

Add 4 TBSP butter to pan, melt on high heat.  Add shallots and garlic.  Saute until softened, about 3 minutes.  Return greens to saute pan.  Remove from heat.

Melt remaining 2 TBSP butter in a saucepan over medium high heat.  Add flour (or cornstarch) and whisk to incorporate.  Add milk and cream, slowly whisking until sauce thickens slightly and coats back of a spoon - about 2 minutes.  Add nutmeg and red pepper flakes.  Season with salt.

Stir sauce into greens and cook over medium heat until warmed through.

If not serving immediately, cool completely then refrigerate.  Reheat over low heat before serving. Transfer to a bowl and serve.  Double Delicious is all I can say.

A minor Christmas miracle occurred today.  I actually have all my Christmas gifts wrapped before Christmas Eve for the first time EVER!  Miracles do happen every day.  Now, it's time to begin preparations for Christmas dinner.  

We are having Cornish Game Hens and roast beef for the carnivores and spinach stuffed manicotti for the vegetarians.  Sides are yet to be decided.  I know there will be creamed greens and wild rice.  Desserts are always a toss up.  Have you set your menu yet?

Merry Christmas and Happy Holidays to you one and all.  Thanks for reading my blog and I will return after Christmas.  Let the fun begin.

Everyday Donna

Things to Remember:

It came upon a midnight clear,
That glorious song, of old
Of angels bending near the earth,
To touch their harps of gold.


Thursday, November 7, 2013

Pumpkin Cream Cheese Muffins

 Why does fall simply scream for you to make things from pumpkin?  And, why is pumpkin so good?  And why are these muffins so super fantastic?  Let's see.  Because it's fall, they are made from pumpkin AND cream cheese and they are amazing.  Does that explain it?

This week was parent teacher conferences at our grandsons' school.  Mom needed help while she went to the conferences, so they stayed here with Grandma.  We had a lot of fun.  I taught them how to play Red Light, Green Light, Mother May I?, and Hide The Thimble.  There was also hide and seek and I Spy.  We had a lot of fun.  The also wanted to bake muffins, so we did.  The 7 year old picked this muffin off my Pinterest board.  We got to it and baked away.  Ever let a 3 year old crack the eggs?  I'm just sayin'.

This recipe makes 24 muffins.  That's a lot of muffins, so they took a good portion of them home so that Dan and I didn't eat them all.  The recipe is from Annie's Eats.  Here is what you need"

Filling

8 ounces cream cheese
1 cup powdered sugar

Muffins

3 cups all purpose flour
2 tsp cinnamon
1 tsp ground nutmeg
1 tsp ground cloves
1 tsp salt
1 tsp baking soda
4 large eggs
1 1/2 cups sugar
1 15 ounce can pumpkin puree
1 1/4 cups vegetable oil

Topping

1/2 cup sugar
5 TBSP flour
1 1/2 tsp cinnamon
4 TBSP cold butter, cut into small pieces

Preheat the oven to 350 degrees Fahrenheit.  Spray muffin tins with cooking spray or put paper cups in each muffin well.

To make the filling, mix the cream cheese and powdered sugar with a mixer until well blended.  Set aside.

To make the muffins, combine the flour, spices, salt, and baking soda.

Combine the eggs, sugar, pumpkin, and oil with a mixer until well blended.  Add dry ingredients.  On low, mix just until blended.

Fill each muffin cup with just enough batter to cover the bottom of each well or paper (about 1 TBSP).

Scoop a small amount of filling (about 1 heaping tsp) into each muffin cup over the batter.  Top with remaining batter covering cream cheese completely.

Make the topping by mixing all the ingredients together.  Cut the butter in with a pastry cutter or a couple of knives until blended.   Sprinkle on topping.

Bake 20-25 minutes.  Cool completely before serving, as cream cheese center will be hot.


It will take all your will power to not eat as many of these at one time as you can.  Trust me.  Just look at the center of these muffins.  Yum.
My daughter said she ate 3 in one day, so just be warned.  I am not kidding when I say you will have a hard time staying away from these.

With Thanksgiving just around the corner, and then the Christmas holidays, you will certainly find an occasion or two to make and serve these.  Give it a go.  They are so worth it.

Everyday Donna

Things to Remember:

"Oh how we love pumpkin season.  You did know this gourd-ish squash has its own season, right?  Winder, Spring, Summer, pumpkin...We anxiously anticipate it every year."  Unknown


Tuesday, November 5, 2013

Yes, Virginia, There is Chocolate Cobbler

 The last few days have been busy ones.  I have been working on projects for the Elves' Fair at our grandsons school which is this Saturday.  They attend a Waldorf school and this is their biggest fund raiser of the year.  Each family donates 12 items for each child they have attending.  Our daughter is a free lance writer and mother of 3 young sons and is very, very busy.  (I remember those days all too well).  Therefore, Grandma makes the items and donates them to the fair because we think the school is absolutely amazing!

So today, I thought we would talk about cobblers.  You know, there are pies, crisps, and cobblers.  Most cobblers are made from fruit with some kind of biscuit type topping for the crust.  Pies can have a bottom and top crust, or just a bottom crust.  Crisps, have a topping usually made with oats and flour and butter and other yummy stuff.

This cobbler is a bit different from the norm.  It has no fruit and does not have a biscuit topping.  It is called a chocolate cobbler.  I mean, yum, what could be better?   This is something traditional to the south and I had never had it before moving to Nashville.  The first time I enjoyed this special confection, it was made by a friend of our daughter's and Annie considers is her favorite dessert.  I might second that notion.

Personally, I am not sure I would call it a cobbler because it is more like a lava cake with all kinds of ooey, gooey chocolate under a cake type topping.   But, I didn't name it and if "they" want to call it chocolate cobbler, I'm all in for the name.  I really can't quibble with a name for something this wonderful.

This is all made in one pan and baked in the same pan.  Simple enough right?  It is also FABULOUSLY delicious.  What more can I say?  The recipe comes from a Gooseberry Patch cookbook and is called Granny's Chocolate Cobbler.  (Go Granny!)  Here is what you need;


3/4 cup butter, melted
3 cups sugar, divided
1 1/2 cups self rising flour
1/2 cup milk
1/2 + 2 TBSP baking cocoa
2 tsps vanilla
2 1/2 cups boiling water

Preheat oven to 350 degrees Fahrenheit

Place the butter in a 9 x 13 baking dish and let it melt in the oven.  Remove pan from oven when butter is melted and set aside.

In a large bowl, combine 1 1/2 cups sugar, flour, milk, 2 TBSP cocoa, and the vanilla.  Pour over the melted butter.

In a small bowl, mix together remaining sugar and cocoa.  Sprinkle evenly over the batter in the pan.

Pour boiling water over the batter and DO NOT STIR!!

BAKE AT 350 FOR 30 MINUTES.  Remove from the oven and try not to eat it all at once!


Serve with whipped cream or ice cream.  Look at that!  You know you want to make this!!

Merciful heavens, this is food for the Gods, the angels, and for you and your family.  I cannot adequately describe this dish, other than to say if you like chocolate you must make it as soon as possible.  Dan loves chocolate and he LOVES this cobbler.  (I kind of like it too!)

Give this recipe a try.  Let me know what you think.  (I can hear you drooling from here)

Everyday Donna

Things to Remember:

My therapist told me the way to achieve true inner peace is to finish what I start.  So far today, I have finished 2 bags of M&M's and a chocolate cake.  I feel better already.  Dave Barry


Tuesday, October 29, 2013

Pumpkin, Caramel, and Pecan Cheesecake - WOW!

 Hello everyone!  Yes, October is winding down.  It's almost Halloween.  How is that possible?  Where has this month gone?  The leaves are finally starting to change.  The transition is later this year because it has been so warm.  It's so nice to see the colors in the trees and the variety of hues on the hillsides.  It definitely means fall is here!

Our first born celebrated the 11th anniversary of her 30th birthday on Saturday.  We sat with her boys while she and her lovely husband had a date night.  They don't get a lot of those.  So, we celebrated with the family at our house on Sunday evening.  I cooked dinner for everyone and instead of the standard birthday cake, I made this fabulous pumpkin cheesecake.  The recipe is in the new Bon Appetit and the Food Network Magazine.

It is a Philadelphia cream cheese advertisement and as soon as I saw it, I knew I had to make it.  Why? Because it sounded absolutely amazing and guess what?  It is absolutely amazing!  Talk about a dessert you are going to want to make for any and all upcoming occasions.  Things like Thanksgiving, Christmas, the new moon, the full moon, the sun shining, the dog got a haircut.  Just pick something.  It's worth it, believe me.

Here is what you need:

1/2 cup chopped pecans divided
38 Ginger snap cookies, finely crushed (about 1 1/2 cups)
1/4 cup butter, melted

4 packages (8 oz. each) cream cheese, softened
1 cup sugar
1 can (15 oz) pumpkin
1 Tbsp cinnamon
1 tsp. vanilla
4 eggs
25 Kraft Caramels
1/4 cup milk

Heat oven to 325 degrees Fahrenheit (notice, it's NOT 350)

Chop 1/4 cup nuts finely, place in medium bowl.  Add crushed ginger snaps and melted butter.  Mix well.  Press into bottom of 13 x 9 inch baking pan.

Beat cream cheese and sugar in a large bowl with a mixer until blended.  Add pumpkin, cinnamon, and vanilla, mix well.  Add eggs 1 at a time mixing on low speed after each addition just until blended.  Pour over crust.

Bake for 45 minutes or until center is almost set.  Cool completely.  Refrigerate for 4 hours.


Make the sauce when you are ready to serve.  Microwave the caramels and milk in a microwaveable bowl on high for 1 1/2 minutes or until caramels are completely melted, stirring every 30 seconds.

Serve cheese cake by spooning the caramel over each piece served and sprinkle with nuts.

Serve with whipped cream if desired.  We desired, it's just not in the picture.  YUMMMMMMY!

This cake is really easy to make and is even better the second day.  Oh so good.  Give it a try, especially if you are a pumpkin lover or a cheesecake lover.  It is a marriage made in heaven!

Everyday Donna

Things to Remember:

Because you don't live near a bakery doesn't mean you have to go without cheesecake!
Hedy Lamar

Monday, October 14, 2013

Pumpkin Poppers!

 Happy Monday to you one and all!  Hoping your weekend was fabulous, restful, and all that you wanted it to be.  Ours was busy as usual.  We had little league games on Saturday and a birthday party for our seven year old grandson on Sunday.  I baked his cake and cupcakes and that was quite an affair.  I am not a cake decorator, but I do my best.  Will share his baseball glove cake and baseball cupcakes with you one of these days.

Well, fall is upon us and it is time for all things pumpkin.  It is amazing to me how the groceries now turn October in to "pumpkin" month with everything pumpkin you can think of.  I must say we do enjoy some good pumpkin treats, so I thought I would share one with you today that I found on Domestically Speaking.  She calls them Pumpkin Poppers and they are deliciously delectable morsels of pumpkin that are kind of like donut balls only baked in a mini muffin tin.  Yum!

This recipe made 24 of these Poppers in my mini muffin pan.  It's an easy recipe and SOOOO good, especially with coffee.  Then again, what isn't good with coffee?  Here is what you need:

1 3/4 cups all purpose flour
2 tsp baking powder
1/2 tsp salt
1  1/2 tsp cinnamon
1/4 tsp ground cloves
1/2 tsp allspice
1/3 cup vegetable oil
1/2 cup brown sugar
1 egg
1 tsp vanilla
3/4 cup pumpkin (not pie filling)
1/2 cup milk
This is how they look when they come out of the oven before you coat them in the cinnamon/sugar mix.


Coating

1/2 stick butter, melted
1/2 cup granulated sugar and 1 1/2 TBSP cinnamon combined in a bowl

Preheat oven to 350 degrees fahrenheit.   Spray mini muffin pan with cooking spray.

Combine all dry ingredients.  Mix with a whisk until combined.  Mix all wet ingredients and pour into dry ingredients.  Just combine.   Do not over mix.

Fill muffin tins almost full.  Bake 8-12 minutes.  Let cool.  (I baked mine 8 minutes)

Roll in melted butter, then sugar/cinnamon mix.  Serve!

Oh, my.  These are really, really good and it's tempting to not eat all of them at one time.  Restrain yourself if you can - you will want some of these for breakfast, a mid afternoon snack, and evening treat.  They are two bites, three at the most and it's easy to just keep popping them in your mouth.  Yum.  Yum.  Yum.

Give this recipe a try.  It's a great fall treat and super easy.  You are going to love these!

Everyday Donna

Things to Remember:

"Oh how we love pumpkin season.  You did know this gourd-ish squash has its own season, right?  Winter, Spring, Summer, pumpkin....We anxiously anticipate it every year."     Unknown


Monday, October 7, 2013

Pumpkin Streusel Coffee Cake


Oh what a glorious Monday today.  It was a perfect 66 degrees with amazing cerulean skies and it really felt like fall for the first time.  I could do this weather every day.  What's not to love about it?  We worked outside all day and it was absolutely perfect.  Pure bliss.
 
This weather definitely puts me in the mood to bake and cook.  I had the urge for something sweet, perhaps made with pumpkin (it is fall after all) and I  used this recipe that I found on Allrecipes.com.   This is an amazing coffee cake with a lovely streusel on the bottom and a brown sugar glaze on the top.  It has the taste of a pumpkin spice cake which is one of my all time favorite cakes and it is easy to bake.  Yes, the perfect recipe.

This cake can be baked in a tube pan or a bundt pan, whichever you may have.  I love bundt cakes, so I went that route.  Easy peasy.  Here is what you need.

1/2 cup butter, softened
1 1/2 cups sugar
1 15 oz. can pumpkin
3 large eggs
2 1/2 cups flour
2 tsp baking powder
1 TBSP cinnamon
1/2 tsp ground cloves
1/2 tsp salt

Streusel Topping

1/4 cup flour
1/4 cup sugar
1/4 cup light brown sugar
1/2 tsp cinnamon
2 TBSP butter, melted
1/3 cup chopped nuts (I used walnuts)

Preheat the oven to 350 degrees Fahrenheit.  Spray the bundt pan with cooking spray and set aside.

Beat the butter and sugar on medium with a mixer until well blended.  Add the pumpkin and eggs.  Mix thoroughly.  In a medium bowl, combine the dry ingredients.  Add to the pumpkin mixture.  Mix on medium until combined.  Pour into prepared pan.

Make the streusel topping by combining all the ingredients.  Sprinkle over the cake batter.  Bake at 30 degrees for 50-55 minutes until a toothpick comes out clean.

Cool about 15 minutes.  Make the brown butter glaze while the cake cools.  Invert cake on a plate.

Brown Butter Icing
1 1/2 TBSP butter
1 1/2 cups powdered sugar
2 TBSP milk

Put the butter in a saucepan and melt on medium heat, letting it cook until it bubbles and browns, continuously stirring.  Don't let it scorch.  As soon as it browns, remove from the stove and pour into the powdered sugar.  Stir.  Add milk 1 TBSP at a time.  I only needed 1 TBSP.  Pour over cooled cake.  Serve.

This cake is soooooo delicious and it was very hard to eat only one piece.  It's perfect with a cup of coffee.  It would also be lovely with hot tea or hot apple cider and it just screams fall.  Mm mmm mmmm.
We ate this cake for dessert, not just for breakfast or with coffee.  Deeeeeelicious!  Our grandsons LOVED it.  It is worth making.  Give it a try and let me know what you think.

Everyday Donna

Things to Remember:

I'm pretty sure the secret to world peace is hidden somewhere in the smell of coffee and baked sweets.  Unknown

(What a great quote!)


Monday, September 30, 2013

Apple Praline Bread - Double Yum!

 Monday, Monday.....you know what the song says. (Bet you are singing it right now.)   I looked up the top 10 songs about Monday and not one of them has a positive title.  The closest one is Manic Monday.  The rest are pretty much downers.  On top of that, it is the last day of September.  Where did that month go?  Wow. Welcome October!

We are tired today.  We spent Sunday helping our best friends from our home town move into their new place right down the street from us.  (Yay!)  Thankfully, it did not pour down rain all day as predicted.  There were a couple of light showers off and on and that was it!  There was plenty of good help and things went fast and smooth.  Awesome.

In order to make their day easier, I fixed brunch for everyone.  We had Chinese Eggs, fruit salad, sausage gravy and biscuits, hash brown potatoes fried with onions, Amish cinnamon bread and this wonderful apple praline bread.  (You can find several of these recipes on my blog.)  I had never made this recipe before, but had pinned it to my Pinterest board for a future "must try." Apples are starting to come in now and I had some fresh from the Farmer's Market so I gave the recipe a try.  Yes, it is a keeper.

It is soooooooo good.  The only thing I would add to the recipe is some cinnamon - mainly because I like the taste of cinnamon and it goes quite nicely with apples, but it is not necessary.  Here is what you need to make this super yummy bread:

1 cup sour cream
1 cup brown sugar
2 eggs
2 tsp vanilla
2 cups flour
2 tsp baking powder
1 1/2 cups peeled apples, finely chopped
1 cup nuts - walnuts or pecans, chopped
*Optional, 1.5 tsp ground cinnamon

Praline Sauce

1/4 cup brown sugar
1/4 cup butter
1/4 cup chopped nuts

Preheat oven to 350 degrees Fahrenheit.

Grease and flour a 9x5 loaf pan.  Set aside.

Use an electric mixer to mix sour cream and brown sugar until well blended.  Add eggs and vanilla.  Mix.  Add flour and baking powder.  Add apples* and nuts.  Pour into prepared loaf pan.

Bake for 1 hour until brown and toothpick inserted in center comes out clean.  (My oven bakes right to temp and it took 1.5 hours for this bread to bake.  Just a little FYI so you don't panic if it's not done at 1 hour.)

After the bread cools, remove from pan and make the praline sauce by putting the butter and brown sugar in a sauce pan.  Cook over medium heat until it bubbles for about 1 minute.  Remove from stove and add nuts.  Pour over cooled loaf of apple bread.  Try not to eat it all at once.


* Be sure and drain any liquid from the chopped apples before adding to the bread.
Yum, yum, yum, yum, YUM!  So good.  This recipe was from a site called Ziplist.com.  You really might want to give this recipe a try, especially while apples are so good and plentiful.  Dan loves apples but doesn't like cooked apples.  He did like this bread a lot.  (He called it cake.)   Whatever you want to call it, I call it delicious!  This is one more recipe that will go in the fall/winter rotation of breads that are delicious for breakfast, brunch, or anytime - especially with a good cup of coffee.  Come on October!

Everyday Donna

Things to Remember:

I can't tell you enough about cinnamon.  Cinnamon is an awesome spice to use and it goes great with something like apples in the morning, or in a mixture of fruit, or in your oatmeal, or even in your cereal.  Emeril Lagasse  

- or in your apple praline bread!  It would kick it up a notch for sure.  donna


Monday, September 16, 2013

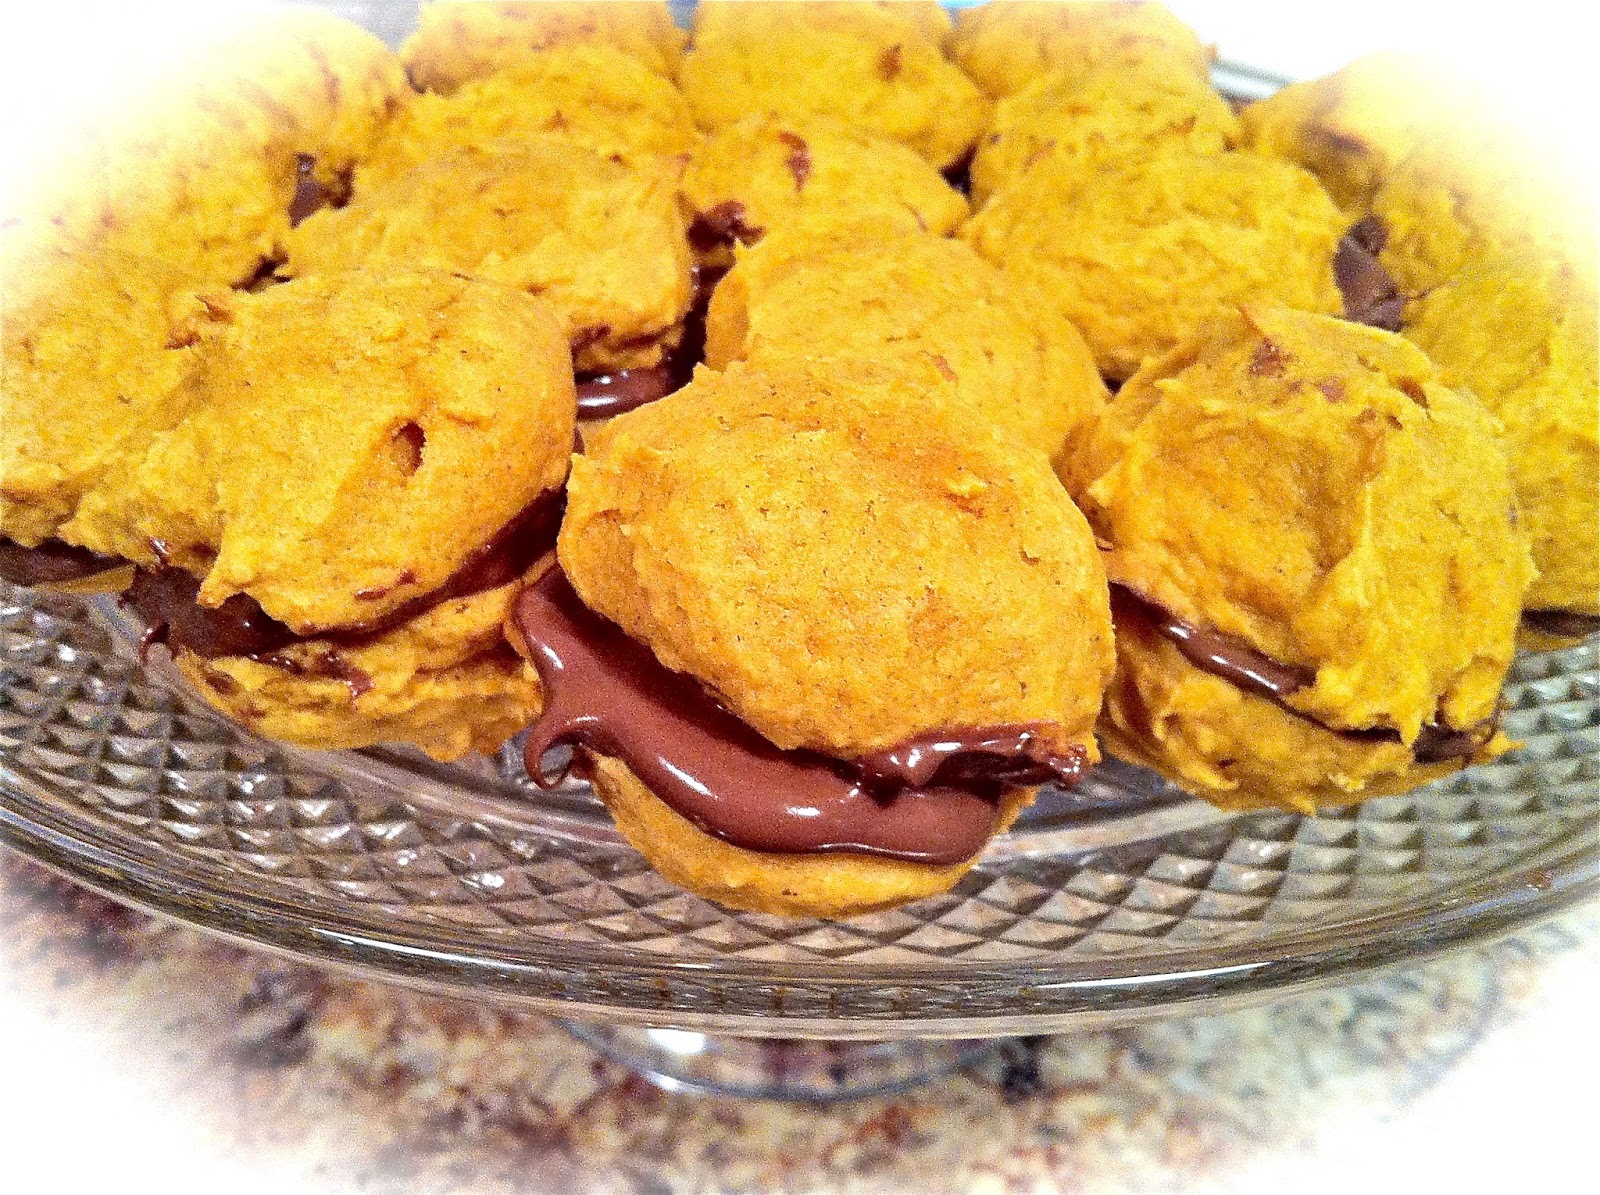
Pumpkin Whoopee Pies With Nutella - YUM!

 Happy Monday, September 16.  It is 7:16 pm and outside it's dark.  That means summer is definitely on the wane and the days are getting shorter, BUT it also means that fall is approaching rapidly.  Yippee!  Do you like fall as much as I do?  The changing leaves, the cooler temperatures, pumpkins, Indian corn, cider, bonfires, apples, sweaters, colorful mums, Halloween and Thanksgiving.  There are so many wonderful things about fall.

Starbucks has their pumpkin spice coffee drinks available and that is the first official "call to fall".  Everyone gets excited when pumpkin spice drinks return.  Therefore, it is okay to start making any and all things pumpkin.  Starbucks gave the go ahead.

I got my new Food Network magazine last week and it has a lot of fabulous recipes or fall.  I wanted to start making them all.  Inserted in the magazine is a little booklet with 50 things you can make from canned pumpkin!  Fifty, five oh, 50.  Wow!!  That is more than exciting and as I perused it I couldn't decide whether to start with #1 and work my way through or - ding, ding, ding, hold the phone.  How about #42 and #43 to start?   It's a pumpkin cookie recipe that can be made into whoopee pies filled with - OH MY - Nutella.  Guess where I started?  You guessed!!  You are a sharp cookie (no pun intended).

Sometimes a recipe just jumps out and says make me now.  Do you ever have that happen?  So, I did.

Here is what you need:

6 TBSP softened butter
1 1/2 cups sugar
1 cup canned pumpkin *see note below
1 egg
1 tsp vanilla
2 cups flour
1 tsp baking soda
1 tsp cinnamon
1/2 tsp salt

Beat the softened butter and sugar with a mixer until fluffy.  Beat in the pumpkin, egg, and vanilla.  Whisk the flour, baking soda, cinnamon, and salt together.  Stir into the pumpkin mixture.

Drop by tablespoons full onto an oiled baking sheet.  Bake at 400 degrees Fahrenheit for 12 minutes; cool.


If you want to eat the cookies, you can make this glaze.

1/2 cup confectioners sugar
1 TBSP milk  - mix together, spread on cookies

OR, if you want to make them into whoopee pies, do not glaze the cookies.  Spread the bottom of one cookie with Nutella and place the bottom of another cookie on top.  You now have a delectable little sandwich made of delicious pumpkin cookies with Nutella spread in the middle to hold them together.  Now, I can't pass this up - whoopee!   This recipe made 36 cookies or 18 whoopee pies.

*I will tell you that I hated to leave that bit of pumpkin in the can since the recipe called for one cup of pumpkin, so I added the whole can to the recipe which probably made the cookies a little softer than they would be if you followed the recipe exactly.  The texture is somewhat like gingerbread, very soft and delicious and oh so good with that lovely dollop of Nutella in the middle.  They are especially good with a cup of coffee and they just scream fall y'all.

It's hard to decide what to make next.  Maybe the pumpkin bread pudding made with cinnamon raisin bread, or maybe the cheesecake pie, or maybe.........   Whatever it is, I will share the recipe with you when I make it.  In the meantime, give these a try.  They are pumpkinlicious.

Everyday Donna

Things to Remember:

What do you get if you divide the circumference of a pumpkin by its diameter?  Pumpkin pi!


Wednesday, August 28, 2013

Blueberry Cobbler With Biscuit Crumb Topping

 Did you ever have fruit that is going down, like fast.  You know, those brown bananas that have a day or so before you have to toss them?  Don't toss those bananas, cut them up and put them in a baggie to go in the freezer if nothing else.  They are good for smoothies!  Or, there is always banana bread.  Yum.

I happen to love all things blueberry and I buy them every time I go to the grocery and then suddenly I have several containers in the fridge and there is that first sign that they may start to shrivel at any moment and must be used!  No blueberry should ever be wasted!  Of course, you can put them in a baggie and freeze them just like the bananas.  But, I had a hankerin' for something sweet and desserty and I usually make a peach and blueberry cobbler, but alas I had no peaches.  Therefore, some other recipe must be used.  I make blueberry pie, but I didn't want to make crust.  It just seemed like too much effort so I started combing the world wide web.

I found this recipe on a blog called wickedgoodkitchen.com and it sounded just perfect so I thought I would give it a try.  It's a keeper!  It's easy and delicious.  I served it for dessert tonight and our 3 year old grandson ate two helpings - with ice cream of course.

Here is what you need:

Filling:

4-5 cups fresh blueberries, rinsed, dried and sorted.  (toss those shriveled ones)
1 cup sugar
2 tsp freshly grated lemon zest
3 Tbsp all purpose flour

Biscuit Crumb Topping:

1 cup + 5 TBSP all purpose flour
6 TBSP sugar
1 & 1/2 tsp baking powder
1/4 tsp salt
6 TBSP butter, cut into bits
1 large egg, slightly beaten
1 tsp vanilla
1 TBSP sugar
1 tsp ground cinnamon

Preheat oven to 375 degrees fahrenheit

Lightly butter a 10" baking dish

Combine the sugar, lemon zest, and flour called for in the filling.

Put the blueberries in the baking dish, sprinkle with the sugar/zest/flour in a very even manner so that there is no clumping of the sugar which allows it to dissolve while baking and won't be gritty.  I stirred mine a couple of times to prevent that from happening.  Continue to evenly sprinkle until all mixture has been used.

Make the crumb topping.  Put the flour in a bowl, add the sugar, baking powder and salt.  Whisk or mix with a fork.

Cut the cold butter into small bits and cut into the flour mixture until crumbly.  I used a pastry blender, or you can use your hands.  Add the beaten egg, vanilla and stir to thoroughly mix until you have a dough type mixture.

Spread over the blueberries using your hands.

Combine the sugar and cinnamon and sprinkle over the biscuit topping.

IMPORTANT.  SET THE BAKING DISH ON A BAKING SHEET BECAUSE IT WILL COOK OVER AND YOU WILL HAVE BURNED SUGAR AND SMOKE IN YOUR KITCHEN AND DON'T ASK ME HOW I KNOW THIS.  JUST SAVE YOURSELF A MESS.   TRUST ME.

Bake for 40-45 minutes until the top is nice and brown.  Remove from the oven and serve warm with a lovely dollop of ice cream or whipped cream or - both!

This really is a wonderful cobbler.  It is not too sweet, but the lemon zest gives it a really nice brightness.  The crust is like a big soft cinnamon biscuit that is absolutely delicious.

I will be making this again, and again, and ...... you know.  Give it a try.  I think you will really like it too.

Everyday Donna

Things to Remember:

Blueberries are considered one of the "super" foods.  So hey, why not enjoy them any way you can.  Cobbler works for me.  donna


Tuesday, May 7, 2013

Cinnamon Bread, Picture Frame, Recipe, Gift


To welcome my friends from Texas, I wanted to make some gift bags with home made goodies they could enjoy in their hotel room.  You know what it's like to be hungry, or want a snack, and there is literally nothing to eat, or only expensive machines in the hall that have nothing you like and you have no change.

While "cruising" Pinterest recently, I had seen this idea which was so cool.  At least I think that's where I saw it.  Couldn't find it again.  Baked individual loaves of bread were tied to a picture frame containing the recipe for the attached bread.  Perfect for gift giving.  How great of an idea is that?  That was my starting point.  They would definitely be getting this awesome cinnamon bread that I had found at redflycreations.com.  This bread is amazing and so easy to make.

I found adorable picture frames to use for holding the recipe.  The recipe was all typed and ready to print.  The biggest problem was we were out of printer ink.  NOOOOOO.  So, I had to write out the recipes at the last minute.  
It may not be as neat as printed recipes, but it did the trick.  No one complained.

To their bags, I also added home made Mr. Goodbar Bites that you can find on my blog.  Basically, they are chocolate covered peanut mounds.  Yum.  There were some nice cups with lids and straws that could be used over and over that I filled with different flavors of Crystal Lite.  In addition, there was trail mix, peanut butter crackers and other assorted goodies.  Hopefully, all things they would enjoy.

The Texas Troupe arrived on Thursday evening.  We met them for dinner and I gave them their "welcome" bags.  They let me know they did enjoy them!  Linda had eaten her cinnamon bread before breakfast on Friday morning.  The others wanted to sample and she told them they would have to eat their own.  I don't think the Mr. Goodbar Bites lasted much longer.  They all came in drinking out of their cups, so all in all it was a rousing success.

To make the cinnamon bread, here is what you need:

1 cup butter, softened
2 cups sugar
2 eggs
2 cups buttermilk  (add 2 tsps. vinegar or lemon juice to regular milk if you don't have buttermilk)
4 cups flour
2 tsps baking soda

Cinnamon/Sugar Mix

2/3 cup sugar
2 tsp cinnamon
mix together in a small bowl

Preheat oven to 350 degrees Fahrenheit.

This recipe makes 2 large loaves or 1 large loaf and 4 small loaves.  Grease and flour loaf pans and set aside.

Cream together butter, 2 cups sugar and eggs.  Add milk, flour, and baking soda.

Fill prepared pans 1/2 (or slightly less) full with batter.

Sprinkle 3/4 of the cinnamon mixture over the top of the batter in the pans.  Add remaining batter.  Sprinkle with last of the sugar.  Swirl with knife.  (I forgot to do that, but it didn't make any difference - other than how it looks.)

Bake at 350 for 45-50 minutes or until toothpick comes out clean.  Cool 20 minutes.  Remove from pan.

Since I was giving these individual loaves as gifts, I left them in the disposable aluminum pans and wrapped them in a clear cellophane party bag and tied them to the picture frame with twine.

This.  Bread.  Is.  Beyond.  Delicious!  Oh my, it is so, so good.  We kept the big loaf and shared it during craft time on Saturday.  This is one I will make again and again.  Yummers.
When you need a gift, give a gift of home made love.  Bake your favorite bread and give the recipe with it.  Using the picture frame is such a great idea.  Then, they have a keepsake and something wonderful to eat.  Great idea for teachers, new mothers, neighbors, or anyone for that matter.

Also, you will definitely want to make this recipe for you and your family. They will LOVE it.  It won't last long and you will wish you had more.

Everyday Donna

Things to Remember:


In the sweetness of friendship let there be laughter, and sharing of pleasures.  For in the dew of little things, the heart finds its morning and is refreshed.     Khalil Gibran


Wednesday, April 24, 2013

Pecan Pie Muffins AKA Pieces Of Heaven

Do you say "pee-can" or "peh-cann"?  I am a "peh-cann" kind of girl.  Southerns tend to say "pee-can".  Either way, these pecan pie muffins are so good.  I mean really good.  Extra specially good.  Divine in fact.  The recipe was emailed to me by my sister.  I have no idea where she got the recipe, but am I ever so glad she did.  They are just like eating little pecan pies.  Seriously.  What could be better?

It was raining cats and dogs this morning and our two and a half year old grandson was spending some time with us while his mom worked on a writing deadline.  We couldn't go outside, so I asked him if he would like to help me make some muffins.  He is a "mini chef" and is ALWAYS up for baking.  I also love having him share the kitchen with me because we are baking memories.  (Did you catch that?  That's not a typo.)

If I took a survey among the male members in our extended family concerning their favorite pie, I know that the answer would be pecan.  How do I know that?  Because I make them for holidays and upon request.  Therefore, why wouldn't they love these delectable little pieces of heaven?  They are much easier to make than a pie and taste just like eating a piece of home made pecan pie and you don't have to fool with a crust.  Even better!   Here is what you need:

1 cup packed light brown sugar
1/2 cup all purpose flour
1 cup chopped pecans
2/3 cups super softened butter
2 whole eggs beaten

Grease a muffin tin - and I mean REALLY grease the cups because these muffins are sticky and you don't want to lose one precious morsel.  Don't use paper cups.

In a medium bowl, combine the brown sugar, flour and pecans.

In a small bowl using an electric mixer, beat the eggs and add the super softened butter, continue beating until smooth.  Add the sugar mixture and thoroughly mix.
The batter looks kind of like chocolate chip cookie dough only not quite as stiff.

Fill the muffin tin cups 2/3 of the way full.   Bake for 20-25 minutes at 350 degrees Fahrenheit.


I used a muffin tin that is not real deep and I got a dozen muffins.  The recipe said  it makes 9 - just so you know to double the recipe because these won't last very long at all!!  They are a little crispy around the top edges and chewy and delicious in the center.  Aaaaaaaamazing.  I could see eating them with some whipped cream on top or a nice dollop of vanilla ice cream.  (Note to self.)  Mmm mmm mmm.

Dan ate one, and then insisted that he really needed another (who can blame him?).  Holly ate one when she came in and declared them fabulous.  Yes, I have had one (or two) myself.  They are sooooooooo good - especially with a nice hot cup of coffee (like now).  Yes, I ate one while typing this.  I just couldn't resist.  Now you want one don't you?

If you like pecan pie, or anyone in your family likes it, give these a try.  They are easy and delicious.  Two really good words in combination, don't you think?  Start preheating the oven.........

Everyday Donna

Things to Remember


Commander Charles Trip Tucker III:  (about pecan pie)  May not be good for the body, but it sure is good for the soul.    (from the movie Enterprise, 2001)


Wednesday, April 17, 2013

Everyday Donna's Grilled Cabbage

 What fun thing did you do today?  We met a friend for lunch and then checked out plants at the Farmer's Market and another garden center.  I came home with a few really awesome succulents, among other things.  Needless to say, I LOVE the weather we are having and am getting extremely excited to start filling all my planters.

In yesterday's post about the beer brined pork chops, I told you that I would post the recipe for this delicious grilled cabbage.  Do you like cabbage?  Did you eat it as a child growing up?  We did!  Every week.   And, you guessed it, it was usually boiled and it made the house smell terrible, but I always loved cooked cabbage.  Then, there is sauerkraut.  Yum.  Love it.  Dan hates it.  Also, there is the Indiana state vegetable, cole slaw, which is made from cabbage.  My friend that we met for lunch today called cole slaw the Indiana state vegetable years ago and it made me laugh so hard I have never forgotten it.  Our whole family refers to cole slaw as the Indiana state vegetable to this day.  Why did he call it that?  Because it is served at every picnic, pot luck, and restaurant in the state.  How much cole slaw have we eaten in our lives?  Waaaaay too much.

Ever tried kimchee?  It is also made from cabbage.  My research said that cabbage and bean curd are the two most used ingredients for cooking in China.  Wonder if they ever make cole slaw?

Cabbage is a very old vegetable, with cultivation beginning around 1000 BCE according to information I found.  Cabbage is a main ingredient in European cooking and Chinese cooking.  The most common use is by pickling, such as sauerkraut and kimchee.  Cabbage is really good for us.   It is full of anti-carginogens, beta carotene, and vitamin C.  Cabbage is related to broccoli, brussels sprouts, and cauliflower.  The reason many people don't like to cook cabbage in the house is because of the really strong smell that permeates the air.  Well, here is the perfect solution -- GRILL IT!  Cooking it out of doors keeps the smell out of the house.  Tadah!

Grilled cabbage is amazingly good, let me tell you.  It is easy to make also.  Here is how I made mine.

1 medium sized head cabbage, cut into wedges
4-5 slices bacon, uncooked
1 medium onion, chopped
1/2 stick butter
1/2 cup grated fresh parmesan cheese
salt and pepper to taste

Cut the head of cabbage in half and then into wedges.  I got 6 wedges.  However many wedges you have, tear that many pieces of aluminum foil about 12 inches long.

Place a wedge of cabbage in the center of each piece of foil.  Lay the bacon strips on top of each other and cut into 1/2 inch strips crossways.  These are called "lardons" of bacon.  Lay some of the lardons on each cabbage wedge.  Now, chop the onion and put some on each wedge.

Cut the 1/2 stick of butter into very thin pieces and lay some on each wedge.  Sprinkle fresh parmesan over each wedge, sprinkle with a small amount of salt and lots of black pepper.

Bring the long ends of the foil together and roll tightly down to the enclosed cabbage.  Roll the ends up tightly, so that there are no holes where the steam can escape while cooking.

Light your grill on one side, leaving the other side unheated.  Place the foil packets on the unheated side.  They should cook about 45 minutes total.  Turn the packets over about 1/2 way through.  Remove from the grill, open and serve.  Yum.  Yum.  One of the best side dishes ever for summer grilling season!

If your bacon doesn't look really crisp when you open your packets, put the pieces in a microwave proof bowl and heat for about 15-30 seconds to crisp it up and redistribute over the cabbage.  Some of mine were crispy, a couple not as much as I would like.  So, when you turn the packets over, you might also want to rearrange them on the grill so the outside packets are closer to the heat for a while.  Just a little FYI.

We really enjoyed this super delicious cabbage with our beer brined pork chops and sour cream mashed potatoes.  Oh so good!
When you are planning a meal and want to know how much cabbage per person, one wedge is plenty for most people.  The flavor of the onions and bacon with the buttery cabbage topped with the parmesan is a perfect combination.  It sure beats the Indiana state vegetable for every meal any day of the week.

Give this recipe a try.  It's delicious.  You are really going to like it.

Everyday Donna

Things to Remember:

Cauliflower is nothing but cabbage with a college education.  Mark Twain


Thursday, April 11, 2013

Red Velvet Mocha Chocolate Chip Cookies - You Must Make These

Holy downpour Batman, it was raining cats and dogs here today.  We had to make a trip across town  and this is what it looked like on Briley Parkway.  Visibility was practically zero at times.
There are lots of hills going around the north and west side of town.  I took this picture trying to show the tops of all the hills encapsulated in clouds.  It didn't work very well, but it was so dark and raining so hard that we could barely see.  Taking pictures from a moving car is not the easiest thing in the world either.  At least, not for me.  Trying to miss the windshield wipers flinging back and forth is a challenge.

I have to remember, April showers bring May flowers.  Otherwise, I am not a fan of these gulley washers.  At least we didn't get the awful storms they had predicted, so I guess I will be happy with lots and lots and lots of rain.  For now.  I have the tools and the gopher wood handy in case an ark is in our future.

Our son mentioned that it was his boss's birthday today and his boss loves to eat according to Tyler.  (Like somebody doesn't?)  So, I told him I would make him some cookies.  My understanding is he really, really likes cookies.  What could be more perfect for such a gloomy day than beautiful red velvet cookies with lots of chocolate chips in them, oh and coffee for the mocha flavor.  Yum.

I found this recipe at petitfoodie.com and they are fantastic.  I decided on red velvet cookies because  -1. I had several red velvet cake mixes on hand, and - 2.  almost everyone loves red velvet anything.  That made for an easy choice.  All ingredients were in house and cookies are easy to make.  Here is what you need:

1 box red velvet cake mix
1 stick butter, slightly melted
1 egg
4 Tablespoons strong brewed coffee
3/4 cup chocolate chips

Preheat your oven to 350 degrees Fahrenheit.

Mix all the ingredients in a bowl.  I used a hand mixer on medium.  Scoop a tablespoon of batter for each cookie.  Bake for 10-13 minutes, remove from the oven.  Let sit on baking sheet for a minute to cool down before removing with a spatula.  I will tell you, I had to let them bake the full 13 minutes.  Otherwise, they were still really mushy.


Look at the chocolate chips peeking out of that beautiful red cookie.  Outstanding!  These are delicious with a nice cup of hot coffee let me tell you right now.  They were just perfect on this yucky, rainy day.  Oh.  Oh.  Oh,  yes, we did sample a few (oops) before packaging some up for the "Boss".  I am sure he didn't mind.  Really.  Someone had to taste them to make sure they were okay.  Right?

I put some cookies on a little silver plate I had from the Dollar Tree.  Then I wrapped them in clear cellophane to make them look festive and gift like.  Nice.
"Boss"man was so appreciative he walked out to the car in the pouring rain to thank me AND asked me how I knew red velvet was his favorite?  How did I know?  I am a mom.  I am observant.  I listen to people's comments about food.  The majority of people will say red velvet cake is their favorite; therefore, why wouldn't they love red velvet cookies too?   Good call on my part, huh?

I hope these deliciously beautiful cookies brightened his special day.  They certainly brightened ours.  We do have a few here for our enjoyment.  This recipe made 3 dozen good sized cookies and I doubled the recipe.  That made our resident "cookie monster" very happy indeed.  Give them a try.  You are gonna' love them.

Everyday Donna

Things to Remember:

Keep some cake mixes on hand for when you need a quick "gift."  Make a cake, cupcakes, or cookies.  Everyone loves a good sweet treat that has been made with love - especially red velvet and you don't have to mess with all that food coloring when using the cake mix.   donna