Do you have things in your life that make you happy and you have no explanation why? I have a list of such items and one of them is shutters. Old wooden shutters and I cannot tell you why. Perhaps it's because they make me think of dreams and possibilities. The louvres are like eyelids that open and close, looking out on the world. When you are tired of the world, you can close them and find solace in your own inner world. I like their roughness, the hinges, the fact that they can be painted and changed - just like a life. Don't call the men in the white coats - I'm just trying to explain and it makes no sense I know.
I found a great pair of shutters recently on a trip to the Habitat Re-Store, one of my favorite places to go. Another great place of possibilities. I knew they were coming home with me because they were only $ 7.00. They were a dirty, dingy yellow and smelled like someone's kitchen disaster. But, I was in love. They needed paint, so I headed to my favorite store in Brentwood called C'est Moi. They carry Annie Sloan Chalk Paint. Do not be confused with chalkboard paint. This paint has chalk in it and will cover any surface without priming which is outstanding. It comes from England and the color choices are all historical in nature. Beautiful, rich colors that can be waxed upon completion with clear and dark waxes and it just makes my heart warm to look at all the ways this paint can be used.
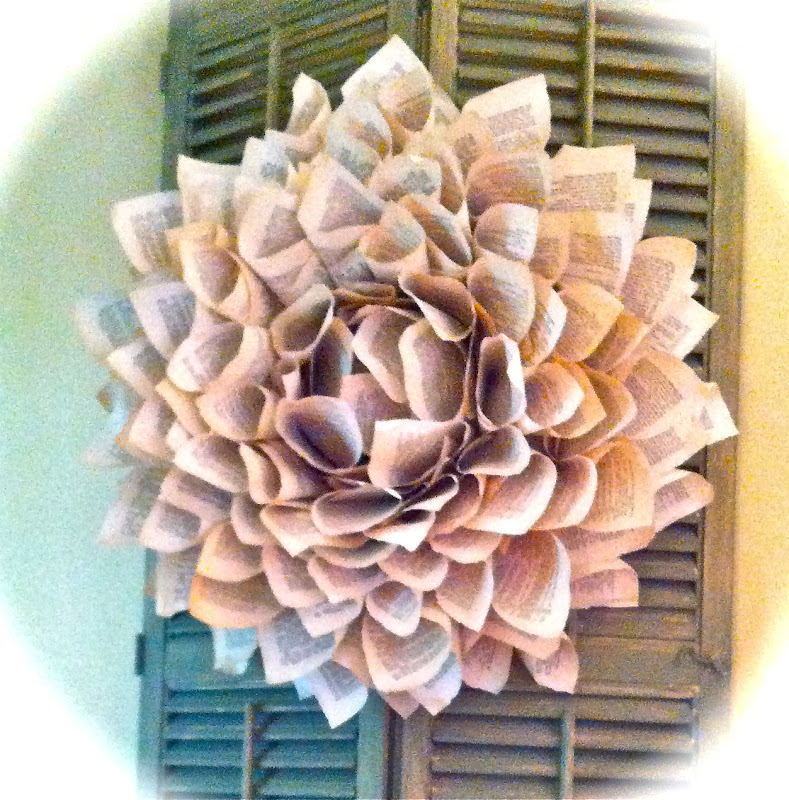
While I was there purchasing paint, I noticed several book page wreaths on the wall. One of them looked like a big dahlia (one of my favorite flowers) and I knew I would have one of those and it would hang on my shutters once they were painted. I just needed to figure out how to make one like it.
I went to JoAnn's and purchased a 12 inch styrofoam wreath that is flat on the back and curved on the top. I knew I needed something that would give the wreath depth instead of something flat. Then, we made a trip to McKay's Used books so I could find some old books with yellowed edges at a good price. Shakespeare's Complete Works for 75 cents was it! Lots of pages because I didn't know how many I would need for the project, perfect aging on the pages, and the book pages were the size I wanted. Forgive me Will.
The first thing I did was remove the pages from the book cover. I opened the book and used scissors to cut away the cover.
Do this on the front and back cover where it attaches to the pages. (This was so hard to do, I LOVE books). This is what you will end up with.
Those are all the glued together pages on the top and the spine on the bottom. Now, you have to tear apart all the pages which must be done carefully since they are all glued together. I used a ruler and placed it against the spine and pulled gently from top to bottom, so the pages did not tear.
As I tore pages, a ridge of glue would develop that would make the pages tear, so I cut it away with scissors, continuing to do so all the way to the bottom of the 1000 plus pages. It will make things easier if you do this and your pages won't be a ragged disaster. You want smooth edges.
Next, I started rolling cones. Lots of cones. I don't know how many cones I rolled, I just filled a box with them. Start at the bottom right corner and roll to the top left corner. I rolled the cones tightly, then loosened them until I had a big, round cone. I did not want tight cones for this project. Then, I stapled them at the bottom. Do I have a picture of these? No, I forgot. Sorry. You can see how they look as I started to put the wreath together.
Start on the back of the styrofoam wreath on the inside. You will have to adjust the size of your cones for the opening in the wreath by making them smaller. You want the tips of the cones to touch. Hot glue them at north, south, east and west. Then, fill in between those. Next, start at north, south, east and west on the outside edge and fill in between, leaving about a finger's width between each cone. After you finish one layer of cones, go back and fill in between the first layer of cones, then repeat with a third layer. On the inside of the wreath, do the same. It will look like this on the back of the wreath.
Put the hanger on now just because it is easier. I cut a piece of ribbon and pinned it through the cones to the styrofoam with a greening pin, then covered it with hot glue to hold it in place. This wreath is light as a feather, so it doesn't take a big hanger.
When the glue is dry, flip the wreath over and begin working on the front. It should look like this when you start.
First, you want to fill in the inside of the wreath. You may have to re-staple your cones about half way up because you are going to cut them almost in half. Flatten all the cones on the inside and start by gluing a round of cones to the inside edge of the styrofoam, starting at north, south, east and west, then fill in between. Glue another round to the inside of these cones, only off set them between the first round of cones. Continue until the center is filled in.
You want the center cones to stand straight up. Next, cut a couple of inches from the bottom of the cones you are going to use, staple them, and put hot glue on the front side of the wreath so that the point is on the bottom, opening on the top, and place them under the outside edge of the styrofoam, off set between the layer of cones that are there. You will want them to be the same length as the cones on the top layer. Next, do a layer of cones that you have cut almost in half around the inside of the center hole, offset between the cones that are standing up. Continue alternating from outside edge, then inside edge, until the entire wreath is filled in. It will make much more sense as you are putting it together. When you are finished, the wreath will look like this.
The hardest part is rolling all the cones. Putting the wreath together is fairly simple. It is definitely an inside wreath because it is paper and so very light. I hung it with a push pin. But I must say, I LOVE the way it looks. The wreath on the shutters is extra special in my book (no pun intended). The finished wreath is 24 inches across, so don't start with a big wreath form or your wreath will be enormous! Just thought I'd warn you in case you don't have room for an enormous wreath.
Tomorrow, I will show you the finished vignette with the shutters and the wreath. It is really lovely and I am so very happy with it. Give this project a try and remember, Christmas is only 4 months away. These could make lovely, inexpensive gifts. Yes, I had to go there, because it's time to start thinking about projects if you intend to do any for gift giving. Have fun with this one, you will find yourself reading the pages as you roll the cones. It is an enlightening experience.
Everyday Donna
Things to Remember:
A good book has no ending. ~R.D. Cumming
Tuesday, August 21, 2012
Monday, August 20, 2012
Transition To Fall Wreath
Greetings friends! Hope your weekend was enjoyable. The weather was absolutely stunning this weekend. I am ever so ready for some cooler days and fallish nights. You can tell by the position of the sun that summer is waning. It gets dark just a little earlier and the evening is just a bit cooler which tells us autumn is on the way. For that, I can say hooray! School is already in session even though a bit of summer remains. Things are so different now, since we didn't go back to school until after Labor Day and that was the official end of summer. It must be hard to know there are still warm summer days remaining when you could be swimming and biking and skating and playing to your hearts content instead of sitting in a classroom. Yep, I'm showing my age.
The moment the last sky rocket faded in the closing ceremonies of the summer Olympics, I was ready to be done with my summer Americana theme. I truly enjoyed having the red, white and blue decorations in and on the house, but it was time for a transition to fall. For me, it's not quite time for pumpkins, gourds and colored leaves, but I wanted late summer colors that could transition to all the glorious colors of fall. I happened upon some dark red silk hydrangeas at Old Time Pottery and I decided that would be my transition "base". I didn't want to spend a lot of money for this wreath, so I found some sun flower bushes in yellows and oranges and some dark red poppy bushes at the Dollar Tree that would blend very nicely with the dark red hydrangeas.
There was a piece of natural colored burlap in my fabric stash left from another project that I used to wrap a 14 inch straw wreath. I cut 2 inch wide strips and pinned the burlap to the wreath with greening pins, wrapping it around until the wreath was completely covered.
There were a bunch of fuzzy green carpals (the pods that fall off magnolia trees) under the magnolia tree that added a nice natural look to the arrangement. All that "weedy" looking grass you see in the picture is actually from a piece of bamboo that had been growing in our daughter's yard. They had cut some of the bamboo because it grows very rapidly and can become very invasive. It was laying in a pile and I was very attracted to the weediness of the leaves, so I brought some home. Those dried leaves were the perfect addition to my late summer wreath. Don't overlook anything in your yard this time of year. Most of it dries nicely and can be used for many projects and the cost is perfect - free!
I cut all the flower stems and arranged them as I wanted them on the wreath and proceeded to glue them down with hot glue. The bow was made with remaining burlap strips. Easy peasy.
As soon as it was finished, I hung it on the front porch. Ahhhh, so refreshing to see something different. Bye bye USA and Americana Star. I enjoyed you for the summer, but it's time to move on. Now, I am in the process of changing everything in the house a little at a time as I complete each project. Wait until you see the next project. I have to tell you, I am in love with it! Hope you'll check back tomorrow.
Everyday Donna
Things to Remember:
Summer days driftin’ away-
song Summer Nights, Grease
The moment the last sky rocket faded in the closing ceremonies of the summer Olympics, I was ready to be done with my summer Americana theme. I truly enjoyed having the red, white and blue decorations in and on the house, but it was time for a transition to fall. For me, it's not quite time for pumpkins, gourds and colored leaves, but I wanted late summer colors that could transition to all the glorious colors of fall. I happened upon some dark red silk hydrangeas at Old Time Pottery and I decided that would be my transition "base". I didn't want to spend a lot of money for this wreath, so I found some sun flower bushes in yellows and oranges and some dark red poppy bushes at the Dollar Tree that would blend very nicely with the dark red hydrangeas.
There was a piece of natural colored burlap in my fabric stash left from another project that I used to wrap a 14 inch straw wreath. I cut 2 inch wide strips and pinned the burlap to the wreath with greening pins, wrapping it around until the wreath was completely covered.
There were a bunch of fuzzy green carpals (the pods that fall off magnolia trees) under the magnolia tree that added a nice natural look to the arrangement. All that "weedy" looking grass you see in the picture is actually from a piece of bamboo that had been growing in our daughter's yard. They had cut some of the bamboo because it grows very rapidly and can become very invasive. It was laying in a pile and I was very attracted to the weediness of the leaves, so I brought some home. Those dried leaves were the perfect addition to my late summer wreath. Don't overlook anything in your yard this time of year. Most of it dries nicely and can be used for many projects and the cost is perfect - free!
I cut all the flower stems and arranged them as I wanted them on the wreath and proceeded to glue them down with hot glue. The bow was made with remaining burlap strips. Easy peasy.
As soon as it was finished, I hung it on the front porch. Ahhhh, so refreshing to see something different. Bye bye USA and Americana Star. I enjoyed you for the summer, but it's time to move on. Now, I am in the process of changing everything in the house a little at a time as I complete each project. Wait until you see the next project. I have to tell you, I am in love with it! Hope you'll check back tomorrow.
Everyday Donna
Things to Remember:
Summer days driftin’ away-
song Summer Nights, Grease
Thursday, August 16, 2012
Perfect Barbecued Pork Chops
Yes, I know, it's pork again. But, here is the reason why. We had family over for Sunday dinner. When I went to the grocery, ham was my choice for the menu except, the hams they had were outrageously expensive. Pork chops, on the other hand, were super extra specially priced. So, guess what we had? You guessed it! Pork Chops.
I purchased two packages of chops, each containing 9 chops, for a total of $14.00. When you are feeding 9 people, that is a spectacular deal. Actually, the packages were half price, so I saved an additional $14.00. Yes! That is what I'm talking about.
I have to say that barbecued pork chops are one of my most favorite meats cooked on the grill - especially if they are prepared with a good rub and barbecue sauce. What's not to love? I like bone in pork chops because then you have that super tasty bone to gnaw on after you finish the chop and the bone adds more flavor. Perhaps Emily Post would not approve, but if you've never tried it, don't knock it. Mm mm mm is all I have to say. Anybody else like to chew on that tasty bone?
Barbecued pork chops were always a favorite meal when all our children were at home. When our son John was about 14/15 years old, he was almost impossible to fill up. If you have or have had sons that age, you understand what I am saying. If you have young sons, this is your warning. Be prepared. Learn to fix mass quantities of food when your sons become teenagers. The reason I say this is one night we had barbecued pork chops. The girls were both in college and I had fixed a lot of them hoping to have left overs. Dan ate one, I ate one, Tyler (our youngest son) ate one and John ate 9 pork chops. Yes, count them Nine, nInE, NINE, pork chops at one meal. There were no left overs. Start saving your money now mothers.
This is how I prepared the pork chops for Sunday dinner. First, I let the chops sit out until they come to room temperature. About an hour before cooking the chops I put this rub on them. (I will be making a huge jar of this rub and keeping it on hand). I found the recipe in a conversation thread about barbecuing and I would give credit where it is due if I had written down the person's name, but I didn't. So, whoever you are here's a great big THANK YOU! This rub is fantastic and this recipe covered all 18 chops.
Barbecue Rub Recipe
3 Tbsp Paprika
2 Tbsp Chili Powder
2 Tbsp Cumin
2 Tbsp Brown Sugar
2 Tbsp salt
2 Tbsp dried oregano
1 Tbsp sugar
1 Tbsp black pepper
1-2 tsp cayenne (I used 1 tsp so it would not be too hot for the little ones)
Mix all this together in a bowl using a fork. With your hands, massage the rub into the chops on both sides. We have a gas grill, so the grill was heated to medium high.
We did the chops in batches since the grill would not hold all 18. We placed 9 chops on the grill and let them cook on the first side about 4 minutes. Flip the chops and let cook another 3 minutes. These chops were less than 3/4 inch thick so you want to cook them high and fast so they don't dry out. Take the first batch of chops off the grill, place in a pan and cover with aluminum foil while you cook the second batch. This allows the juices in the meat to flow through the chops which keeps them super moist.
After cooking the second batch of chops, we put those in a pan covered with foil and let them sit. Uncover the first batch of chops and using a basting brush, brush one side of the chops with your favorite barbecue sauce. If you are a frequent reader, you know we love Sweet Baby Ray's original. When all the chops are coated with sauce on one side, place them sauce side down on the grill while you baste the side facing you. It will only take 1-2 minutes for the chops to brown, flip them over and let the other side get nice and brown and quickly remove from the heat. Return to the pan and cover with the foil while you repeat the process with the second batch. I mean look at those chops in the picture - doesn't it make you want one?
By cooking the chops at a fairly high heat and quickly, they do not dry out and become overcooked. We all thought these chops were fantastic! Our son in love was talking about them again last night, about how good they were. He said his mom always cooked pork chops until they were so dry, and many of us grew up with moms who did the same thing. Not these chops. Uh uh, they were outstanding.
I think you will find using this cooking method will give you a really juicy, tasty pork chop that everyone will love! We actually had left overs this time and we enjoyed them reheated the second night. They were just as good as the first night!
Even if you don't make these chops, make the rub and keep it on hand for other meats you grill. It would be outstanding on chicken and other cuts of pork, even steak. We will definitely be using it often. Good luck with your pork chops.
Everyday Donna
Things to Remember:
“There is poetry in a pork chop to a hungry man.”
Philip Gibbs (NY Times 1951)
I purchased two packages of chops, each containing 9 chops, for a total of $14.00. When you are feeding 9 people, that is a spectacular deal. Actually, the packages were half price, so I saved an additional $14.00. Yes! That is what I'm talking about.
I have to say that barbecued pork chops are one of my most favorite meats cooked on the grill - especially if they are prepared with a good rub and barbecue sauce. What's not to love? I like bone in pork chops because then you have that super tasty bone to gnaw on after you finish the chop and the bone adds more flavor. Perhaps Emily Post would not approve, but if you've never tried it, don't knock it. Mm mm mm is all I have to say. Anybody else like to chew on that tasty bone?
Barbecued pork chops were always a favorite meal when all our children were at home. When our son John was about 14/15 years old, he was almost impossible to fill up. If you have or have had sons that age, you understand what I am saying. If you have young sons, this is your warning. Be prepared. Learn to fix mass quantities of food when your sons become teenagers. The reason I say this is one night we had barbecued pork chops. The girls were both in college and I had fixed a lot of them hoping to have left overs. Dan ate one, I ate one, Tyler (our youngest son) ate one and John ate 9 pork chops. Yes, count them Nine, nInE, NINE, pork chops at one meal. There were no left overs. Start saving your money now mothers.
This is how I prepared the pork chops for Sunday dinner. First, I let the chops sit out until they come to room temperature. About an hour before cooking the chops I put this rub on them. (I will be making a huge jar of this rub and keeping it on hand). I found the recipe in a conversation thread about barbecuing and I would give credit where it is due if I had written down the person's name, but I didn't. So, whoever you are here's a great big THANK YOU! This rub is fantastic and this recipe covered all 18 chops.
Barbecue Rub Recipe
3 Tbsp Paprika
2 Tbsp Chili Powder
2 Tbsp Cumin
2 Tbsp Brown Sugar
2 Tbsp salt
2 Tbsp dried oregano
1 Tbsp sugar
1 Tbsp black pepper
1-2 tsp cayenne (I used 1 tsp so it would not be too hot for the little ones)
Mix all this together in a bowl using a fork. With your hands, massage the rub into the chops on both sides. We have a gas grill, so the grill was heated to medium high.
We did the chops in batches since the grill would not hold all 18. We placed 9 chops on the grill and let them cook on the first side about 4 minutes. Flip the chops and let cook another 3 minutes. These chops were less than 3/4 inch thick so you want to cook them high and fast so they don't dry out. Take the first batch of chops off the grill, place in a pan and cover with aluminum foil while you cook the second batch. This allows the juices in the meat to flow through the chops which keeps them super moist.
After cooking the second batch of chops, we put those in a pan covered with foil and let them sit. Uncover the first batch of chops and using a basting brush, brush one side of the chops with your favorite barbecue sauce. If you are a frequent reader, you know we love Sweet Baby Ray's original. When all the chops are coated with sauce on one side, place them sauce side down on the grill while you baste the side facing you. It will only take 1-2 minutes for the chops to brown, flip them over and let the other side get nice and brown and quickly remove from the heat. Return to the pan and cover with the foil while you repeat the process with the second batch. I mean look at those chops in the picture - doesn't it make you want one?
By cooking the chops at a fairly high heat and quickly, they do not dry out and become overcooked. We all thought these chops were fantastic! Our son in love was talking about them again last night, about how good they were. He said his mom always cooked pork chops until they were so dry, and many of us grew up with moms who did the same thing. Not these chops. Uh uh, they were outstanding.
I think you will find using this cooking method will give you a really juicy, tasty pork chop that everyone will love! We actually had left overs this time and we enjoyed them reheated the second night. They were just as good as the first night!
Even if you don't make these chops, make the rub and keep it on hand for other meats you grill. It would be outstanding on chicken and other cuts of pork, even steak. We will definitely be using it often. Good luck with your pork chops.
Everyday Donna
Things to Remember:
“There is poetry in a pork chop to a hungry man.”
Philip Gibbs (NY Times 1951)
Tuesday, August 14, 2012
A Tip To Keep The Pesky Flies Away While Eating Outdoors
You are probably wondering just what that is in the picture above? Let me give you a hint. It is a lemon studded with cloves. Does that help any? Do you have any idea what it's for? Let me give you another hint. It is sitting on a table out of doors. Have an idea yet? Here's the answer. It is to keep flies away while you are eating. Really. Seriously.
Now you are very skeptical I know. How do I know? Because I was extremely skeptical. For years I have been trying to find ways to have a pleasant meal out of doors and not be accosted by flies. I really, really, rally DISLIKE flies. I mean, who doesn't? They are some of the most annoying creatures on earth and there is nothing appealing about looking at food with flies all over it. Ugh. Even worse is spending time swatting them away from your face and arms. It will make you temporarily insane - at least that's the excuse I use. You'll have to pick your own excuse, but you're welcome to use mine.
We had family over for dinner Sunday evening and it was so beautiful outside, I wanted to enjoy the weather. I knew all the grandsons would want to spend their time in the yard, so why not kill two birds with one stone? We'll eat in the yard and watch them play. They don't like to take much time to eat when they are all together. If we are inside, they all want to go outside and no one gets to enjoy their food. We live on a corner and the yard is not fenced. Get the picture?
So, the issue was how to keep the flies away. I looked up some things on the internet. You supposedly can fill zip lock bags with water, lime juice and pennies, but most everyone said it doesn't work so why bother? Another suggestion was putting vinegar in bowls and setting it on the table. Now that is supposed to work well, but there would be no way Pawpaw Dan would sit at the table if he could smell the vinegar. Which is worse, flies or vinegar? He would say vinegar. So, I nixed that option. Another suggestion was to spray the area with hydrogen peroxide and needed to be reapplied with regularity. Sounded like a lot of work, so that one went by the wayside also.
Next, I went to good old Pinterest where you can find a suggestion or tip for just about anything. (Oh why did I not think up Pinterest? It's a genius site for sure and what did we ever do without it?). Anyway, I typed in "how to keep flies away" and up came this suggestion and let me tell you, it really works. The tip came from a blog called My Creative Time and the writer said she and her husband had spent time in San Diego years ago and ate at as many outdoor restaurants as they could to enjoy the beautiful weather. All of the restaurants had these cut lemons with cloves on their tables and she finally asked why. Their server said it was to keep flies away and she commented how there weren't any that bothered them. She said she has been using this tip for years. That's when I knew I was on to something. Also, EHow.com said using lemons, oranges and cloves as cleaning agents helped keep flies away. Aha! This is the one.
Fortunately, I had lemons in the fridge and some whole cloves. I cut the lemons in half and studded them with the whole cloves like she said. I would have used more cloves, but I was at the bottom of the bottle. The lemons in her picture had a few more cloves which probably would work even better! I have some small red ramekins that I used to put the lemons in and simply sat them on the table.
They are unobtrusive and somewhat decorative actually and they really did the trick! I saw one fly make a fly by and he landed on the lemon. It was a touch and go landing, he quickly left. That was it. So, the next time you are going camping or want to have a pleasant meal out of doors, give this easy tip a try. They actually should last for several days if you are camping. It's an inexpensive way to keep those pesky little critters away. Now, if we could just come up with a real solution for chiggers, we would all be happy campers. My grandparents used kerosene rags tied around their ankles and wrists. That's really not an option for me. Have you ever worn essence of kerosene? Just sayin'.
Here's a special thanks to Emma, writer of My Creative Time blog for one of the best tips ever. Give it a try, you will be glad you did.
Everyday Donna
Things to Remember:
“Time flies like an arrow, fruit flies like a banana.” Groucho Marx
Now you are very skeptical I know. How do I know? Because I was extremely skeptical. For years I have been trying to find ways to have a pleasant meal out of doors and not be accosted by flies. I really, really, rally DISLIKE flies. I mean, who doesn't? They are some of the most annoying creatures on earth and there is nothing appealing about looking at food with flies all over it. Ugh. Even worse is spending time swatting them away from your face and arms. It will make you temporarily insane - at least that's the excuse I use. You'll have to pick your own excuse, but you're welcome to use mine.
We had family over for dinner Sunday evening and it was so beautiful outside, I wanted to enjoy the weather. I knew all the grandsons would want to spend their time in the yard, so why not kill two birds with one stone? We'll eat in the yard and watch them play. They don't like to take much time to eat when they are all together. If we are inside, they all want to go outside and no one gets to enjoy their food. We live on a corner and the yard is not fenced. Get the picture?
So, the issue was how to keep the flies away. I looked up some things on the internet. You supposedly can fill zip lock bags with water, lime juice and pennies, but most everyone said it doesn't work so why bother? Another suggestion was putting vinegar in bowls and setting it on the table. Now that is supposed to work well, but there would be no way Pawpaw Dan would sit at the table if he could smell the vinegar. Which is worse, flies or vinegar? He would say vinegar. So, I nixed that option. Another suggestion was to spray the area with hydrogen peroxide and needed to be reapplied with regularity. Sounded like a lot of work, so that one went by the wayside also.
Next, I went to good old Pinterest where you can find a suggestion or tip for just about anything. (Oh why did I not think up Pinterest? It's a genius site for sure and what did we ever do without it?). Anyway, I typed in "how to keep flies away" and up came this suggestion and let me tell you, it really works. The tip came from a blog called My Creative Time and the writer said she and her husband had spent time in San Diego years ago and ate at as many outdoor restaurants as they could to enjoy the beautiful weather. All of the restaurants had these cut lemons with cloves on their tables and she finally asked why. Their server said it was to keep flies away and she commented how there weren't any that bothered them. She said she has been using this tip for years. That's when I knew I was on to something. Also, EHow.com said using lemons, oranges and cloves as cleaning agents helped keep flies away. Aha! This is the one.
Fortunately, I had lemons in the fridge and some whole cloves. I cut the lemons in half and studded them with the whole cloves like she said. I would have used more cloves, but I was at the bottom of the bottle. The lemons in her picture had a few more cloves which probably would work even better! I have some small red ramekins that I used to put the lemons in and simply sat them on the table.
They are unobtrusive and somewhat decorative actually and they really did the trick! I saw one fly make a fly by and he landed on the lemon. It was a touch and go landing, he quickly left. That was it. So, the next time you are going camping or want to have a pleasant meal out of doors, give this easy tip a try. They actually should last for several days if you are camping. It's an inexpensive way to keep those pesky little critters away. Now, if we could just come up with a real solution for chiggers, we would all be happy campers. My grandparents used kerosene rags tied around their ankles and wrists. That's really not an option for me. Have you ever worn essence of kerosene? Just sayin'.
Here's a special thanks to Emma, writer of My Creative Time blog for one of the best tips ever. Give it a try, you will be glad you did.
Everyday Donna
Things to Remember:
“Time flies like an arrow, fruit flies like a banana.” Groucho Marx
Monday, August 13, 2012
The East Nashville Tomato Art Fest 2012
Hola friends and neighbors! How was your weekend? Hope it was wonderful. The weather here in Nashville took a wonderful turn from blistering heat to the low 80s. Now that's what I'm talking about! It was so lovely we spent most of the weekend outside. The downside to that was I have the worst case of chiggers I have ever had in my life! If you don't know what chiggers are, look them up. They are evil little critters. I understand the food chain and the need for it in our world, but I do NOT like being at the top of their food chain. I will tell you this, there may be nothing that itches worse, except poison ivy. Yikes.
The big event of the weekend in East Nashville was the Tomato Fest. What a truly fun event. It happens the second Saturday in August and celebrates all things tomato. As you can see from the poster, the tomato is a uniter, not a divider and brings together all fruits and vegetables. You just have to love that philosophy!
History of the Tomato Art Fest
The Tomato Art Fest was founded by Meg and Bret MacFadyen, owners of East Nashville’s Art and Invention Gallery. In 2004, the gallery hosted an art show celebrating the tomato in late summer, and planned a few neighborhood events to promote the show. The Tomato Art Fest proved so popular that it immediately turned into an annual, signature event for the hip, urban neighborhood of East Nashville. tomatoartfest.com
The Art and Invention Gallery, and Garage Mahal, is a really cool place located at 5 points in East Nashville. They show original art by local artists and it is open year round.
This "tomato" decahedron in the background was created by a local artist and you could have your picture taken inside. There was a constant flow of people in and out. I thought it was hilarious.
The sign says "uniting nightshades and polyhedra". Awesome!
The tomato sculpture had 29 vertices and 12 faces, and the bottom sign declared 2012 the year of the tomadodecahedron. Clever!
There were hundreds of booths set up in the closed streets manned by artists and food vendors. Lots and lots of people attended since the weather was spectacular. Usually, it is like a sauna, so hot that it is unbearable. Mother nature totally cooperated this year and we thank her heartily. I heard there were as many as 35,000 people in attendance Saturday afternoon. That's a lot of people for 5 Points.
There are all kinds of activities, lots of live music - I mean, really, it's Nashville, home of country music - but there were all kinds of bands playing. There was a vintage fashion show at one of the vintage shops, a Tomato King and Queen, 3 Crow Bar made bloody mary's and tomato margarita's all day. Pied Piper ice cream shop has tomato ice cream (and it's really good), and then there is I Dream of Weenie, our local weenie wagon. If you ever come to East Nashville, it is a must to visit I Dream of Weenie.
If you look very closely, you will see that I Dream of Weenie is made from an old VW van with a porch attached on the front. It is so darn cute! There were so many people waiting in line, I couldn't get a really good picture. Adorable!
Here is a street view of vendor's booths and lots of people checking out all their art work.
Look at the color of the sky! Such a beautiful blue and not a cloud in it. What a great day for being neighborly.
The grandsons were enthralled at the man on top of the building making the biggest bubbles I have ever seen. He had two big sticks, with some kind of rope tied between that he was obviously dipping in bubble solution of some kind and he would hold the sticks up and huge bubbles were released by the wind into the sky. The little guys squealed with delight and so did we. I really need to find out how to do that! I wish the picture was better, but I was too far away.
There was even a tomato street prophet wearing a sandwich board wanting to save the tomatoes and the humans AND the rest of the ecosystem. Yes!
And, there were tomato balloons. Of course, the grandsons had to have some. I named them toothy tomato.
How cute is that? You can see Pawpaw on the right, corralling another balloon.
There are some incubator businesses next to Garage Mahal that are such a great idea. All different kinds of cute places to shop.
There is also Wonders on Woodland and Rumors which is a lovely wine bar and restaurant.
I took a tour of The Art and Invention Gallery and checked out all the tomato art. There were some amazing pieces to choose from. I know, when you think of tomato art you wonder how many ways can you draw a tomato? There are many, many ways and they are so clever and lovely. Here is the blue ribbon winner.
These are rain barrels painted like tomato soup cans. I LOVE these. Very creative indeed.
Here are a few more pictures to enjoy. This is a huge place and it was packed with people, so I couldn't get as many pictures as I wanted, but it will give you an idea of all the creativity done around the simple tomato.
The clerk let me take a picture of her awesome hat that was created by a local fashion designer. I did not get her name because I had to take the picture in a hurry, but the hat was awesome. There are lots of people wearing tomato inspired hats and clothing at the festival. East Nashvillians love to have a good time!
There were sparkly winged tomatoes on a black top hat and a big, sparkly red heart on the front. If you know me, you know I am a sparkly kind of gal and I fell in love with her hat!
This is one of my favorite buildings in East Nashville. Love, love, love the mural art on the wall.
We had a great afternoon strolling, eating, people watching and enjoying the beautiful weather. The idea of using the tomato for a festival theme was perfect. You know, some people think a tomato is a fruit and some think it is a vegetable. Next time you eat a tomato, look at it differently. The tomato is a uniter, not a divider - bringing fruits and vegetables together. It's kind of a metaphor for life don't you think? Something we all should strive for - uniting, not dividing. We're already looking forward to next year's festival. Perhaps you should mosey on down and check it out.
Everyday Donna
Things to Remember:
"It's difficult to think anything but pleasant thoughts while eating a homegrown tomato." - Lewis GrizzardThursday, August 9, 2012
Pork Loin With Bacon and Brown Sugar Glaze - YUM!
You are looking at a picture of the very last piece of one of the best pork loins I have ever made. I was in such a tizzy trying to get everything ready for dinner with starving grandsons running everywhere - some were crying they were so hungry - that I forgot to take a picture of that beautiful roast when it came out of the oven. I was VERY sad. Everyone had been served when I realized I didn't have one single picture of the finished product. Fortunately, when I looked in the pan there was one glorious piece left, so that is what you are looking at. See that glaze? Amazingly delicious!
The grocery had a special on pork roasts and I got a 5 pound roast for the outstanding price of $9.00. Wowza, I was excited. I like to fix dinner for the "in town" family and sometimes it is a challenge to come up with something that will feed everyone without breaking the budget. Do you ever have that problem? We have 6 adults and 6 children eating, so it takes quite a bit to fill everyone up, especially the men.
Consider pork loin. It is delicious, easy to prepare, feeds a lot of people and can be found at a good price if you watch the ads. There are lots and lots of ways to fix it. I happened upon this recipe online and didn't write down where I found it. I think it was at AllGoodRecipes.com and let me tell you, it's a keeper. First, you make a rub for the pork loin and then cover it with bacon. I mean, that should be enough right? But, you also make a wonderful brown sugar glaze to go over it and that just puts it over the top! The meat was so tender and juicy, just heavenly. And then the glaze, well you'll just have to make it to find out. Yummmmmo!
Here is what you need:
1 5 pound pork loin (or somewhere close)
about 5/6 slices of bacon, cut in half
1 tsp. chili powder
1/2 tsp paprika
2 tsp salt
1/2 tsp fresh cracked black pepper
1/2 tsp cumin
1 tsp cinnamon
Let your pork loin set out for about 1/2 hour to come to room temperature. Mix all the spices and rub over the entire pork loin. Place in a 9x13 baking pan or dish, fat side up, and cover the pork with the bacon slices. Try not to overlap the bacon too much so it will cook. Place in a 350 degree oven and cook for about 1.5 hours.
I did remember to take a picture of the roast just as I put it in the oven. It was a crazy day.
While the pork is cooking, make the glaze. Here is what you need:
1 cup light brown sugar, packed
1 TBSP flour (I used 1.5 tsp. corn starch so it is gluten free)
2 TBSP cider vinegar
1/2 tsp dijon mustard
Combine the ingredients in a saucepan and stir until the sugar has melted and everything is combined. Simmer for one (1) minute. Remove the loin from the oven after 1.5 hours. Pour the glaze over the entire roast and return the pan to the oven. Continue to cook for another 15 - 30 minutes until the internal temperature reaches 160 degrees F.
Remove the pan from the oven and let it sit for a few minutes before slicing and serving. (if you can wait that long) One look at that crispy bacon on top and you will want to dig right in.
This dish is so fantastic that it could be served at the most elegant dinner party or for a simple family meal. Oh my, it is so good. It made me hungry just looking at the picture. Everyone in the family loved it. We will be having this again.
Add this recipe to your repertoire. You will have requests to make it again. I know if there had been any left, it would have made fantastic leftovers. Maybe next time.
Everyday Donna
Things to Remember:
There is nothing like sitting around the dinner table with family enjoying good food, laughing, talking and making memories.
donna
The grocery had a special on pork roasts and I got a 5 pound roast for the outstanding price of $9.00. Wowza, I was excited. I like to fix dinner for the "in town" family and sometimes it is a challenge to come up with something that will feed everyone without breaking the budget. Do you ever have that problem? We have 6 adults and 6 children eating, so it takes quite a bit to fill everyone up, especially the men.
Consider pork loin. It is delicious, easy to prepare, feeds a lot of people and can be found at a good price if you watch the ads. There are lots and lots of ways to fix it. I happened upon this recipe online and didn't write down where I found it. I think it was at AllGoodRecipes.com and let me tell you, it's a keeper. First, you make a rub for the pork loin and then cover it with bacon. I mean, that should be enough right? But, you also make a wonderful brown sugar glaze to go over it and that just puts it over the top! The meat was so tender and juicy, just heavenly. And then the glaze, well you'll just have to make it to find out. Yummmmmo!
Here is what you need:
1 5 pound pork loin (or somewhere close)
about 5/6 slices of bacon, cut in half
1 tsp. chili powder
1/2 tsp paprika
2 tsp salt
1/2 tsp fresh cracked black pepper
1/2 tsp cumin
1 tsp cinnamon
Let your pork loin set out for about 1/2 hour to come to room temperature. Mix all the spices and rub over the entire pork loin. Place in a 9x13 baking pan or dish, fat side up, and cover the pork with the bacon slices. Try not to overlap the bacon too much so it will cook. Place in a 350 degree oven and cook for about 1.5 hours.
I did remember to take a picture of the roast just as I put it in the oven. It was a crazy day.
While the pork is cooking, make the glaze. Here is what you need:
1 cup light brown sugar, packed
1 TBSP flour (I used 1.5 tsp. corn starch so it is gluten free)
2 TBSP cider vinegar
1/2 tsp dijon mustard
Combine the ingredients in a saucepan and stir until the sugar has melted and everything is combined. Simmer for one (1) minute. Remove the loin from the oven after 1.5 hours. Pour the glaze over the entire roast and return the pan to the oven. Continue to cook for another 15 - 30 minutes until the internal temperature reaches 160 degrees F.
Remove the pan from the oven and let it sit for a few minutes before slicing and serving. (if you can wait that long) One look at that crispy bacon on top and you will want to dig right in.
This dish is so fantastic that it could be served at the most elegant dinner party or for a simple family meal. Oh my, it is so good. It made me hungry just looking at the picture. Everyone in the family loved it. We will be having this again.
Add this recipe to your repertoire. You will have requests to make it again. I know if there had been any left, it would have made fantastic leftovers. Maybe next time.
Everyday Donna
Things to Remember:
There is nothing like sitting around the dinner table with family enjoying good food, laughing, talking and making memories.
donna
Wednesday, August 8, 2012
Donna's Fresh Green Beans With Bacon And New Potatoes
Let's talk about the humble green bean, perhaps the blandest of all vegetables. Unless you doctor those beans up with some real flavor, they really are quite tasteless, and boring, and tasteless. Did I say tasteless? So, let's make some green beans the way grandma did, except without all the bacon grease. Yeah, those things would slide right off your plate. They were so shiny from the bacon grease you could put your lipstick on looking in one of them. Did they taste good? Sure, but we know that is not the healthiest way to eat them even though grandma lived to the ripe old age of 96. Hmmm, there may be something in that bacon grease after all.
Grandma always classified green beans as bunch beans or pole beans. Actually, they are bush beans and pole beans. Did you know there was a difference? If you have family from Kentucky, you know the difference. Bush beans grow low to the ground on a bush like plant and are thin and not very stringy. Pole beans, otherwise known as shelly beans in the Kentucky vernacular, are the ones I really love. They were planted next to a tripod of poles with string staked to the ground and the beans would vine up the strings. They are thicker green beans and can be kind of stringy so you have to remove the strings when you snap the beans. Also, you can pop them open and let some of the beans inside the pod fall into the pot and they are super delicious. Those are known as shelly beans. Anybody know what I'm talking about? I know my cousin Linda does. When they are available in the summer, I would much rather have the pole beans than the bush beans. They have so much more flavor and personality than the bush beans. If bush beans are all that's available, I'm good with those.
Green beans were available fairly early in the summer at the farmer's market and I fixed a lot of them. Then the drought came along and there were no green beans because they need a lot of water. I am more than happy to report that they are available again at the farmer's market. We got enough rain in July that there are fresh green beans again. Yay!!!
If you have never prepared fresh green beans, you don't know what you are missing. Seriously. Canned or frozen green beans in no way compare to the fresh variety, especially if they are cooked the right way. Grandma's way. About the only way I will eat a canned green bean is if you fix a green bean casserole - what we always called the Indiana state casserole. You know, the one that shows up at every holiday and pot luck dinner. Yeah, that's the one.
Let's talk about fresh green beans and how to make them heavenly delicious. If I am going to go to the effort to cook green beans, I don't want just a handful when I'm done. I want left overs, several days worth of green beans because they actually get better each time you eat them. They just keep absorbing all the goodness from the onions and the smoked meat and the new potatoes. Okay, I just drooled on the keyboard. Time to get down to business.
You want to buy 3 to 4 pounds of green beans. Don't faint. You will eat them. If not, share them with friends and family. They are going to love you forever if you do. Now, you have to snap all those beans. That's right. Snap them all. I use it as a meditation practice. Our youngest son Tyler always loved to help me snap beans when he was a little guy. I really miss him helping me. We always had a lot of fun and that is such a good memory.
First, set up your snapping station. I use a colander, a bowl to hold the strings and bean ends, and the bag of green beans. Put another plastic bag down to catch any ends or strings that miss the bowl. Makes clean up easier. Trust me, this is not my first rodeo. You will be glad you did this.
If you've never really studied a fresh green bean, they have two distinct ends that must be removed.
If you are using bush beans, they are not very stringy so you will remove each end and snap the rest of the bean in several pieces. If you are using pole beans, they can be really stringy and the string will be attached to the end when you break it off. Just peel it all the way down to the end of the bean. Repeat with the other end, then snap into several pieces. This takes a little time, maybe a half hour. Put on some good music, clear your mind and snap away. Before you know it you have a colander full of green beans, an empty bag and a bowl with ends and strings. Clean up the bags, toss the ends in the trash, and take the colander to the sink to wash the beans. Let the colander drain in the sink while you get the seasoning ready in the big pot you will cook the beans in.
Lets talk about seasoning. You want something with a good smokey flavor like bacon, country bacon (like in the picture below), a smoked ham hock or a smoked turkey leg. All are delicious and impart wonderful flavor to the beans and the pot liquor. Pot liquor is the flavored water that remains from cooking the beans in case you didn't know. It's yummo.
For this batch of beans, I used this smoked bacon I get at the farmer's market.
It comes in a chunk and only costs about $3.00 and I use it for many, many things. I cut off some thick strips, about 3 or 4, and dice it. You can also use strips of bacon you buy in the grocery. Stack 4 or 5 strips on top of each other and cut into lardons (strips cut crossways) and do the same thing I am going to tell you about.
Get your dutch oven or big pot out (at least 10 quarts) and put it on the stove. Peel two big onions and cut them in half. Then cut them into big chunks. Put the diced bacon in the bottom of the pot to cook and render out the bacon fat. Grandma always kept a container with bacon grease in it and just spooned it into the pot. Most of us don't have those today, so this is the way to render out that scrumptious, flavorful fat. Don't let the bacon get very brown, it will continue to cook with the green beans. Take the pot off the heat and add all the drained green beans in the colander to the pot. Add the onion chunks and stir to mix the bacon and rendered fat into the green beans. Fill the pot with water so that about 3/4 of the beans are under water. They will release more water as they cook, so don't overfill. You can always add water. Put the pot back on medium heat, cover, and cook for at least an hour.
Now, we like new potatoes cooked with our beans. If you want to do that, buy about 2 pounds of small new potatoes, red or white, scrub them and cut the middle of the peel away from the potato. You will add these about the last 45 minutes of cook time. It's so worth doing.
At about an hour, season your green beans with salt. They take a lot of salt, but start with a small amount, about a tablespoon - you can always add! I taste and add, taste and add until I get where I want them to be. Add black pepper too. Lots. Put all the new potatoes on top of the green beans, cover the pot and continue to cook for 45 minutes to an hour, until the green beans are really soft and tender and the potatoes are too. They should look like the picture at the begging of the blog.
If you want to use a smoked turkey leg or ham hock, get the green beans ready to cook and just add either one on top of the beans. It's just a little different than using bacon.
For a complete meal, you can add corn on the cob on top of the potatoes. Shuck the corn, remove the silks and break the cobs in 1/2. Lay them on top of the potatoes and let cook for about 20 minutes. Ta da. You now have a complete meal. Add some sliced tomatoes, cornbread or biscuits and enjoy. If you used a smoked turkey leg or ham hock, cut the meat away from the bone and add to the beans. Super delicious! This is one of our all time favorite summer meals. Our kids always loved fresh green beans. My Grandma sure knew what she was doing. This grandma has been fixing green beans the same way for 43 years. No complaints yet!
I wish I could give you an exact recipe, but cooking green beans is not an exact science. It is a flavor and a feeling and a taste that suits you. Don't be afraid to give this a try, you'll never want canned beans again. Let me know how they turn out and Good luck!
Everyday Donna
Things to Remember:
Botanically speaking, tomatoes are the fruit of a vine, just as are cucumbers, squashes, beans and peas.
Horace Gray
Grandma always classified green beans as bunch beans or pole beans. Actually, they are bush beans and pole beans. Did you know there was a difference? If you have family from Kentucky, you know the difference. Bush beans grow low to the ground on a bush like plant and are thin and not very stringy. Pole beans, otherwise known as shelly beans in the Kentucky vernacular, are the ones I really love. They were planted next to a tripod of poles with string staked to the ground and the beans would vine up the strings. They are thicker green beans and can be kind of stringy so you have to remove the strings when you snap the beans. Also, you can pop them open and let some of the beans inside the pod fall into the pot and they are super delicious. Those are known as shelly beans. Anybody know what I'm talking about? I know my cousin Linda does. When they are available in the summer, I would much rather have the pole beans than the bush beans. They have so much more flavor and personality than the bush beans. If bush beans are all that's available, I'm good with those.
Green beans were available fairly early in the summer at the farmer's market and I fixed a lot of them. Then the drought came along and there were no green beans because they need a lot of water. I am more than happy to report that they are available again at the farmer's market. We got enough rain in July that there are fresh green beans again. Yay!!!
If you have never prepared fresh green beans, you don't know what you are missing. Seriously. Canned or frozen green beans in no way compare to the fresh variety, especially if they are cooked the right way. Grandma's way. About the only way I will eat a canned green bean is if you fix a green bean casserole - what we always called the Indiana state casserole. You know, the one that shows up at every holiday and pot luck dinner. Yeah, that's the one.
Let's talk about fresh green beans and how to make them heavenly delicious. If I am going to go to the effort to cook green beans, I don't want just a handful when I'm done. I want left overs, several days worth of green beans because they actually get better each time you eat them. They just keep absorbing all the goodness from the onions and the smoked meat and the new potatoes. Okay, I just drooled on the keyboard. Time to get down to business.
You want to buy 3 to 4 pounds of green beans. Don't faint. You will eat them. If not, share them with friends and family. They are going to love you forever if you do. Now, you have to snap all those beans. That's right. Snap them all. I use it as a meditation practice. Our youngest son Tyler always loved to help me snap beans when he was a little guy. I really miss him helping me. We always had a lot of fun and that is such a good memory.
First, set up your snapping station. I use a colander, a bowl to hold the strings and bean ends, and the bag of green beans. Put another plastic bag down to catch any ends or strings that miss the bowl. Makes clean up easier. Trust me, this is not my first rodeo. You will be glad you did this.
If you've never really studied a fresh green bean, they have two distinct ends that must be removed.
If you are using bush beans, they are not very stringy so you will remove each end and snap the rest of the bean in several pieces. If you are using pole beans, they can be really stringy and the string will be attached to the end when you break it off. Just peel it all the way down to the end of the bean. Repeat with the other end, then snap into several pieces. This takes a little time, maybe a half hour. Put on some good music, clear your mind and snap away. Before you know it you have a colander full of green beans, an empty bag and a bowl with ends and strings. Clean up the bags, toss the ends in the trash, and take the colander to the sink to wash the beans. Let the colander drain in the sink while you get the seasoning ready in the big pot you will cook the beans in.
Lets talk about seasoning. You want something with a good smokey flavor like bacon, country bacon (like in the picture below), a smoked ham hock or a smoked turkey leg. All are delicious and impart wonderful flavor to the beans and the pot liquor. Pot liquor is the flavored water that remains from cooking the beans in case you didn't know. It's yummo.
For this batch of beans, I used this smoked bacon I get at the farmer's market.
It comes in a chunk and only costs about $3.00 and I use it for many, many things. I cut off some thick strips, about 3 or 4, and dice it. You can also use strips of bacon you buy in the grocery. Stack 4 or 5 strips on top of each other and cut into lardons (strips cut crossways) and do the same thing I am going to tell you about.
Get your dutch oven or big pot out (at least 10 quarts) and put it on the stove. Peel two big onions and cut them in half. Then cut them into big chunks. Put the diced bacon in the bottom of the pot to cook and render out the bacon fat. Grandma always kept a container with bacon grease in it and just spooned it into the pot. Most of us don't have those today, so this is the way to render out that scrumptious, flavorful fat. Don't let the bacon get very brown, it will continue to cook with the green beans. Take the pot off the heat and add all the drained green beans in the colander to the pot. Add the onion chunks and stir to mix the bacon and rendered fat into the green beans. Fill the pot with water so that about 3/4 of the beans are under water. They will release more water as they cook, so don't overfill. You can always add water. Put the pot back on medium heat, cover, and cook for at least an hour.
Now, we like new potatoes cooked with our beans. If you want to do that, buy about 2 pounds of small new potatoes, red or white, scrub them and cut the middle of the peel away from the potato. You will add these about the last 45 minutes of cook time. It's so worth doing.
At about an hour, season your green beans with salt. They take a lot of salt, but start with a small amount, about a tablespoon - you can always add! I taste and add, taste and add until I get where I want them to be. Add black pepper too. Lots. Put all the new potatoes on top of the green beans, cover the pot and continue to cook for 45 minutes to an hour, until the green beans are really soft and tender and the potatoes are too. They should look like the picture at the begging of the blog.
If you want to use a smoked turkey leg or ham hock, get the green beans ready to cook and just add either one on top of the beans. It's just a little different than using bacon.
For a complete meal, you can add corn on the cob on top of the potatoes. Shuck the corn, remove the silks and break the cobs in 1/2. Lay them on top of the potatoes and let cook for about 20 minutes. Ta da. You now have a complete meal. Add some sliced tomatoes, cornbread or biscuits and enjoy. If you used a smoked turkey leg or ham hock, cut the meat away from the bone and add to the beans. Super delicious! This is one of our all time favorite summer meals. Our kids always loved fresh green beans. My Grandma sure knew what she was doing. This grandma has been fixing green beans the same way for 43 years. No complaints yet!
I wish I could give you an exact recipe, but cooking green beans is not an exact science. It is a flavor and a feeling and a taste that suits you. Don't be afraid to give this a try, you'll never want canned beans again. Let me know how they turn out and Good luck!
Everyday Donna
Things to Remember:
Botanically speaking, tomatoes are the fruit of a vine, just as are cucumbers, squashes, beans and peas.
Horace Gray
Subscribe to:
Posts (Atom)


