Showing posts with label egg. Show all posts

Monday, October 14, 2013

Pumpkin Poppers!

 Happy Monday to you one and all!  Hoping your weekend was fabulous, restful, and all that you wanted it to be.  Ours was busy as usual.  We had little league games on Saturday and a birthday party for our seven year old grandson on Sunday.  I baked his cake and cupcakes and that was quite an affair.  I am not a cake decorator, but I do my best.  Will share his baseball glove cake and baseball cupcakes with you one of these days.

Well, fall is upon us and it is time for all things pumpkin.  It is amazing to me how the groceries now turn October in to "pumpkin" month with everything pumpkin you can think of.  I must say we do enjoy some good pumpkin treats, so I thought I would share one with you today that I found on Domestically Speaking.  She calls them Pumpkin Poppers and they are deliciously delectable morsels of pumpkin that are kind of like donut balls only baked in a mini muffin tin.  Yum!

This recipe made 24 of these Poppers in my mini muffin pan.  It's an easy recipe and SOOOO good, especially with coffee.  Then again, what isn't good with coffee?  Here is what you need:

1 3/4 cups all purpose flour
2 tsp baking powder
1/2 tsp salt
1  1/2 tsp cinnamon
1/4 tsp ground cloves
1/2 tsp allspice
1/3 cup vegetable oil
1/2 cup brown sugar
1 egg
1 tsp vanilla
3/4 cup pumpkin (not pie filling)
1/2 cup milk
This is how they look when they come out of the oven before you coat them in the cinnamon/sugar mix.


Coating

1/2 stick butter, melted
1/2 cup granulated sugar and 1 1/2 TBSP cinnamon combined in a bowl

Preheat oven to 350 degrees fahrenheit.   Spray mini muffin pan with cooking spray.

Combine all dry ingredients.  Mix with a whisk until combined.  Mix all wet ingredients and pour into dry ingredients.  Just combine.   Do not over mix.

Fill muffin tins almost full.  Bake 8-12 minutes.  Let cool.  (I baked mine 8 minutes)

Roll in melted butter, then sugar/cinnamon mix.  Serve!

Oh, my.  These are really, really good and it's tempting to not eat all of them at one time.  Restrain yourself if you can - you will want some of these for breakfast, a mid afternoon snack, and evening treat.  They are two bites, three at the most and it's easy to just keep popping them in your mouth.  Yum.  Yum.  Yum.

Give this recipe a try.  It's a great fall treat and super easy.  You are going to love these!

Everyday Donna

Things to Remember:

"Oh how we love pumpkin season.  You did know this gourd-ish squash has its own season, right?  Winter, Spring, Summer, pumpkin....We anxiously anticipate it every year."     Unknown


Monday, September 16, 2013

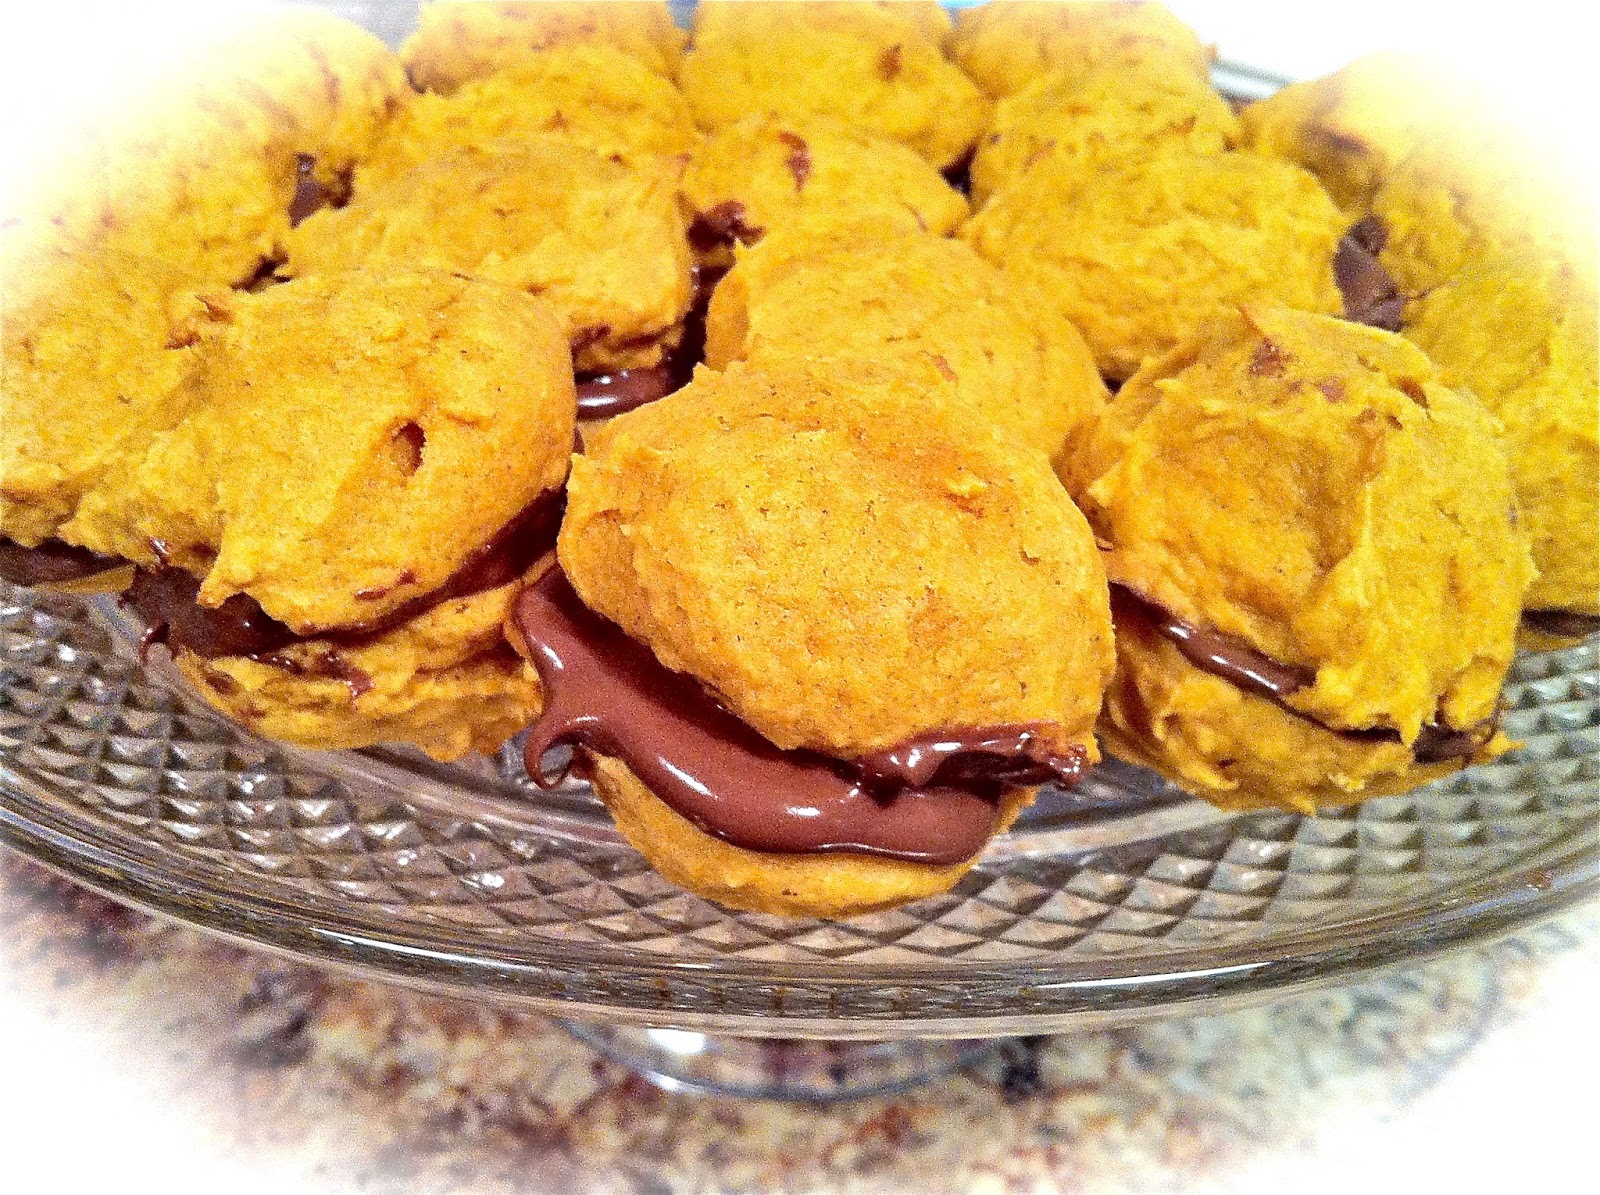
Pumpkin Whoopee Pies With Nutella - YUM!

 Happy Monday, September 16.  It is 7:16 pm and outside it's dark.  That means summer is definitely on the wane and the days are getting shorter, BUT it also means that fall is approaching rapidly.  Yippee!  Do you like fall as much as I do?  The changing leaves, the cooler temperatures, pumpkins, Indian corn, cider, bonfires, apples, sweaters, colorful mums, Halloween and Thanksgiving.  There are so many wonderful things about fall.

Starbucks has their pumpkin spice coffee drinks available and that is the first official "call to fall".  Everyone gets excited when pumpkin spice drinks return.  Therefore, it is okay to start making any and all things pumpkin.  Starbucks gave the go ahead.

I got my new Food Network magazine last week and it has a lot of fabulous recipes or fall.  I wanted to start making them all.  Inserted in the magazine is a little booklet with 50 things you can make from canned pumpkin!  Fifty, five oh, 50.  Wow!!  That is more than exciting and as I perused it I couldn't decide whether to start with #1 and work my way through or - ding, ding, ding, hold the phone.  How about #42 and #43 to start?   It's a pumpkin cookie recipe that can be made into whoopee pies filled with - OH MY - Nutella.  Guess where I started?  You guessed!!  You are a sharp cookie (no pun intended).

Sometimes a recipe just jumps out and says make me now.  Do you ever have that happen?  So, I did.

Here is what you need:

6 TBSP softened butter
1 1/2 cups sugar
1 cup canned pumpkin *see note below
1 egg
1 tsp vanilla
2 cups flour
1 tsp baking soda
1 tsp cinnamon
1/2 tsp salt

Beat the softened butter and sugar with a mixer until fluffy.  Beat in the pumpkin, egg, and vanilla.  Whisk the flour, baking soda, cinnamon, and salt together.  Stir into the pumpkin mixture.

Drop by tablespoons full onto an oiled baking sheet.  Bake at 400 degrees Fahrenheit for 12 minutes; cool.


If you want to eat the cookies, you can make this glaze.

1/2 cup confectioners sugar
1 TBSP milk  - mix together, spread on cookies

OR, if you want to make them into whoopee pies, do not glaze the cookies.  Spread the bottom of one cookie with Nutella and place the bottom of another cookie on top.  You now have a delectable little sandwich made of delicious pumpkin cookies with Nutella spread in the middle to hold them together.  Now, I can't pass this up - whoopee!   This recipe made 36 cookies or 18 whoopee pies.

*I will tell you that I hated to leave that bit of pumpkin in the can since the recipe called for one cup of pumpkin, so I added the whole can to the recipe which probably made the cookies a little softer than they would be if you followed the recipe exactly.  The texture is somewhat like gingerbread, very soft and delicious and oh so good with that lovely dollop of Nutella in the middle.  They are especially good with a cup of coffee and they just scream fall y'all.

It's hard to decide what to make next.  Maybe the pumpkin bread pudding made with cinnamon raisin bread, or maybe the cheesecake pie, or maybe.........   Whatever it is, I will share the recipe with you when I make it.  In the meantime, give these a try.  They are pumpkinlicious.

Everyday Donna

Things to Remember:

What do you get if you divide the circumference of a pumpkin by its diameter?  Pumpkin pi!


Wednesday, August 28, 2013

Blueberry Cobbler With Biscuit Crumb Topping

 Did you ever have fruit that is going down, like fast.  You know, those brown bananas that have a day or so before you have to toss them?  Don't toss those bananas, cut them up and put them in a baggie to go in the freezer if nothing else.  They are good for smoothies!  Or, there is always banana bread.  Yum.

I happen to love all things blueberry and I buy them every time I go to the grocery and then suddenly I have several containers in the fridge and there is that first sign that they may start to shrivel at any moment and must be used!  No blueberry should ever be wasted!  Of course, you can put them in a baggie and freeze them just like the bananas.  But, I had a hankerin' for something sweet and desserty and I usually make a peach and blueberry cobbler, but alas I had no peaches.  Therefore, some other recipe must be used.  I make blueberry pie, but I didn't want to make crust.  It just seemed like too much effort so I started combing the world wide web.

I found this recipe on a blog called wickedgoodkitchen.com and it sounded just perfect so I thought I would give it a try.  It's a keeper!  It's easy and delicious.  I served it for dessert tonight and our 3 year old grandson ate two helpings - with ice cream of course.

Here is what you need:

Filling:

4-5 cups fresh blueberries, rinsed, dried and sorted.  (toss those shriveled ones)
1 cup sugar
2 tsp freshly grated lemon zest
3 Tbsp all purpose flour

Biscuit Crumb Topping:

1 cup + 5 TBSP all purpose flour
6 TBSP sugar
1 & 1/2 tsp baking powder
1/4 tsp salt
6 TBSP butter, cut into bits
1 large egg, slightly beaten
1 tsp vanilla
1 TBSP sugar
1 tsp ground cinnamon

Preheat oven to 375 degrees fahrenheit

Lightly butter a 10" baking dish

Combine the sugar, lemon zest, and flour called for in the filling.

Put the blueberries in the baking dish, sprinkle with the sugar/zest/flour in a very even manner so that there is no clumping of the sugar which allows it to dissolve while baking and won't be gritty.  I stirred mine a couple of times to prevent that from happening.  Continue to evenly sprinkle until all mixture has been used.

Make the crumb topping.  Put the flour in a bowl, add the sugar, baking powder and salt.  Whisk or mix with a fork.

Cut the cold butter into small bits and cut into the flour mixture until crumbly.  I used a pastry blender, or you can use your hands.  Add the beaten egg, vanilla and stir to thoroughly mix until you have a dough type mixture.

Spread over the blueberries using your hands.

Combine the sugar and cinnamon and sprinkle over the biscuit topping.

IMPORTANT.  SET THE BAKING DISH ON A BAKING SHEET BECAUSE IT WILL COOK OVER AND YOU WILL HAVE BURNED SUGAR AND SMOKE IN YOUR KITCHEN AND DON'T ASK ME HOW I KNOW THIS.  JUST SAVE YOURSELF A MESS.   TRUST ME.

Bake for 40-45 minutes until the top is nice and brown.  Remove from the oven and serve warm with a lovely dollop of ice cream or whipped cream or - both!

This really is a wonderful cobbler.  It is not too sweet, but the lemon zest gives it a really nice brightness.  The crust is like a big soft cinnamon biscuit that is absolutely delicious.

I will be making this again, and again, and ...... you know.  Give it a try.  I think you will really like it too.

Everyday Donna

Things to Remember:

Blueberries are considered one of the "super" foods.  So hey, why not enjoy them any way you can.  Cobbler works for me.  donna


Wednesday, May 22, 2013

Donna's Barbecue Cheeseburgers


Memorial Day weekend is upon us folks and that means the official summer grilling season is about to begin for real.  What is better than summer grilling season?   I can't think of too many things actually.  There's nothing better than warm days and evenings when it stays light late into the evening and you can fire up the grill and toss on something quick and easy.    That's what I'm talking about.  Quick AND easy.  Outdoor grilling and eating can be casual, no muss, no fuss,  using paper plates to eat on  and that is Okay!!  It's important to enjoy every moment of the summer, sharing time with family and friends.

A while back we were going to grill some good old fashioned American burgers for dinner, but I had a bit of inspiration and decided to doctor them up just a bit before they went on the grill.  This is my pepper jack barbecue burger and are they ever tasty!  Wow.  We all loved them, so I have been making our burgers this way since.  I'm not sure Dan would want to go back to just a plain older burger and he is a real connoisseur when it comes to hamburgers.  He may hold a world record for the number of hamburgers eaten in a lifetime.  As for the kind of "cheese"burger you make, you can use any cheese that you like as long as you can buy an 8 ounce block and grate it because the cheese in these burgers is mixed in the cheeseburger, not melted on top.  We have also made these with cheddar cheese which are just as good, especially if you don't like spicy foods.  Next, we are going to try them with mozzarella and some marinara sauce.  How good would that be?

Here is what you need and how you made Donna's barbecue cheeseburgers.

2 pounds 80/20 ground beef
1/2 medium onion, minced
1 8 ounce block cheese, grated
1 large egg
1/2 cup barbecue sauce (I use Sweet Baby Ray's original)
1.5 tsp salt
fresh cracked black pepper

Thoroughly mix all the ingredients in a bowl using your hands.  You don't want to add too much salt because the cheese and the barbecue sauce contain salt.

To make the patties, I scooped out about a tennis ball sized section of the ground beef mixture, rolled it between my hands to make a ball, and pressed it into a burger patty with a bit of a well in the middle.  This helps make sure the middle of the burger cooks at the same time as the edges of the burgers.  I got 10 good sized burgers from this mixture.
See all of that delicious cheese in the burgers?  After they are cooked, the cheese oozes out of the burger and you enjoy that delicious flavor with ever bite.  Yum.  Yum.

Cook the burgers to your liking -  rare, medium, well done.  Dress them up anyway you like.  We had ours with lettuce, tomato, pickle, sliced onion, and just a little more barbecue sauce.  Yessirree Bob they are fine.  Cheesey, barbecuey, slightly oniony, deliciousness.

You might want to make the patties ahead and let them sit in the fridge for an hour or two because they are softer than burgers made with plain ground beef.  This will help keep them from falling apart on the grill when you flip them.  Even if they do split, it doesn't matter.  Just scoop up all the pieces because you won't want to waste one bite.

Hope this gives you an idea for a different version of the All American favorite - the hamburger.  I think you're gonna like them a lot!  Happy summer grilling season!

Everyday Donna

Things to Remember:

Grilling takes the formality out of entertaining.  Bobby Flay


Thursday, April 11, 2013

Red Velvet Mocha Chocolate Chip Cookies - You Must Make These

Holy downpour Batman, it was raining cats and dogs here today.  We had to make a trip across town  and this is what it looked like on Briley Parkway.  Visibility was practically zero at times.
There are lots of hills going around the north and west side of town.  I took this picture trying to show the tops of all the hills encapsulated in clouds.  It didn't work very well, but it was so dark and raining so hard that we could barely see.  Taking pictures from a moving car is not the easiest thing in the world either.  At least, not for me.  Trying to miss the windshield wipers flinging back and forth is a challenge.

I have to remember, April showers bring May flowers.  Otherwise, I am not a fan of these gulley washers.  At least we didn't get the awful storms they had predicted, so I guess I will be happy with lots and lots and lots of rain.  For now.  I have the tools and the gopher wood handy in case an ark is in our future.

Our son mentioned that it was his boss's birthday today and his boss loves to eat according to Tyler.  (Like somebody doesn't?)  So, I told him I would make him some cookies.  My understanding is he really, really likes cookies.  What could be more perfect for such a gloomy day than beautiful red velvet cookies with lots of chocolate chips in them, oh and coffee for the mocha flavor.  Yum.

I found this recipe at petitfoodie.com and they are fantastic.  I decided on red velvet cookies because  -1. I had several red velvet cake mixes on hand, and - 2.  almost everyone loves red velvet anything.  That made for an easy choice.  All ingredients were in house and cookies are easy to make.  Here is what you need:

1 box red velvet cake mix
1 stick butter, slightly melted
1 egg
4 Tablespoons strong brewed coffee
3/4 cup chocolate chips

Preheat your oven to 350 degrees Fahrenheit.

Mix all the ingredients in a bowl.  I used a hand mixer on medium.  Scoop a tablespoon of batter for each cookie.  Bake for 10-13 minutes, remove from the oven.  Let sit on baking sheet for a minute to cool down before removing with a spatula.  I will tell you, I had to let them bake the full 13 minutes.  Otherwise, they were still really mushy.


Look at the chocolate chips peeking out of that beautiful red cookie.  Outstanding!  These are delicious with a nice cup of hot coffee let me tell you right now.  They were just perfect on this yucky, rainy day.  Oh.  Oh.  Oh,  yes, we did sample a few (oops) before packaging some up for the "Boss".  I am sure he didn't mind.  Really.  Someone had to taste them to make sure they were okay.  Right?

I put some cookies on a little silver plate I had from the Dollar Tree.  Then I wrapped them in clear cellophane to make them look festive and gift like.  Nice.
"Boss"man was so appreciative he walked out to the car in the pouring rain to thank me AND asked me how I knew red velvet was his favorite?  How did I know?  I am a mom.  I am observant.  I listen to people's comments about food.  The majority of people will say red velvet cake is their favorite; therefore, why wouldn't they love red velvet cookies too?   Good call on my part, huh?

I hope these deliciously beautiful cookies brightened his special day.  They certainly brightened ours.  We do have a few here for our enjoyment.  This recipe made 3 dozen good sized cookies and I doubled the recipe.  That made our resident "cookie monster" very happy indeed.  Give them a try.  You are gonna' love them.

Everyday Donna

Things to Remember:

Keep some cake mixes on hand for when you need a quick "gift."  Make a cake, cupcakes, or cookies.  Everyone loves a good sweet treat that has been made with love - especially red velvet and you don't have to mess with all that food coloring when using the cake mix.   donna


Wednesday, February 27, 2013

Hand Breaded Pork Tenderloin How To - And You Will Want To

 Remember, I am from the "old school", better known as "the good old days".    I graduated high school in 1966 - a year most of you won't even remember.  As a matter of fact, most of you weren't even born then.  But let me tell you, we had a lot of fun back then.

We used to get in our cars (in my case, my parent's car), whether with friends or a date, and tool around town from one drive-in restaurant to another, visiting with our friends, eating, laughing, talking, cruising to see who was there, and then riding around some more.  Round and round from the Farmer's Daughter to Hamilton's Drive-In, out to the Double R, across town to Frisch's Drive-In and then back across town to the Parkway.  Then it was time to start the circuit all over.  Gasoline was $.24.9 cents a gallon.  Dan and I have cashed in many a coke bottle to go out on dates and buy gasoline.  Do you even know what it means to cash in coke bottles?  I know I'm old.  Sheesh.

Those were the days of carhops and window trays.  There were no drive through windows.  You pulled in to a parking place, placed your order on the speaker next to the car (each car had a speaker) and then a car hop - that was an employee of the restaurant - would bring your order out on a tray that attached to your car door.  You had to roll your window down for the tray to be attached.  Then, everyone ate in the car while all kinds of hilarity went on.  Yes, hilarity.  Those were some good times for sure.

Last week, a group of people I graduated high school with (back when dinosaurs roamed the earth) were on Facebook talking about who had the best breaded tenderloin sandwich in town.  I am from Evansville, Indiana, in case you wondered.  That was a major discussion and made me start thinking about those delicious sandwiches that all the restaurants had.  If you have never had a breaded tenderloin sandwich, you have NO idea what you are missing.  I'll take one over a hamburger any day of the week.

I had tenderloin sandwiches on my mind, so I decided to make some for dinner last night.  I have made them through the years and thought I would share how to make them, because you really, really want to make these.  They are crisp on the outside, tender on the inside and SOOOOOOOO delicious.  Our youngest son is 25 and he declared them fabulous.  Our houseguest Ken also LOVED them.  Tyler's friend Craig, who may be one of the pickiest eaters on the planet devoured his in about 3.4 seconds.  They all ate two HUGE sandwiches along with parmesan potato wedges and oven roasted Brussels sprouts that are to die for.  (I will tell you how to make those in another post.)

Here is how you make these fabulous sandwiches.  First you need a pork tenderloin.  I buy mine at Aldi's.  They are only $3.99 for a plain tenderloin and you can make 5 or 6 sandwiches from one tenderloin.  (I cooked two whole tenderloins for dinner.  Yeah.  That looks like a lot until you have a lot of guys eating.)  You also need a meat mallet or a heavy cast iron skillet to flatten the individual portions out.

This is a pork tenderloin.
It will have what is called silver skin on some of it like pork ribs do.  Remove it with a sharp knife.  Cut the tenderloin into medallions about 1.5 inches thick,   I got 6 portions out of each tenderloin.
If you are having a bad day or feeling frustrated, here is where you can have some fun!  It's time to pound away until each medallion has been flattened and is really thin.  It's really cheap therapy!  Make sure you have something under them like a cutting board so you don't damage your counter tops.
Wow, I felt so relaxed after all that pounding.

Now, it's time to  make your "breading".  I use flour, egg mixed with milk, and crushed saltine crackers.  To crush the crackers, you can do it in a blender or food processor if you have one, but I do it this way.  I place an entire sleeve of crackers in a gallon sized zip lock back and use my wooden rolling pin to crush the crackers until they are a really fine consistency like bread crumbs.  It only takes a few minutes and you don't have to wash a food processor or blender.

Next, you need a breading station.  Did I take pictures?  Of course not.  Remember, we eat this food, it is not for a magazine display (I wish), so I get engrossed in what I'm doing and forget to take pictures.  Life can be difficult sometimes, hey?  Anyway, I use 3 of my antique Corning ware bowls that are square and flat on the bottom.  In one, I place all purpose flour.  In the second one, I crack two eggs and add about 1/3 cup milk and whisk it until well mixed.  In the third bowl, I put my cracker crumbs.

Time to start the ritual - the breading process.  Put a large saute skillet on the stove and put about an inch of vegetable oil in it and let it start getting good and hot.  Unlike Paula Deen, sadly I do not have a deep fryer built into my kitchen, so a skillet it is.  You want the oil to ripple, that's when you are ready to fry.

While the oil is heating, lightly salt a cutlet, dredge each side in flour, egg wash, and cracker crumbs.  Put them in a container (like a plate), until you are ready to fry.  When the oil is ready - go!
You will cook the cutlets approximately 3 minutes on each side, or until they are golden brown.  Turn the cutlets when you can see the edges turning brown on the side that is in the hot oil.  It's really easy.  This is how they look when finished.
Just look at the beautiful golden color.  They are not only good to look at, they are crispy, crunchy on the outside and super tender on the inside.  Now, you want to dress them "old school".  I like them with lettuce, tomato, dill pickles, mayonnaise and just a little dijon mustard.  That's my way.  I put all the condiments out and everyone fixed theirs the way they like it.
Put these on a nice fresh bun, decorate it to your liking and dig in.  Yes, they are twice as big as the bun.  That's the way they were back in the day.  I wish you could have been here to enjoy these with us, they were fabulous if I do say so myself.

We didn't have to get in the car and drive around for hours just to get one although that was most of the fun.  You can do these at home in your own kitchen and eat as many as you want for the price of one sandwich at most restaurants.  I know you are drooling just looking at this.  I know you want one.  Do it.  Make these.  You are going to love them!  Try on some "old school", you're gonna like it.

Everyday Donna

Things to Remember:

Everyone will have their "good old days."  You know, like when we walked to school up hill both ways in a foot of snow?  Oh, you don't remember those days?  You will.  Trust me.  Just wait.  donna


Wednesday, August 29, 2012

I Know You Want One Of These German Chocolate Cake Bars!

Yesterday we did healthy, today not so much.  This has been a two dessert recipe week.  Why?  Because it just seems like that kind of week and Labor Day Weekend is coming up.  You may be celebrating that last big hurrah of summer with family and friends and you need dessert for a celebration.  Right?  If you don't want to try the Apple Pie Bars from earlier in the week, try these over the top fabulous German Chocolate Cake Bars.

This dessert is going to knock your socks off if you've never made it.  It's got all the good stuff like chocolate, coconut, nuts, chocolate chips, sweetened condensed milk, chocolate.  Did I mention chocolate?  Just in case I forgot, it's got chocolate and is it ever good.

Blame Pinterest, friends, it's all their fault.  I start looking through all the posts late at night and there is one good recipe after another and I am just happily pinning away.  What's the use of pinning if you don't make some of these delectable treats.   It just becomes a past time.  Me, I am all about jumping in with both feet and giving these recipes a try.

There have been a couple that were not keepers, but for the most part they have all been really good.  These German Chocolate Cake Bars are the bomb.  Seriously, the bomb.  The only flaw I can find is that the recipe uses a Devil's Food Cake Mix and next time I might use a German Chocolate Cake mix just to get a more German chocolate taste.  Don't get me wrong, the Devil's food is really, really good.  It was just not really German chocolate.  If you don't know, it's really not German chocolate, but German's chocolate which is a brand name.  Through the years, it has come to be known as German chocolate.  Just a bit of trivia for you.  You can buy German's chocolate at the grocery in the baking aisle of you want real German's chocolate.

This recipe originally came from your friend and mine, Paula Deen.  Now we all know Miss Paula knows a knockout dessert and they are always worth a try.  Try it I did and it is definitely a keeper.

Here is what you need:

1 box Devil's Food Cake Mix (or German Chocolate Cake Mix)
1/2 cup melted butter
1 large egg

1 14 oz can sweetened condensed milk
1 tsp vanilla
1 large egg
1 cup chopped pecans
1 cup shredded coconut
1/2 cup semi sweet chocolate chips  (I used 1 cup, cause why not?)

Preheat oven to 350 degrees.  Grease a 9x13 pan.

Mix cake mix, butter and egg.  Press in bottom of pan.  Do not press up the sides of the pan.  Bake 7 minutes.

While the base is baking, mix the filling.  Mix sweetened condensed milk, vanilla, egg and nuts.  Pour evenly over warm crust .  Sprinkle with chocolate chips.  Use 1 cup if you really like chocolate (and we do)!

Bake 24-30 minutes until light golden brown.

Cool completely before cutting into squares.
I mean, look at all those chocolate chips!  Who wouldn't want that many?  If you only want 1/2 as many, that's your choice, but the full cup made it really awesome.  Of course, we all had a little scoop of vanilla bean ice cream on ours just in case you want to give that a try.

Thank you Paula Deen.  You did not fail to deliver one more decadent, totally unhealthy dessert for our enjoyment.  Give these a try, you will be glad you did.

Everyday Donna

Things to Remember:

“All you need is love. But a little chocolate now and then doesn't hurt.” 
 Charles M. Schulz


Monday, August 27, 2012

As American As Apple Pie Bars

Good Monday to you one and all.  Hope your weekend was enjoyable.  Here were are in the last few days of August already.  Where has the time gone?  Seems as though it was just the beginning of summer and we are now in the waning days.

This summer has been an amazing year for peaches and we have certainly enjoyed our share of wonderful desserts made with them.  When I was at the Farmer's Market last week, lo and behold, apples are starting to come in.  Big, beautiful Granny Smith and Golden Delicious apples, oh my.  I know that Granny Smith's are supposed to be better for baking, but our favorite is Golden Delicious.  Slightly tart, slightly sweet, and much better for eating if you just want to enjoy a nice juicy apple.

Needless to say, I had to buy a basket of these beautiful apples.  They were huge, so I shared them with our daughters because the grandsons love a good apple too.  The remaining apples were destined for a dessert that I have been making since 1990, when I purchased a little cook book published by Land O Lakes  - you know the butter right?  It's a collection of favorite cookie recipes and they are outstanding.   My favorite recipe in the book is for apple pie bars which may be better than any apple pie I have ever eaten.  Dan is not a fan of apple pie (I know, I know), but he really likes these.  He is a bit averse to cooked fruit (the texture) and these are not as thick as apple pie.  I think that is why he likes them, that and all the wonderful cinnamon flavor.  Yum, yum.

They do take a little more effort than some cookie bars because you make a crust like apple pie, but it is really worth the effort!  They are baked in a 15x10x1 inch jelly roll pan, so you have to roll the crust to fit the pan, but that is the most difficult thing about the recipe.  Here is what you will need.

Ingredients:

Crust

Milk
1 egg yolk (reserve egg white)
2 1/2 cups all purpose flour
1 tsp salt
1 cup Land O Lakes butter, softened

Filling

1 cup crushed corn flake cereal
8 cups peeled, cored, 1/4 inch sliced tart cooking apples (about 8-10 medium)
1 cup granulated sugar
1 1/2 tsps ground cinnamon
1 reserved egg white
2 tablespoons granulated sugar
1/2 tsp ground cinnamon

Glaze

1 cup powdered sugar
1 to 2 tablespoons milk
1/2 teaspoon vanilla

Heat oven to 350 degrees F.  For crust, add enough milk to egg yolk to measure 2/3 cup; set aside.  In medium bowl, combine flour and salt.  Cut in butter until crumbly.  With fork, stir in milk mixture until dough forms a ball; divide into halves.  Roll out 1/2 of the dough, on lightly floured surface, into a 15 x 10 inch rectangle.  Place on bottom of ungreased 15x10x1 inch jelly roll pan.

For filling, sprinkle crushed cereal over top of rolled out dough in the pan.  Layer apples over cereal.  In small bowl, combined 1 cup granulated sugar and 1 1/2 tsps ground cinnamon.  Sprinkle over apples.
Roll remaining 1/2 of dough into a 15 1/2 x 10 1/2 inch rectangle; place over apples.  (It will be lumpy, but will smooth out when apples cook down).  In small bowl, with fork beat egg white until foamy; brush over top crust.  In another small bowl, stir together 2 tablespoons granulated sugar and 1/2 teaspoon cinnamon; sprinkle over crust.  Bake for 45 - 60 minutes, or until lightly browned.

For glaze, in small bowl, stir together all glaze ingredients.  Drizzle over warm bars.  To make drizzling easy, put the glaze in a small zip lock bag, snip off a corner, and drizzle by squeezing the bag.
Cut into bars and enjoy.  I cut them more into a square than a bar because we like a nice dollop of ice cream on ours.  If you cut into bars, you will have about 3 dozen.  It's your choice.  These are so extraordinarily good, that you won't mind the effort to make them one little bit.

The awesome thing is, you can eat them without a plate or fork, unless you are enjoying them with some ice cream!  It's so much easier than eating apple pie.  If you want to make your family, friends or co-workers super happy, make a batch of these bars and share!   They are a party in your mouth that will make everyone happy and they make your house smell heavenly while they are baking.

Give this wonderful autumn dessert a try.  You will be so glad you did.

Everyday Donna

Things to Remember:

As American as baseball, hot dogs, apple pie and Chevrolet - 1970-s marketing jingle.