Showing posts with label flour. Show all posts

Thursday, November 7, 2013

Pumpkin Cream Cheese Muffins

 Why does fall simply scream for you to make things from pumpkin?  And, why is pumpkin so good?  And why are these muffins so super fantastic?  Let's see.  Because it's fall, they are made from pumpkin AND cream cheese and they are amazing.  Does that explain it?

This week was parent teacher conferences at our grandsons' school.  Mom needed help while she went to the conferences, so they stayed here with Grandma.  We had a lot of fun.  I taught them how to play Red Light, Green Light, Mother May I?, and Hide The Thimble.  There was also hide and seek and I Spy.  We had a lot of fun.  The also wanted to bake muffins, so we did.  The 7 year old picked this muffin off my Pinterest board.  We got to it and baked away.  Ever let a 3 year old crack the eggs?  I'm just sayin'.

This recipe makes 24 muffins.  That's a lot of muffins, so they took a good portion of them home so that Dan and I didn't eat them all.  The recipe is from Annie's Eats.  Here is what you need"

Filling

8 ounces cream cheese
1 cup powdered sugar

Muffins

3 cups all purpose flour
2 tsp cinnamon
1 tsp ground nutmeg
1 tsp ground cloves
1 tsp salt
1 tsp baking soda
4 large eggs
1 1/2 cups sugar
1 15 ounce can pumpkin puree
1 1/4 cups vegetable oil

Topping

1/2 cup sugar
5 TBSP flour
1 1/2 tsp cinnamon
4 TBSP cold butter, cut into small pieces

Preheat the oven to 350 degrees Fahrenheit.  Spray muffin tins with cooking spray or put paper cups in each muffin well.

To make the filling, mix the cream cheese and powdered sugar with a mixer until well blended.  Set aside.

To make the muffins, combine the flour, spices, salt, and baking soda.

Combine the eggs, sugar, pumpkin, and oil with a mixer until well blended.  Add dry ingredients.  On low, mix just until blended.

Fill each muffin cup with just enough batter to cover the bottom of each well or paper (about 1 TBSP).

Scoop a small amount of filling (about 1 heaping tsp) into each muffin cup over the batter.  Top with remaining batter covering cream cheese completely.

Make the topping by mixing all the ingredients together.  Cut the butter in with a pastry cutter or a couple of knives until blended.   Sprinkle on topping.

Bake 20-25 minutes.  Cool completely before serving, as cream cheese center will be hot.


It will take all your will power to not eat as many of these at one time as you can.  Trust me.  Just look at the center of these muffins.  Yum.
My daughter said she ate 3 in one day, so just be warned.  I am not kidding when I say you will have a hard time staying away from these.

With Thanksgiving just around the corner, and then the Christmas holidays, you will certainly find an occasion or two to make and serve these.  Give it a go.  They are so worth it.

Everyday Donna

Things to Remember:

"Oh how we love pumpkin season.  You did know this gourd-ish squash has its own season, right?  Winder, Spring, Summer, pumpkin...We anxiously anticipate it every year."  Unknown


Monday, October 7, 2013

Pumpkin Streusel Coffee Cake


Oh what a glorious Monday today.  It was a perfect 66 degrees with amazing cerulean skies and it really felt like fall for the first time.  I could do this weather every day.  What's not to love about it?  We worked outside all day and it was absolutely perfect.  Pure bliss.
 
This weather definitely puts me in the mood to bake and cook.  I had the urge for something sweet, perhaps made with pumpkin (it is fall after all) and I  used this recipe that I found on Allrecipes.com.   This is an amazing coffee cake with a lovely streusel on the bottom and a brown sugar glaze on the top.  It has the taste of a pumpkin spice cake which is one of my all time favorite cakes and it is easy to bake.  Yes, the perfect recipe.

This cake can be baked in a tube pan or a bundt pan, whichever you may have.  I love bundt cakes, so I went that route.  Easy peasy.  Here is what you need.

1/2 cup butter, softened
1 1/2 cups sugar
1 15 oz. can pumpkin
3 large eggs
2 1/2 cups flour
2 tsp baking powder
1 TBSP cinnamon
1/2 tsp ground cloves
1/2 tsp salt

Streusel Topping

1/4 cup flour
1/4 cup sugar
1/4 cup light brown sugar
1/2 tsp cinnamon
2 TBSP butter, melted
1/3 cup chopped nuts (I used walnuts)

Preheat the oven to 350 degrees Fahrenheit.  Spray the bundt pan with cooking spray and set aside.

Beat the butter and sugar on medium with a mixer until well blended.  Add the pumpkin and eggs.  Mix thoroughly.  In a medium bowl, combine the dry ingredients.  Add to the pumpkin mixture.  Mix on medium until combined.  Pour into prepared pan.

Make the streusel topping by combining all the ingredients.  Sprinkle over the cake batter.  Bake at 30 degrees for 50-55 minutes until a toothpick comes out clean.

Cool about 15 minutes.  Make the brown butter glaze while the cake cools.  Invert cake on a plate.

Brown Butter Icing
1 1/2 TBSP butter
1 1/2 cups powdered sugar
2 TBSP milk

Put the butter in a saucepan and melt on medium heat, letting it cook until it bubbles and browns, continuously stirring.  Don't let it scorch.  As soon as it browns, remove from the stove and pour into the powdered sugar.  Stir.  Add milk 1 TBSP at a time.  I only needed 1 TBSP.  Pour over cooled cake.  Serve.

This cake is soooooo delicious and it was very hard to eat only one piece.  It's perfect with a cup of coffee.  It would also be lovely with hot tea or hot apple cider and it just screams fall.  Mm mmm mmmm.
We ate this cake for dessert, not just for breakfast or with coffee.  Deeeeeelicious!  Our grandsons LOVED it.  It is worth making.  Give it a try and let me know what you think.

Everyday Donna

Things to Remember:

I'm pretty sure the secret to world peace is hidden somewhere in the smell of coffee and baked sweets.  Unknown

(What a great quote!)


Monday, September 30, 2013

Apple Praline Bread - Double Yum!

 Monday, Monday.....you know what the song says. (Bet you are singing it right now.)   I looked up the top 10 songs about Monday and not one of them has a positive title.  The closest one is Manic Monday.  The rest are pretty much downers.  On top of that, it is the last day of September.  Where did that month go?  Wow. Welcome October!

We are tired today.  We spent Sunday helping our best friends from our home town move into their new place right down the street from us.  (Yay!)  Thankfully, it did not pour down rain all day as predicted.  There were a couple of light showers off and on and that was it!  There was plenty of good help and things went fast and smooth.  Awesome.

In order to make their day easier, I fixed brunch for everyone.  We had Chinese Eggs, fruit salad, sausage gravy and biscuits, hash brown potatoes fried with onions, Amish cinnamon bread and this wonderful apple praline bread.  (You can find several of these recipes on my blog.)  I had never made this recipe before, but had pinned it to my Pinterest board for a future "must try." Apples are starting to come in now and I had some fresh from the Farmer's Market so I gave the recipe a try.  Yes, it is a keeper.

It is soooooooo good.  The only thing I would add to the recipe is some cinnamon - mainly because I like the taste of cinnamon and it goes quite nicely with apples, but it is not necessary.  Here is what you need to make this super yummy bread:

1 cup sour cream
1 cup brown sugar
2 eggs
2 tsp vanilla
2 cups flour
2 tsp baking powder
1 1/2 cups peeled apples, finely chopped
1 cup nuts - walnuts or pecans, chopped
*Optional, 1.5 tsp ground cinnamon

Praline Sauce

1/4 cup brown sugar
1/4 cup butter
1/4 cup chopped nuts

Preheat oven to 350 degrees Fahrenheit.

Grease and flour a 9x5 loaf pan.  Set aside.

Use an electric mixer to mix sour cream and brown sugar until well blended.  Add eggs and vanilla.  Mix.  Add flour and baking powder.  Add apples* and nuts.  Pour into prepared loaf pan.

Bake for 1 hour until brown and toothpick inserted in center comes out clean.  (My oven bakes right to temp and it took 1.5 hours for this bread to bake.  Just a little FYI so you don't panic if it's not done at 1 hour.)

After the bread cools, remove from pan and make the praline sauce by putting the butter and brown sugar in a sauce pan.  Cook over medium heat until it bubbles for about 1 minute.  Remove from stove and add nuts.  Pour over cooled loaf of apple bread.  Try not to eat it all at once.


* Be sure and drain any liquid from the chopped apples before adding to the bread.
Yum, yum, yum, yum, YUM!  So good.  This recipe was from a site called Ziplist.com.  You really might want to give this recipe a try, especially while apples are so good and plentiful.  Dan loves apples but doesn't like cooked apples.  He did like this bread a lot.  (He called it cake.)   Whatever you want to call it, I call it delicious!  This is one more recipe that will go in the fall/winter rotation of breads that are delicious for breakfast, brunch, or anytime - especially with a good cup of coffee.  Come on October!

Everyday Donna

Things to Remember:

I can't tell you enough about cinnamon.  Cinnamon is an awesome spice to use and it goes great with something like apples in the morning, or in a mixture of fruit, or in your oatmeal, or even in your cereal.  Emeril Lagasse  

- or in your apple praline bread!  It would kick it up a notch for sure.  donna


Monday, September 16, 2013

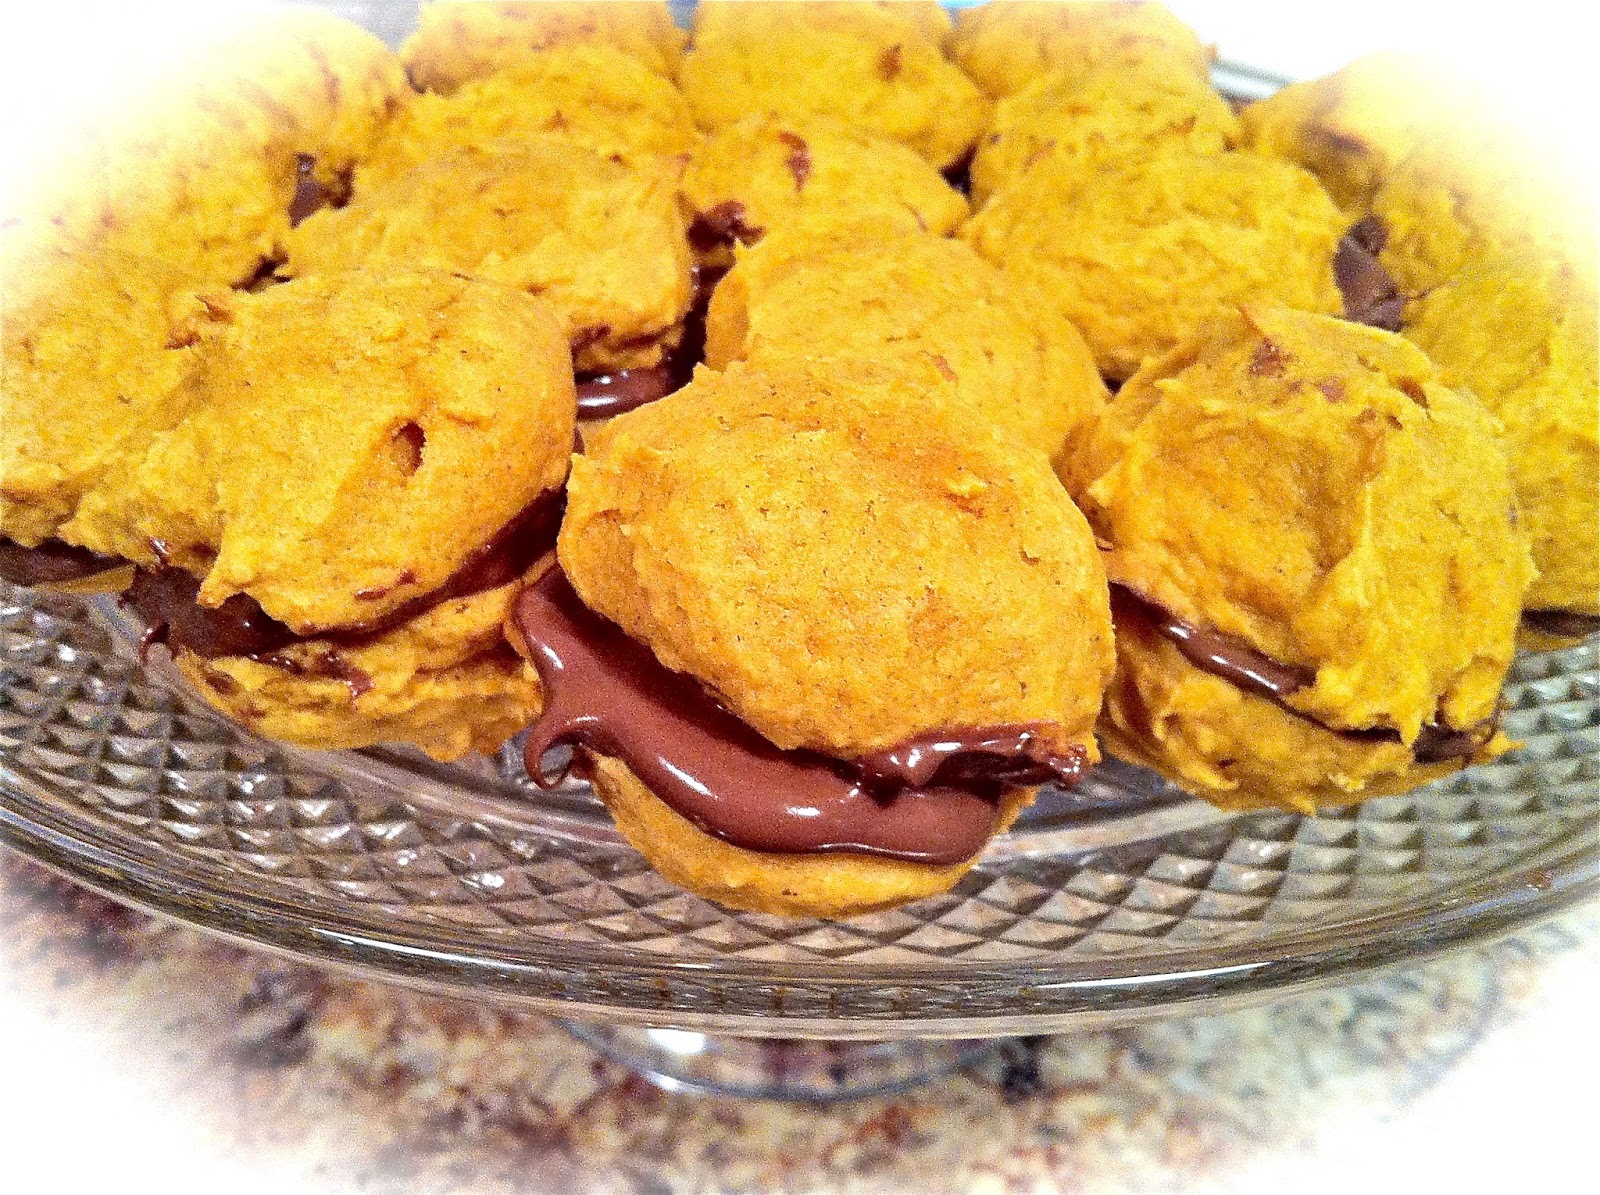
Pumpkin Whoopee Pies With Nutella - YUM!

 Happy Monday, September 16.  It is 7:16 pm and outside it's dark.  That means summer is definitely on the wane and the days are getting shorter, BUT it also means that fall is approaching rapidly.  Yippee!  Do you like fall as much as I do?  The changing leaves, the cooler temperatures, pumpkins, Indian corn, cider, bonfires, apples, sweaters, colorful mums, Halloween and Thanksgiving.  There are so many wonderful things about fall.

Starbucks has their pumpkin spice coffee drinks available and that is the first official "call to fall".  Everyone gets excited when pumpkin spice drinks return.  Therefore, it is okay to start making any and all things pumpkin.  Starbucks gave the go ahead.

I got my new Food Network magazine last week and it has a lot of fabulous recipes or fall.  I wanted to start making them all.  Inserted in the magazine is a little booklet with 50 things you can make from canned pumpkin!  Fifty, five oh, 50.  Wow!!  That is more than exciting and as I perused it I couldn't decide whether to start with #1 and work my way through or - ding, ding, ding, hold the phone.  How about #42 and #43 to start?   It's a pumpkin cookie recipe that can be made into whoopee pies filled with - OH MY - Nutella.  Guess where I started?  You guessed!!  You are a sharp cookie (no pun intended).

Sometimes a recipe just jumps out and says make me now.  Do you ever have that happen?  So, I did.

Here is what you need:

6 TBSP softened butter
1 1/2 cups sugar
1 cup canned pumpkin *see note below
1 egg
1 tsp vanilla
2 cups flour
1 tsp baking soda
1 tsp cinnamon
1/2 tsp salt

Beat the softened butter and sugar with a mixer until fluffy.  Beat in the pumpkin, egg, and vanilla.  Whisk the flour, baking soda, cinnamon, and salt together.  Stir into the pumpkin mixture.

Drop by tablespoons full onto an oiled baking sheet.  Bake at 400 degrees Fahrenheit for 12 minutes; cool.


If you want to eat the cookies, you can make this glaze.

1/2 cup confectioners sugar
1 TBSP milk  - mix together, spread on cookies

OR, if you want to make them into whoopee pies, do not glaze the cookies.  Spread the bottom of one cookie with Nutella and place the bottom of another cookie on top.  You now have a delectable little sandwich made of delicious pumpkin cookies with Nutella spread in the middle to hold them together.  Now, I can't pass this up - whoopee!   This recipe made 36 cookies or 18 whoopee pies.

*I will tell you that I hated to leave that bit of pumpkin in the can since the recipe called for one cup of pumpkin, so I added the whole can to the recipe which probably made the cookies a little softer than they would be if you followed the recipe exactly.  The texture is somewhat like gingerbread, very soft and delicious and oh so good with that lovely dollop of Nutella in the middle.  They are especially good with a cup of coffee and they just scream fall y'all.

It's hard to decide what to make next.  Maybe the pumpkin bread pudding made with cinnamon raisin bread, or maybe the cheesecake pie, or maybe.........   Whatever it is, I will share the recipe with you when I make it.  In the meantime, give these a try.  They are pumpkinlicious.

Everyday Donna

Things to Remember:

What do you get if you divide the circumference of a pumpkin by its diameter?  Pumpkin pi!


Tuesday, September 10, 2013

Cheesy Macaroni With Chicken and Spinach

Do you have picky eaters in your family, especially children who are suspect of any food that has the color green to it?  Will they eat salad, or raw vegetables of any kind?  We were fortunate.  Our children were all adventurous eaters who loved crudite, salad, most every vegetable.  One of them didn't like green peas, and one of them didn't like lima beans.  Other than that, they would eat about anything.

Our grandsons on the other hand, do NOT fall into that category.  We have two who are pretty good eaters, two who are middle of the road, one who is only 18 months old and finding his way in the food world with a few texture issues and one who is suspect of any and everything that isn't "white".  Do you know what I mean?  He likes chicken, pasta, cheese, eggs, he will eat shrimp oddly enough, fish, turkey, rice - do you see the pattern here?  He just turned 10 and he has been like this since he was a little bitty fella.

I have seen him gag and retch at things his mother would make him taste and it was downright comical at times.  When he was about 4 his mother made him taste canteloupe during dinner.  I truly wish I had a video of his facial contortions, his gagging, shivering, and complaining.  Yes, he would literally shiver every time he got the canteloupe close to his mouth.  After probably 20 minutes, he finally licked it and I thought his dinner was going to end up on the table.  You know that "pre sound" that comes with regurgitation?  Yep, that's the one.  It still makes me laugh to think about it.  To our daughter's credit, she makes him try.  The pronouncement is usually, thanks, but I'll pass.

Their pediatrician said these are what they call "the white" kids who are suspect of colored foods and they think it is an evolutionary thing from the hunter/gatherer times when men did not always know which foods were edible.   Makes sense, but it does not make feeding such children easy.

All that was to say H will eat this dish AFTER he picks the spinach out.  He loved it otherwise and so did the other boys.  It is cheesy, and filled with chicken and pasta.   Perfect.  I added the spinach for some color and extra nutrition.  H is the only one who picked the spinach out, so you might luck out and get your family to eat it with the spinach.  You never know.

I made this dish using one of the herbed chickens I wrote about in my blog on August 19.  You can find the recipe there.  Or, you could use a rotisserie chicken from the grocery or cook the chicken breasts like in the recipe.  It is a great way to use leftover chicken.  The original recipe came from AllRecipes.com.  Here is what you need:

3 TBSP butter
salt and pepper
1/2 pound pasta (penne, fusilli, or bow tie, cooked al dente)
2 - 3 boneless skinless chicken breasts or leftover chicken from a rotisserie or roasted chicken
1/4 cup + 1 TBSP flour
3 cloves garlic, minced
3 cups milk
3/4 cup shredded mozzarella (I used one ball of fresh mozzarella from Aldi's)
3/4 cup grated parmesan cheese
2 cups fresh baby spinach

Preheat oven to 400 degrees Fahrenheit.  Spray a 9 x 13 baking dish with cooking spray.

Cook pasta in boiling water just until al dente, drain and put aside.

If you are cooking chicken breasts, season the chicken with some salt and pepper and put some olive oil in a medium skillet.  Cook the chicken until it is no longer pink.  Remove and let sit for about 5 minutes.  Slice thin.  Put aside.

In a medium pot, melt the butter and add the flour and garlic.  Cook about 1 minute to cook out the raw flour taste.  This makes your roux for the sauce.  Gradually add the milk, whisking continuously until thick.  Stir in the cheese and whisk until melted and sauce is smooth.  Remove from heat and add the pasta.  Pour into the prepared baking dish and add the chicken.  Add the fresh spinach and stir to incorporate the chicken and spinach.

Bake uncovered for 25 - 30 minutes until golden and bubbling.  Remove from oven and serve.

This is soooooooooo good.  The sauce is amazing with the mozzarella and parmesan.  One of the best mac and cheese type recipes I have found.  Yum.  Yum.  Yum.  The only thing I might add next time are some crushed red pepper flakes for just a little zing.   Feel free to leave the spinach out if you have eaters who are suspect of green things in their food.  Or, add some broccoli if they would prefer that, or green peas.   Spinach was just my addition and we loved it.  Next time, I might try another vegetable.

Serve this with a nice green salad and you have a complete meal.  Oh, maybe some crusty bread too.  Oh yeah.

This recipe is super easy to prepare, especially if you have some chicken on hand that is already cooked.  It reheats beautifully.  We had leftovers the next day and it was just as good as the first day.
Give this recipe a try.  I think it will be quite a hit.

Everyday Donna

Things to Remember:

Dude, macaroni and cheese if the food of the gods!  Haley James Scott


Monday, June 3, 2013

Fresh Peach and Blueberry Bread - Delicioso!

 Here we are in the first week of June already.  This year is flying by.  Today, we got to attend our 6 year old grandson's "bridge" ceremony which is a Waldorf education celebration of moving from kindergarden to the halls of higher learning, better known as first grade.  As I watched him cross the bridge from the land of childhood, play, and imagination, into the land of higher learning where the road to maturity begins, my heart was filled with joy.  The teacher told a beautiful story about the land of the littles and what it was like before they chose their families and came to earth - the beautiful blue and green world of plants, animals, and minerals.  As they crossed the bridge, the teacher gave them a key to wear around their necks (the key to higher learning) and a small bag containing a gift from the animal, plant, and mineral world.  Then they received a yellow rose and joined their families.  There were tears (just in case  you wondered).  It was a wonderful way to start the week.

We had a busy weekend.  My sister, Sara, and our longtime friend, Linda, came to visit for the weekend.  We toured the city, ate a lot of good food, and even did some honky tonkin' on Broadway here in Nashville.  There is so much good music going on in this town.  Talk about a fun way to spend Saturday afternoon.  If you ever come to the city, do NOT miss all the music.  Nashville is Music City, USA, after all.

Knowing they were coming to visit, I baked some goodies to have on hand.  First, I made two fresh strawberry pies which I will write about tomorrow.  Since fresh peaches are coming in from Georgia, I had some on hand that I had purchased at the Nashville Farmer's Market.  Now, there is always that conundrum of what to do with peaches after you make a cobbler, or slice some up to enjoy on cake or with ice cream.  You can always eat one whole (peeled I hope, peach skin makes me shiver), but there has to be many more things you can make with sweet, ripe, juicy peaches.

I found this recipe for peach/carrot bread on All Recipes.com.  The recipe sounded so good, but I didn't know how I felt about peaches and carrots and I really didn't want to stand and grate carrots.  Personally, I prefer peaches and blueberries.  I often add blueberries to my peach cobbler because they complement each other so beautifully.  I had blueberries on hand, so I substituted blueberries for the carrots.  Guess what?  It works!  It works superbly!!  This bread is awesome!!!!  Here is what you need.

3/4 cups chopped pecans
2 1/2 cups all purpose flour
3/4 cup sugar
1 tsp ground cinnamon
3/4 tsp baking soda
1/2 tsp salt
1 1/2 cups peeled, chopped fresh peaches
3/4 cup fresh blueberries
2/3 cup vegetable oil
1/2 cup milk
2 large eggs lightly beaten

Mix all the ingredients together in a large bowl using a spoon.  Pour the batter into a 9 x 5 loaf pan that has been lightly greased and floured.  Place in a 350 degree preheated oven and bake for 1 hour and 5 to 10 minutes.  Test the center of the loaf with a skewer in the center until it comes out clean.

Remove from the oven and let cool before removing from the pan.
This recipe makes a very large loaf.  It fills the loaf pan to the top when baked, so be sure and bake it until very done in the center.  I took mine out at 1 hr 5 minutes and tested it with a toothpick.  The toothpick showed clean, but the bread was a little underdone in the center when we ate it.  (I would recommend a skewer instead of a toothpick so it goes down into the loaf further.) No one seemed to mind one bit though.  Everyone had several pieces in fact.  This is DELICIOUS!
You can see the peaches and the blueberries, and the pecans add a nice texture to the bread with that lovely hint of cinnamon.  Mmm.  Mmm.  Mmm.  It's sort of like baked peach cobbler without having to make a crust.

There will be fresh peaches from now until the first part of September.  Here is a recipe  you can use that is something different, easy, and soooooo good.  Makes some loaves and freeze them.  It is awesome for breakfast or brunch.  Fabulous with coffee.  If you want to try the carrots, just use 3/4 cups grated carrots in place of the blueberries.  If you make it that way, let me know how it turns out.  We will stick with the blueberries.

Everyday Donna

Things to Remember:

It's nice to have some home baked goods for company.  It let's them know you thought of them and wished to honor them with something from your hands and heart.  donna


Tuesday, May 28, 2013

Spiced Pecan Cake


Happy Tuesday everyone!  Has it seemed like Monday all day to you?  It sure has to me!  Those Monday holidays mess up my week, especially since I don't go to work everyday.  Sometimes I have to look at my phone to see what day it actually is.

Hope you all enjoyed your Memorial Day weekend.  We celebrated with family and friends with a cookout enjoying the first of the summer bounty from the Farmer's Market.  Fresh strawberries, corn, green beans, and peaches are in.  Yum.  One of the most enjoyable things about summer is the bounteous fare of fresh fruits and vegetables we get to enjoy.  And, then, there is the beautiful sunshine, warm weather, and summer evenings to top it all off.

Fresh local strawberries are the absolute best don't you think?  It's nice to have access to strawberries all year round, but they just don't taste like the smaller, juicier, sweeter, local berries.  They are just a little taste of heaven as far as I am concerned.

I made this beautiful pecan cake with some of the fabulous pecans my new friend Dianna sent me from Texas.  They pick them up off the ground by the pounds.  There are pecan trees everywhere in the Dallas area.  Yes, I said pounds. Wouldn't that be wonderful?  My daughter told me there is a company you can take them to and they shell them for you.  Amazing!  Who knew?  It's sure better than cracking hundreds of shells and trying to get the nuts to come out in something other than little tiny pieces.  Look at these beauties!
We have bags of them to enjoy.  Lucky us!  So, I decided to make this fabulous pecan cake I found on Food Network.com.  The recipe was posted by Pat and Gina Neeley and is really, really good.  Makes a super "shortcake" for fresh fruit.  Here is what you need:

Filling

1 1/4 cups chopped pecans
3 Tbsp brown sugar
1 1/2 tsp cinnamon

Stir everything together in a bowl until all the nuts are coated.  Set aside.

Glaze:

1 1/2 cups powdered sugar
2 Tbsp lemon juice
2 Tbsp milk

Combine all ingredients in a bowl and set aside.

Cake

1 package golden yellow cake mix
1 cup sour cream
1/3 cup vegetable oil
1/4 cup sugar
2 Tbsp all purpose flour
4 large eggs

Preheat oven to 375 degrees, grease and flour a 9x13 pan

Beat all cake ingredients together for 4 minutes.  Pour half the batter into the prepared cake pan.  Spread the pecan filling on top of the batter.  Pour remaining batter over pecans, spreading batter to cover the filling.

Bake about 30 minutes until toothpick comes out clean.  Let cool 30 minutes.  Drizzle with glaze.

This cake is as good by itself as it is with some beautiful strawberries!  Makes a perfect "coffee type cake" that could be served for brunch.   Or, it's absolutely delicious eaten just as it is.  Give it a try.  It's delicious.

 Everyday Donna

Things to Remember:

 A special thank you to my dad and his two brothers who all served in World War II.  As a mother, I can't imagine seeing three of your sons go off to war.  What a sacrifice.  Fortunately, they all returned.  Others were not so fortunate.   Thank you will never be enough for their service and sacrifice for our freedom.

Tuesday, May 7, 2013

Cinnamon Bread, Picture Frame, Recipe, Gift


To welcome my friends from Texas, I wanted to make some gift bags with home made goodies they could enjoy in their hotel room.  You know what it's like to be hungry, or want a snack, and there is literally nothing to eat, or only expensive machines in the hall that have nothing you like and you have no change.

While "cruising" Pinterest recently, I had seen this idea which was so cool.  At least I think that's where I saw it.  Couldn't find it again.  Baked individual loaves of bread were tied to a picture frame containing the recipe for the attached bread.  Perfect for gift giving.  How great of an idea is that?  That was my starting point.  They would definitely be getting this awesome cinnamon bread that I had found at redflycreations.com.  This bread is amazing and so easy to make.

I found adorable picture frames to use for holding the recipe.  The recipe was all typed and ready to print.  The biggest problem was we were out of printer ink.  NOOOOOO.  So, I had to write out the recipes at the last minute.  
It may not be as neat as printed recipes, but it did the trick.  No one complained.

To their bags, I also added home made Mr. Goodbar Bites that you can find on my blog.  Basically, they are chocolate covered peanut mounds.  Yum.  There were some nice cups with lids and straws that could be used over and over that I filled with different flavors of Crystal Lite.  In addition, there was trail mix, peanut butter crackers and other assorted goodies.  Hopefully, all things they would enjoy.

The Texas Troupe arrived on Thursday evening.  We met them for dinner and I gave them their "welcome" bags.  They let me know they did enjoy them!  Linda had eaten her cinnamon bread before breakfast on Friday morning.  The others wanted to sample and she told them they would have to eat their own.  I don't think the Mr. Goodbar Bites lasted much longer.  They all came in drinking out of their cups, so all in all it was a rousing success.

To make the cinnamon bread, here is what you need:

1 cup butter, softened
2 cups sugar
2 eggs
2 cups buttermilk  (add 2 tsps. vinegar or lemon juice to regular milk if you don't have buttermilk)
4 cups flour
2 tsps baking soda

Cinnamon/Sugar Mix

2/3 cup sugar
2 tsp cinnamon
mix together in a small bowl

Preheat oven to 350 degrees Fahrenheit.

This recipe makes 2 large loaves or 1 large loaf and 4 small loaves.  Grease and flour loaf pans and set aside.

Cream together butter, 2 cups sugar and eggs.  Add milk, flour, and baking soda.

Fill prepared pans 1/2 (or slightly less) full with batter.

Sprinkle 3/4 of the cinnamon mixture over the top of the batter in the pans.  Add remaining batter.  Sprinkle with last of the sugar.  Swirl with knife.  (I forgot to do that, but it didn't make any difference - other than how it looks.)

Bake at 350 for 45-50 minutes or until toothpick comes out clean.  Cool 20 minutes.  Remove from pan.

Since I was giving these individual loaves as gifts, I left them in the disposable aluminum pans and wrapped them in a clear cellophane party bag and tied them to the picture frame with twine.

This.  Bread.  Is.  Beyond.  Delicious!  Oh my, it is so, so good.  We kept the big loaf and shared it during craft time on Saturday.  This is one I will make again and again.  Yummers.
When you need a gift, give a gift of home made love.  Bake your favorite bread and give the recipe with it.  Using the picture frame is such a great idea.  Then, they have a keepsake and something wonderful to eat.  Great idea for teachers, new mothers, neighbors, or anyone for that matter.

Also, you will definitely want to make this recipe for you and your family. They will LOVE it.  It won't last long and you will wish you had more.

Everyday Donna

Things to Remember:


In the sweetness of friendship let there be laughter, and sharing of pleasures.  For in the dew of little things, the heart finds its morning and is refreshed.     Khalil Gibran


Wednesday, February 27, 2013

Hand Breaded Pork Tenderloin How To - And You Will Want To

 Remember, I am from the "old school", better known as "the good old days".    I graduated high school in 1966 - a year most of you won't even remember.  As a matter of fact, most of you weren't even born then.  But let me tell you, we had a lot of fun back then.

We used to get in our cars (in my case, my parent's car), whether with friends or a date, and tool around town from one drive-in restaurant to another, visiting with our friends, eating, laughing, talking, cruising to see who was there, and then riding around some more.  Round and round from the Farmer's Daughter to Hamilton's Drive-In, out to the Double R, across town to Frisch's Drive-In and then back across town to the Parkway.  Then it was time to start the circuit all over.  Gasoline was $.24.9 cents a gallon.  Dan and I have cashed in many a coke bottle to go out on dates and buy gasoline.  Do you even know what it means to cash in coke bottles?  I know I'm old.  Sheesh.

Those were the days of carhops and window trays.  There were no drive through windows.  You pulled in to a parking place, placed your order on the speaker next to the car (each car had a speaker) and then a car hop - that was an employee of the restaurant - would bring your order out on a tray that attached to your car door.  You had to roll your window down for the tray to be attached.  Then, everyone ate in the car while all kinds of hilarity went on.  Yes, hilarity.  Those were some good times for sure.

Last week, a group of people I graduated high school with (back when dinosaurs roamed the earth) were on Facebook talking about who had the best breaded tenderloin sandwich in town.  I am from Evansville, Indiana, in case you wondered.  That was a major discussion and made me start thinking about those delicious sandwiches that all the restaurants had.  If you have never had a breaded tenderloin sandwich, you have NO idea what you are missing.  I'll take one over a hamburger any day of the week.

I had tenderloin sandwiches on my mind, so I decided to make some for dinner last night.  I have made them through the years and thought I would share how to make them, because you really, really want to make these.  They are crisp on the outside, tender on the inside and SOOOOOOOO delicious.  Our youngest son is 25 and he declared them fabulous.  Our houseguest Ken also LOVED them.  Tyler's friend Craig, who may be one of the pickiest eaters on the planet devoured his in about 3.4 seconds.  They all ate two HUGE sandwiches along with parmesan potato wedges and oven roasted Brussels sprouts that are to die for.  (I will tell you how to make those in another post.)

Here is how you make these fabulous sandwiches.  First you need a pork tenderloin.  I buy mine at Aldi's.  They are only $3.99 for a plain tenderloin and you can make 5 or 6 sandwiches from one tenderloin.  (I cooked two whole tenderloins for dinner.  Yeah.  That looks like a lot until you have a lot of guys eating.)  You also need a meat mallet or a heavy cast iron skillet to flatten the individual portions out.

This is a pork tenderloin.
It will have what is called silver skin on some of it like pork ribs do.  Remove it with a sharp knife.  Cut the tenderloin into medallions about 1.5 inches thick,   I got 6 portions out of each tenderloin.
If you are having a bad day or feeling frustrated, here is where you can have some fun!  It's time to pound away until each medallion has been flattened and is really thin.  It's really cheap therapy!  Make sure you have something under them like a cutting board so you don't damage your counter tops.
Wow, I felt so relaxed after all that pounding.

Now, it's time to  make your "breading".  I use flour, egg mixed with milk, and crushed saltine crackers.  To crush the crackers, you can do it in a blender or food processor if you have one, but I do it this way.  I place an entire sleeve of crackers in a gallon sized zip lock back and use my wooden rolling pin to crush the crackers until they are a really fine consistency like bread crumbs.  It only takes a few minutes and you don't have to wash a food processor or blender.

Next, you need a breading station.  Did I take pictures?  Of course not.  Remember, we eat this food, it is not for a magazine display (I wish), so I get engrossed in what I'm doing and forget to take pictures.  Life can be difficult sometimes, hey?  Anyway, I use 3 of my antique Corning ware bowls that are square and flat on the bottom.  In one, I place all purpose flour.  In the second one, I crack two eggs and add about 1/3 cup milk and whisk it until well mixed.  In the third bowl, I put my cracker crumbs.

Time to start the ritual - the breading process.  Put a large saute skillet on the stove and put about an inch of vegetable oil in it and let it start getting good and hot.  Unlike Paula Deen, sadly I do not have a deep fryer built into my kitchen, so a skillet it is.  You want the oil to ripple, that's when you are ready to fry.

While the oil is heating, lightly salt a cutlet, dredge each side in flour, egg wash, and cracker crumbs.  Put them in a container (like a plate), until you are ready to fry.  When the oil is ready - go!
You will cook the cutlets approximately 3 minutes on each side, or until they are golden brown.  Turn the cutlets when you can see the edges turning brown on the side that is in the hot oil.  It's really easy.  This is how they look when finished.
Just look at the beautiful golden color.  They are not only good to look at, they are crispy, crunchy on the outside and super tender on the inside.  Now, you want to dress them "old school".  I like them with lettuce, tomato, dill pickles, mayonnaise and just a little dijon mustard.  That's my way.  I put all the condiments out and everyone fixed theirs the way they like it.
Put these on a nice fresh bun, decorate it to your liking and dig in.  Yes, they are twice as big as the bun.  That's the way they were back in the day.  I wish you could have been here to enjoy these with us, they were fabulous if I do say so myself.

We didn't have to get in the car and drive around for hours just to get one although that was most of the fun.  You can do these at home in your own kitchen and eat as many as you want for the price of one sandwich at most restaurants.  I know you are drooling just looking at this.  I know you want one.  Do it.  Make these.  You are going to love them!  Try on some "old school", you're gonna like it.

Everyday Donna

Things to Remember:

Everyone will have their "good old days."  You know, like when we walked to school up hill both ways in a foot of snow?  Oh, you don't remember those days?  You will.  Trust me.  Just wait.  donna


Friday, February 1, 2013

Chocolate Macaroon Bundt Cake - A Superbowl Must

If you don't love coconut, read no further.  This recipe is not for you.  If you do love coconut, come on in  - this recipe has your name ALL over it.  If you like Almond Joy's, coconut bonbons, macaroons, or anything that has coconut in it you are going to love this cake.

By the way, you probably want to make this cake for Superbowl Sunday.  Why?  Because it is so good.  It's somewhat like "chocolate heaven on a fork" good.  It's like "where has this been all my life" good.  It's "why haven't I made this before" good?!   Did I say it was good?  Not.  Kidding.

I don't usually post on Friday night, but the last two days have been super busy helping Daughter #2 and her family move.  Whew.  What a job.  Grandma is T. I. R. E. D. today.    On top of that, it is cold here in middle Tennessee and it was a day for comfort food.  We have been grabbing things here and there between cleaning and unpacking.  Time for some home cooking.

Tonight, I made one of our favorites - Shepherd's Pie - and for dessert Chocolate Macaroon Bundt Cake.  Is it comforting?  In every conceivable way.  Is it easy?  Yes.  Is it fabulously delicious?  Oh my heaven's yes.   Here is what you need to make this treat:

1 Devils Food cake mix - make according to directions on the box

Filling

2 egg whites
1/2 cup sugar
2 cups sweetened coconut flakes
2 TBSP flour
2 tsp vanilla

Mix all together and put aside.  I used a whisk.

Glaze
1 cup powdered sugar
2 TBSP butter
2 TBSP milk
1 cup chocolate chips

slivered or sliced Almonds, optional

Put a sauce pan on the stove and melt the butter at medium low.  Add the chocolate chips, powdered sugar and 1 TBSP of milk at a time until the chips are melted the the glaze is thin enough to pour.  If you need a little more milk, add sparingly.

Preheat oven to 350 degrees F.

Make the cake mix according to directions on the box.  Pour half the batter into a lightly greased non-stick Bundt pan.

Use a tablespoon and drop mounds of the coconut filling all around the center of the cake batter, spreading it out evenly by lightly tapping with the spoon, making sure it does not touch the sides of the cake pan.  

Pour the rest of the cake batter over the coconut filling.

Bake for 45 minutes or until a toothpick comes out clean.  Cool in the pan for 20-30 minutes and turn onto a plate to cool completely.  Drizzle with the chocolate glaze.  Decorate with slivered or sliced almonds if you wish.  (I wished).

This is a view from the top.
Look at all that icing puddling in the center of the cake.  Yum.  Yum.

Now, a cross section of the interior of the cake.
Look at that super tunnel of coconut that is sweet, and chewy, and fantabulous.

Isn't it pretty?  Don't you want a piece?  If you were here, I would gladly share.  Since you aren't here, looks like you need to make one for yourself, your family, and all your friends.  They are going to LOVE, LOVE, LOVE it.  Don't you want to run your finger through those big puddles of chocolate at the base of the cake?  Come on, I know you do.  That's what icing is for.  MMMMMMMMMMMM.

In order to enjoy the food, er game, on Sunday, it would be nice to have a fabulous dessert to go along with all the other scrumptious food that will most likely be available.  Maybe you have to take a dish to a party, perhaps you are the host.   Either way, this is a wonderful cake that will make you happy no matter who wins.  Gooooooooo team!  Can't you tell I'm a major football fan?  I try, really I do.

Everyday Donna

Things to Remember:

I'm old enough to remember the first Superbowl and this year is #47.  I was 17 (do the math).   It was not the big deal it is today, with parties and food and celebration.  It really has developed into a phenomenon that is lots of fun.  Hope your team wins!  Enjoy the halftime show!  Eat some cake.


Tuesday, January 29, 2013

Bad Name, Great Recipe - Mud Hen Bars, Great for Super Bowl Sunday

This my friends is a Mud Hen Bar.  A What?  A Mud Hen Bar.  A what?  You read that correctly.  What exactly is a Mud Hen and why would anyone name something so delicious such an awful name?  I wish I knew.  Truly.  This is something you will want to make in the very near future.  They would be excellent for Super Bowl Sunday!  They are easy to make and so, so good.

I tried to do some research on why they would be named Mud Hen Bars, but with no luck.  Seems there are many people on the world wide web asking the same question.  Evidently the recipe has been around for years and years with no information about how the name came to be.  This is what I did find.  There is a Mud Hen, New Jersey, a minor league baseball team in Toledo, Ohio, named the Mud Hens, and a Mud Hen is a bird that lives in the marshes, is very round with long legs and has trouble launching itself into flight.  Now, I see no connection to any of these other than the fact that the original recipe could possibly have come from Mud Hen, New Jersey.  Even then, I think I would have come up with a better name.  Seriously, Mud Hen does NOT sound inviting in any way and they are really, really good!

I found this recipe on one of my favorite sites, Plain Chicken.  I read over the ingredients and knew these would be good because I have been making a cookie bar called Chinese Chews for years and they are somewhat similar. (I'll share that one some day).   Now there's another name - Chinese Chews.  Where did that name come from?  Makes you wonder and they are just as good as Mud Hen Bars.

Here is what you need to make these delectable treats:

1/2 cup butter (1 stick), room temperature
1 cup white sugar
1 whole egg
2 eggs separated
1 1/2 cups flour
1 tsp baking powder
1/4 tsp salt
1 tsp vanilla
1 cup semi sweet chocolate chips
1 cup mini marshmallows
1 cup brown sugar

Preheat oven to 350 degrees F.

First, beat the white sugar and butter together until creamy.  Beat in 1 whole egg and 2 egg yolks, keeping the whites for later.  Mix in the flour, baking powder, salt and vanilla.  Spread cookie batter into a lightly greased 9x13 pan.

Sprinkle the marshmallows and chocolate chips on top of the unbaked cookie crust.
(Are you thinking s'mores yet?  That's what I thought, but kind of yes and no.)

Beat the egg whites until stiff peaks form.  A stiff peak must stand on it's own.
Now, fold in the brown sugar.  This is your meringue.  Folding means stirring from the bottom up and over the top, not just mixing.  Be gentle.
Spread the meringue mixture over the marshmallows and chocolate chips.  Bake for 30 minutes.
It looks kind of flat when you first spread it on, but looks like this after it is baked.
That lovely merengue gets nice and puffy and brown and kind of crunchy.  Oh my.

Let cool in the pan and cut into squares.  Serve.  Try to keep from eating them all in one sitting.

These bars are sweet, I am warning you now.  But, holy cow they are good.  My only idea would be to add chopped nuts and maybe even some coconut if you like either or both.  Wowsa.  That would make them over the top good.

You have a nice layer of cookie base, just a hint of chocolate chip cookie, but not quite because of the melted marshmallows in the middle with the chocolate chips.  The texture of the meringue is heavenly with all that brown sugar in it.  They are chewy bars that you will just have to make to understand how good they are.

Yeah, you need to make these.  They would be a real hit for Super Bowl Sunday.  Dan LOVES them. If you're like me and don't really care about the game, but do love the good eats, these are for you!  They will make your day.

Everyday Donna

Things to Remember:

Even though the name is not particularly appealing for a recipe, don't pass it by.  Names can be deceiving.  ; )


Monday, January 28, 2013

Parmesan Chicken Sticks - Perfect For Super Bowl Sunday

Iiiiiitttttttt's Monday!  Again!  Hope your weekend was spectacular.  We spent ours at grandsons' (plural) basketball games on Saturday and helped our other daughter pack her house for their big move this week.  Have you ever packed to move with two little ones running around?  I have, and all the help you can wrangle is a major bonus.  Some to pack and some to chase children.  They are moving to a new house all on one level.  She is so excited.  No more flights of stairs to navigate with two little boys.   Talk about a workout.  Wow.

On Friday night, I felt ambitious and wanted to fix something different for dinner.  Don't you get tired of the same things all the time?  I sure do.  Well, that huge package of boneless, skinless chicken breasts  in the fridge looked like they were it whether they wanted to be or not.  I hunted around the net to see what I could find as far as recipes using chicken breasts.  One of the first places I always look is Foodnetwork.com.  Lots and lots of good recipes on there and Ina Garten, better known as the Barefoot Contessa, always has awesome recipes that are not hard, but always flavorful and delicious.  What did I spy, but a recipe for parmesan chicken sticks.  Sounded good to me!  I mean, who doesn't love chicken parmesan?   And, what to go with them?  Why my 3 cheese mac and cheese of course (made from scratch) and a recipe for zucchini cakes that I found on Pinterest a while back.  They are like potato pancakes made with zucchini and a tzatziki sauce to go with them.  Yum.  Yum.  Yum.

I put our youngest son to work grating zucchini while I prepared the parmesan chicken sticks.  They are really easy and oh my goodness delicious.  These would be perfect for Super Bowl serving!!  For Super Bowl you want some finger type food that guys will love and these certainly fit the bill.  Here is what you need:

1 1/2 pounds skinless, boneless chicken breasts (3 to 4 - I used 4 and had a mound of chicken sticks)
1 cup flour
1 tsp kosher salt
1/2 tsp freshly ground black pepper
2 extra large eggs
1 cup seasoned bread crumbs (I used Italian bread crumbs)
1/2 cup grated Parmesan
Unsalted butter
Good olive oil
Bamboo skewers 6-10 inches long, optional

Directions

Lay the chicken breasts on a cutting board and slice each diagonally into 4 or 5 large strips.  (The chicken breasts I had were very large so I got 6-7 strips per breast).  I also ended up doubling the breading recipe.

Combine the flour, salt, and pepper in a shallow bowl.  Beat the eggs with 1 TBSP of water in a second shallow bowl.  Combine the breadcrumbs and Parmesan in a third shallow bowl.  Dredge the chicken breasts on both sides in the flour mixture, then dip both sides into the egg mixture and roll in the bread-crumb mixture, pressing lightly to coat.

Heat 1 TBSP of butter and 1 TBSP of olive Oil in a large saute pan and cook the chicken sticks on medium low heat for about 3 minutes on each side, until just cooked through.  Don't crowd the pan.  (I used my non stick electric skillet so I could cook more at a time).  Add more butter and oil and cook the rest of the chicken sticks.  Serve each stick on a skewer if you want.  (We didn't bother, but could be good for the Super Bowl).

You can keep the chicken breasts warm for about 15 minutes on a sheet pan in a preheated 200 degree F oven until you finish all the chicken sticks.

We ate these with some Trader Joe's marinara sauce (warmed) for dipping.  Mm, mm, mm, mm, mmm.  Dan and Tyler declared these fantastic and we certainly will be making them again!  We had a huge plate of chicken sticks and enjoyed them for two more meals.


If you have children, I guarantee they will love these scrumptious pieces of chicken.  So will anyone at a Super Bowl gathering.  They were so tender and tasty we could not stop commenting on how delicious they were.  Tyler, who is somewhat of a foodie, TRULY liked them if you want a good testimonial from someone with rather discriminating taste.  Dan declared the meal better than most restaurant meals which made the effort more than worthwhile.

Thanks Ina for a great recipe!  Hope you all give it a try.

Everyday Donna

Things to Remember:

I predict that one of the teams will win the Super Bowl.  ; )


Thursday, January 3, 2013

Zucchini Cranberry Bread or Muffins

Oh, the post holiday catch up as I like to call it.  Restocking the pantry, doing grocery shopping and other necessary errands.  It is nice to be back in a routine, don't you think?  Today was beautiful and sunny with a temperature that was not too cold.  A light coat and scarf was all that was needed to enjoy the out of doors.  I was SO glad to see the sun.

My goal and motto for this year is to "simplify".  Yes.  It's time to pare down some more, lead a kinder, gentler life.   Why do we all have so much "stuff"?  When we moved here two years ago this month (where does the time go?) we got rid of so much "stuff."  Many, many trips to the Goodwill and Salvation Army, things given to those who could use them, even putting things out on the curb for people to take.  And where are we now?  Full to overflowing again.  How does this happen?  So, it's time to simplify, pare down, share what we have, organize and get rid of the unnecessary.  This is a process that we must stay on top of!  It is not only necessary, but quite enjoyable.

One of my chores yesterday was to clean out all the left overs and odd things that accumulate in the refrigerator.  You know that stuff I'm talking about right?  You have to get rid of the old, to make room for the new in your life.  In the drawer was one lonely, huge zucchini.  It was perfectly good and I wanted to use it in some way.  So, I decided to make some wonderful zucchini cranberry bread.  This is an easy recipe and is soooooo good.

Did you know that zucchini is really a fruit?  We tend to use it in savory dishes most of the time and think of it as a vegetable.  It's not.  It is delicious grilled, sauteed or steamed.  There are so many uses for zucchini and it is super nutritious.  Zucchini also makes a super sweet, delicious bread.

To add to the flavor, I added some dried cranberries.  Do you like cranberries?  I happen to love them - that combination of tart and sweetness from the berries is very appealing and yummy to me.  Did you know that cranberries are white until they ripen?  Most people know they grow in acidic bogs in the Northern part of our country and they are harvested by flooding the bogs which causes the fruit to float to the top so they can be captured.  But, did you know they are considered one of the super fruits?  Yes they are, absolutely full of anti oxidants.  Even better.  The more color something has, the better it is for you.

Cranberries are mostly associated with Thanksgiving and Christmas, but they are available all through cool weather and dried cranberries are available year round.  They are a wonderful snack and can be an alternative to raisins.  If you don't like them, you don't have to add them to the bread.

Here is what you need to make this bread.

3 cups all purpose flour
2 cups sugar
2.5 tsp cinnamon
1 1/4 tsp salt
1 tsp baking soda
1/2 tsp baking powder
3 eggs
2 cups shredded unpeeled zucchini  (I used a box grater, grated very fine)
1 cup vegetable oil
1 TBSP vanilla (yes, a tablespoon)
1 cup cranberries - if using fresh, chop the cranberries - I used dried cranberries
1/2 cup chopped pecans

Preheat oven to 350 degrees F

Mix all the ingredients using a whisk or spoon.  Try not to over mix or bread could be tough.
Grease and flour 2 9x5 loaf pans or spray two muffin tins with cooking spray.

Fill each loaf pan 3/4 full.  Same for muffin tins if making muffins.

Bake bread for 50-60 minutes, until a toothpick inserted in the center comes out clean.

If making muffins, bake for 25-30 minutes, until toothpick inserted in center muffin comes out clean.

This bread is easy to make and is extra good with a cup of coffee or hot tea.  Even the grandsons ate it (just don't tell them it has zucchini in it).  After working at the homeless shelter, I feel bad about throwing any usable food away knowing there are so many people who are "food insecure".   So, if you find yourself with one large zucchini and don't know what to do with it, try this recipe.  It is worth the time and effort!  Better yet, share a loaf with a friend, family member or neighbor.  They will love you for it.

Everyday Donna

Things to Remember:

Our life is frittered away by detail… Simplify, simplify.

Henry Thoreau


Wednesday, January 2, 2013

Fresh Blueberry Muffins - Yum, Yum

Happy New Year!!  Here's hoping 2013 is going to be an auspicious and fabulous year for one and all. We waved goodbye to 2012 and never looked back.   Everyone survived the end of the Mayan calendar (hooray) and we headed right on in to 2013 with a big smile on our face.  Can you see me brushing my shoulders off, waving goodbye as I forge ahead into the new year?  Here is hoping you can and will do the same.  Bye Bye 2012.  It was nice knowing you.

Now, the holidays are over and the gloom of January sets in.  Gray days.  Cold weather.  I'm really not a fan, but did you know that January is national soup month?  Yippeeeeee!  Who doesn't love soup?  I could eat it every day - seriously - even in hot weather.  Soup is delicious and nutritious.  You can get lots of veggies in one pot and that means you don't have tons of pots and pans to clean up after the meal.  If you make the batch big enough, there are left overs (sometimes for days) and soup tastes better as it melds and meshes all the flavors together.  Soup can also be frozen to enjoy at a later time.  Mmmmm, mmmm, mm.

During the "post Christmas let down", some of the family came down with the grippe, the creepy crud.  You know, the scratchy throat, hacking cough, runny nose misery.  Kids, parents, Pawpaw and Uncle Ty.  So Grandma whipped up a batch of home made chicken noodle soup, also know as Jewish penicillin.  Yes, science has found that chicken broth has medicinal value in relieving congestion.
(www.sciencedaily.com/releases/2000/10/001018075252.htm).  You can find a recipe for home made noodle soup on my blog post of September 17.  We just finished up the last of this batch for dinner tonight.  It is just perfect for these miserable January days.

To go along with the chicken noodle soup, I made a batch of fresh blueberry muffins.  Super.  Delicious.  Blueberries are known as one of the super foods high in antioxidants and are also really good for our immune system.  It's beneficial that they taste really good too.

Here is what you need to make these muffins:

1/2 cup butter, softened to room temperature
2 cups unsifted all purpose flour
1 cup sugar
2 large eggs
1/2 cup milk
2 tsp baking powder
1/2 tsp salt
1.5 - 2 cups fresh blueberries (dust with flour so they won't sink in the muffin batter)
1.5 tsp vanilla

Topping:  cinnamon sugar (2 Tbsp. cinnamon, 1 Tbsp. sugar)

preheat oven to 375 degrees F

Cream the softened butter and sugar with a mixer until light and fluffy.  Add the eggs, 1 at a time.  Mix thoroughly.

Combine the dry ingredients in a separate bowl.

Gradually add the dry ingredients to the butter/sugar mixture until thoroughly combined.  Add the milk and vanilla.  Add the flour dusted blueberries.  (don't skip this step, it keeps the blueberries from sinking to the bottom of the muffins).

Spray a 12 cup muffin pan with cooking spray.  Fill each cup 2/3 full.  Sprinkle cinnamon sugar on top.  Bake 25-30 minutes until a toothpick inserted in the center muffin come out clean.

Let me tell you, these hit the spot with that home made chicken noodle soup.  They would also be delicious to serve for breakfast or brunch, or as an afternoon snack.  If you have a muffin monster at your house, give these a try.  It's a great way to start the new year.

Everyday Donna

Things to Remember:

If you reduce stress, eat a healthier brain diet [singling out foods like spinach,blueberries and salmon], get aerobic activity each day, that is going to protect your brain and possibly lower your risk for Alzheimer's disease or at least delay the outset,


Tuesday, November 13, 2012

Pumpkin Cream Cheese Bundt Cake - Spectacular!

 It's countdown to Thanksgiving which is only 9 - count 'em - 9 days away.  Are you cooking?  Are you going to someone's house?  Are you going to a restaurant?  Are you skipping it altogether?   If you are cooking, do you have your menu set?  Do you have to take a dish if you are going elsewhere?  So many things to think about, so little time.  

If you are serving dinner at your abode and you want a dessert that is scrumptious and not too difficult, have I got a "must try" for you!  Woweeeee, this pumpkin cream cheese cake is fabulous.  If you are in charge of taking dessert to someone else's home, have I got a "must try" for you!  Oh, I just said that didn't I?  Well, I am not being facetious when I say give this cake a try.  I mean, what's not to love?  Pumpkin and cream cheese in the same dessert should seal the deal without any other considerations.
This cake is easier than baking a pie, but has that same moist, spicy flavor that pumpkin pie has.  It has cinnamon and cloves and nuts, and cream cheese, and a cinnamon glaze that is oh so good and cream cheese.  Look at this slice up close.
See that vein of cream cheese deliciousness running through there?  Doesn't it make you want to take a bite?  Or maybe just eat the whole piece?  And, this time of year is perfect for anything pumpkin.  We love our pumpkin bread, pumpkin crunch, pumpkin dump cake, Trader Joe's pumpkin tea,  and now we have THIS lovely cake that would be perfect for a breakfast type coffee cake, or even more perfect for an after dinner treat.  I have to say, Dan and I jumped right in as soon as it was ready - still warm actually - and enjoyed it with a lovely cup of hot java.  Oh. My. Goodness.  Dan doesn't like pumpkin pie (I know, I know), but he really loved this.  As a matter of fact, he had two pieces!

Here is what you need (because you really do want to make this!)

Filling

1 8 oz block cream cheese, softened
1/2 cup granulated sugar
1 TBSP all purpose flour
1 large egg
1/2 tsp vanilla extract

Cake

1 2/3 cup all purpose flour
1 tsp baking soda
1/2 tsp salt
1 tsp ground cinnamon
1 tsp ground cloves
1 1/4 cups canned pumpkin puree
1/2 cup vegetable oil
2 large eggs
1 1/2 cups granulated sugar
1 cup chopped pecans or walnuts (optional)  ( I used 1/2 cup chopped pecans)

Glaze

1 cup powdered sugar
2 TBSP milk
1/2 tsp cinnamon

Preheat your oven to 325 degrees.  (note temperature)  Grease and flour a Bundt pan.

In a medium mixing bowl, combine the cream cheese, sugar, flour, egg and vanilla.  Beat with a mixer until smooth and creamy.  Set aside.

In a large bowl,  sift together 1 2/3 cups flour, baking soda, salt, cinnamon, and cloves and set aside.

In another bowl, combine the pumpkin puree, oil, eggs, and sugar.  Mix well until all ingredients are thoroughly combined.  Stir the pumpkin mixture into the flour mixture just until combined.   Fold in nuts if using.

Pour half of the pumpkin batter evenly into the prepared Bundt pan.  Spoon the cream cheese mixture over the pumpkin batter.  Cover the cream cheese with the remaining pumpkin batter.  Using a knife, stick it straight down through the top layer of pumpkin batter and cream cheese filling.  Swirl the knife around these two layers creating a marble effect.

Bake for 55-60 minutes until a toothpick inserted in the middle comes out clean.  Let the cake cool before removing from pan.

After removing the cake from the pan, pour the glaze over the top of the cake, letting it run down the sides.  Hold yourself back at this point.  Now, serve.

This cake is worth the effort to make, believe me.  I had the urge to make something sweet this afternoon while I was Christmas crafting.  Do you ever have that urge come over you?  The "I need something sweet" urge?  If you don't, I understand....but I get that urge and today was one of those days and I wanted something pumpkin.  Simple as that.  I pulled out this recipe and went to work.  Let me say, it was a really good choice!  This cake is moist, slightly spicy, with that wonderful vein of cream cheese running through it and that delicious cinnamon glaze topping it.  Perfection!

This cake will be just the thing for Thanksgiving, Christmas,  and all winter.  Yummmmmo!  It would be a wonderful gift to give for the holiday season, or take one to work and share with your co-workers. Have the neighbors over for coffee and cake.   Be sure and have the recipe handy because they will ask for it.  Now go rummage through your cupboards and see if you have all the ingredients because you really, really want to make this.  Now.  Really.

Everyday Donna

Things to Remember:

Dessert is probably the most important stage of the meal, since it will be the last thing your guests remember before they pass out all over the table.
William Powell