Monday, September 16, 2013

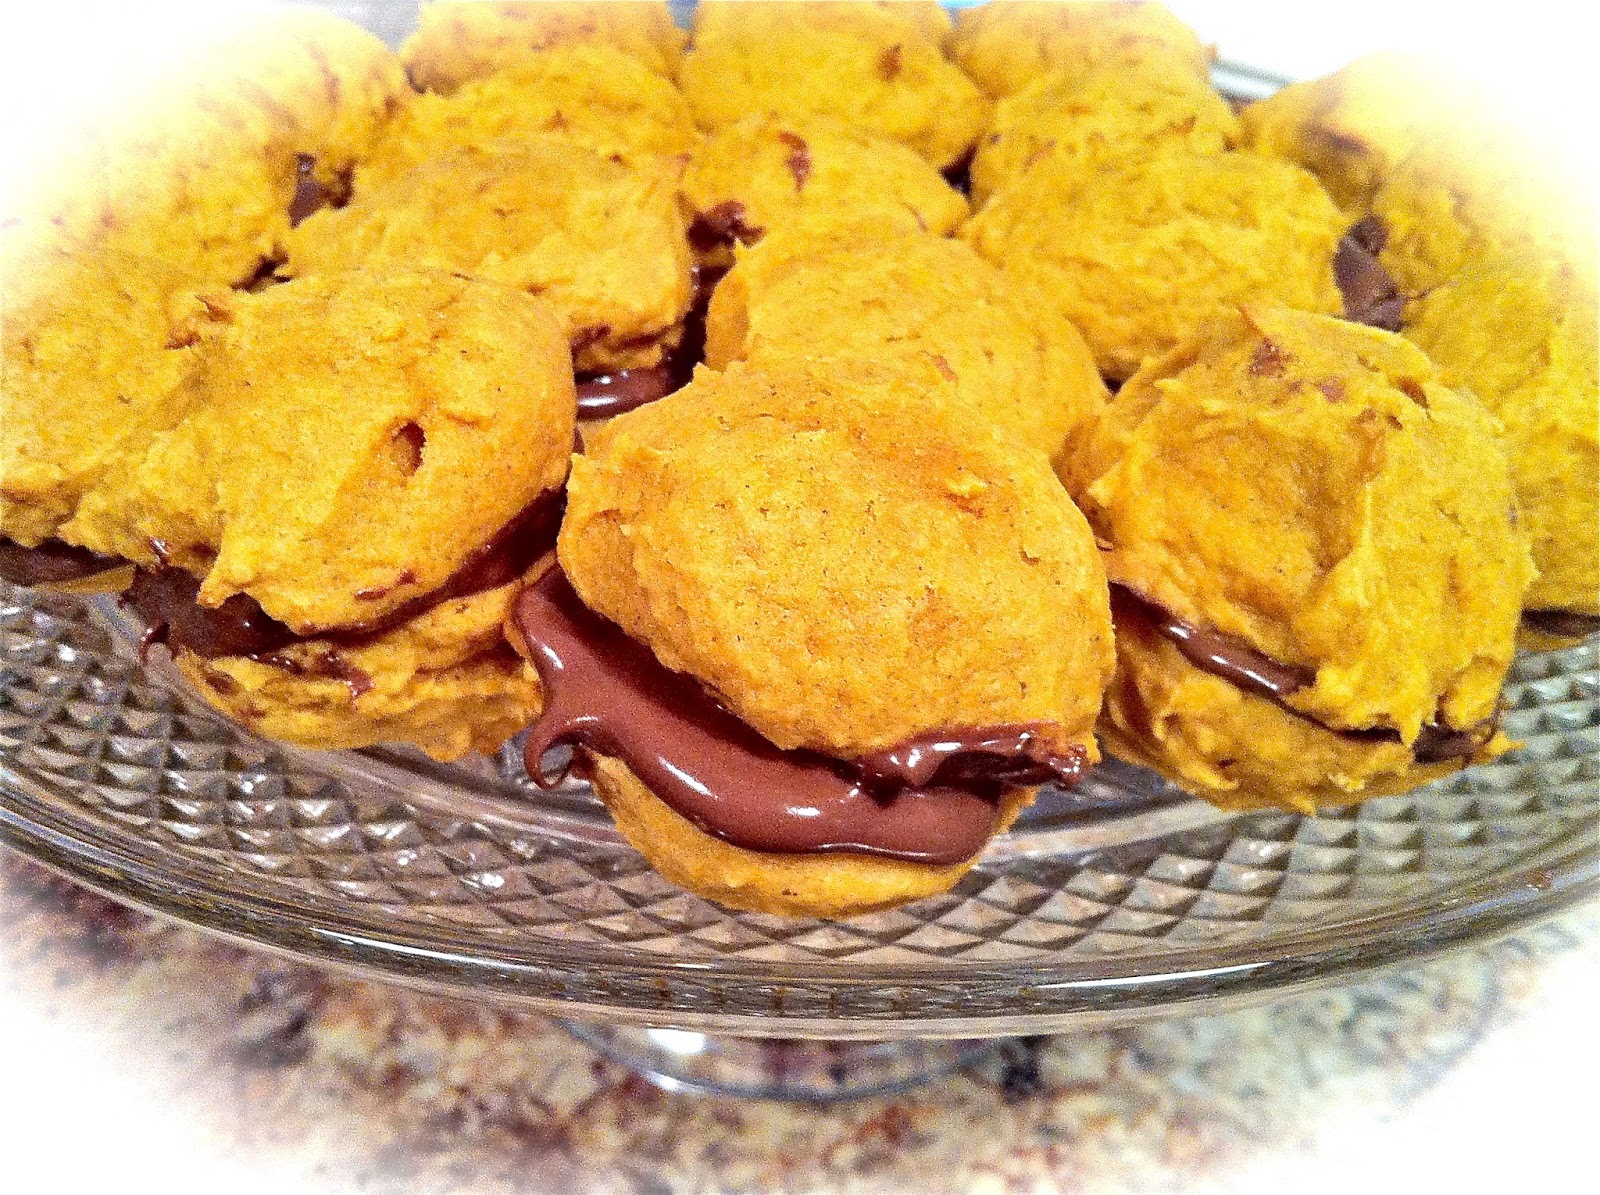
Pumpkin Whoopee Pies With Nutella - YUM!

 Happy Monday, September 16.  It is 7:16 pm and outside it's dark.  That means summer is definitely on the wane and the days are getting shorter, BUT it also means that fall is approaching rapidly.  Yippee!  Do you like fall as much as I do?  The changing leaves, the cooler temperatures, pumpkins, Indian corn, cider, bonfires, apples, sweaters, colorful mums, Halloween and Thanksgiving.  There are so many wonderful things about fall.

Starbucks has their pumpkin spice coffee drinks available and that is the first official "call to fall".  Everyone gets excited when pumpkin spice drinks return.  Therefore, it is okay to start making any and all things pumpkin.  Starbucks gave the go ahead.

I got my new Food Network magazine last week and it has a lot of fabulous recipes or fall.  I wanted to start making them all.  Inserted in the magazine is a little booklet with 50 things you can make from canned pumpkin!  Fifty, five oh, 50.  Wow!!  That is more than exciting and as I perused it I couldn't decide whether to start with #1 and work my way through or - ding, ding, ding, hold the phone.  How about #42 and #43 to start?   It's a pumpkin cookie recipe that can be made into whoopee pies filled with - OH MY - Nutella.  Guess where I started?  You guessed!!  You are a sharp cookie (no pun intended).

Sometimes a recipe just jumps out and says make me now.  Do you ever have that happen?  So, I did.

Here is what you need:

6 TBSP softened butter
1 1/2 cups sugar
1 cup canned pumpkin *see note below
1 egg
1 tsp vanilla
2 cups flour
1 tsp baking soda
1 tsp cinnamon
1/2 tsp salt

Beat the softened butter and sugar with a mixer until fluffy.  Beat in the pumpkin, egg, and vanilla.  Whisk the flour, baking soda, cinnamon, and salt together.  Stir into the pumpkin mixture.

Drop by tablespoons full onto an oiled baking sheet.  Bake at 400 degrees Fahrenheit for 12 minutes; cool.


If you want to eat the cookies, you can make this glaze.

1/2 cup confectioners sugar
1 TBSP milk  - mix together, spread on cookies

OR, if you want to make them into whoopee pies, do not glaze the cookies.  Spread the bottom of one cookie with Nutella and place the bottom of another cookie on top.  You now have a delectable little sandwich made of delicious pumpkin cookies with Nutella spread in the middle to hold them together.  Now, I can't pass this up - whoopee!   This recipe made 36 cookies or 18 whoopee pies.

*I will tell you that I hated to leave that bit of pumpkin in the can since the recipe called for one cup of pumpkin, so I added the whole can to the recipe which probably made the cookies a little softer than they would be if you followed the recipe exactly.  The texture is somewhat like gingerbread, very soft and delicious and oh so good with that lovely dollop of Nutella in the middle.  They are especially good with a cup of coffee and they just scream fall y'all.

It's hard to decide what to make next.  Maybe the pumpkin bread pudding made with cinnamon raisin bread, or maybe the cheesecake pie, or maybe.........   Whatever it is, I will share the recipe with you when I make it.  In the meantime, give these a try.  They are pumpkinlicious.

Everyday Donna

Things to Remember:

What do you get if you divide the circumference of a pumpkin by its diameter?  Pumpkin pi!


Tuesday, September 10, 2013

Cheesy Macaroni With Chicken and Spinach

Do you have picky eaters in your family, especially children who are suspect of any food that has the color green to it?  Will they eat salad, or raw vegetables of any kind?  We were fortunate.  Our children were all adventurous eaters who loved crudite, salad, most every vegetable.  One of them didn't like green peas, and one of them didn't like lima beans.  Other than that, they would eat about anything.

Our grandsons on the other hand, do NOT fall into that category.  We have two who are pretty good eaters, two who are middle of the road, one who is only 18 months old and finding his way in the food world with a few texture issues and one who is suspect of any and everything that isn't "white".  Do you know what I mean?  He likes chicken, pasta, cheese, eggs, he will eat shrimp oddly enough, fish, turkey, rice - do you see the pattern here?  He just turned 10 and he has been like this since he was a little bitty fella.

I have seen him gag and retch at things his mother would make him taste and it was downright comical at times.  When he was about 4 his mother made him taste canteloupe during dinner.  I truly wish I had a video of his facial contortions, his gagging, shivering, and complaining.  Yes, he would literally shiver every time he got the canteloupe close to his mouth.  After probably 20 minutes, he finally licked it and I thought his dinner was going to end up on the table.  You know that "pre sound" that comes with regurgitation?  Yep, that's the one.  It still makes me laugh to think about it.  To our daughter's credit, she makes him try.  The pronouncement is usually, thanks, but I'll pass.

Their pediatrician said these are what they call "the white" kids who are suspect of colored foods and they think it is an evolutionary thing from the hunter/gatherer times when men did not always know which foods were edible.   Makes sense, but it does not make feeding such children easy.

All that was to say H will eat this dish AFTER he picks the spinach out.  He loved it otherwise and so did the other boys.  It is cheesy, and filled with chicken and pasta.   Perfect.  I added the spinach for some color and extra nutrition.  H is the only one who picked the spinach out, so you might luck out and get your family to eat it with the spinach.  You never know.

I made this dish using one of the herbed chickens I wrote about in my blog on August 19.  You can find the recipe there.  Or, you could use a rotisserie chicken from the grocery or cook the chicken breasts like in the recipe.  It is a great way to use leftover chicken.  The original recipe came from AllRecipes.com.  Here is what you need:

3 TBSP butter
salt and pepper
1/2 pound pasta (penne, fusilli, or bow tie, cooked al dente)
2 - 3 boneless skinless chicken breasts or leftover chicken from a rotisserie or roasted chicken
1/4 cup + 1 TBSP flour
3 cloves garlic, minced
3 cups milk
3/4 cup shredded mozzarella (I used one ball of fresh mozzarella from Aldi's)
3/4 cup grated parmesan cheese
2 cups fresh baby spinach

Preheat oven to 400 degrees Fahrenheit.  Spray a 9 x 13 baking dish with cooking spray.

Cook pasta in boiling water just until al dente, drain and put aside.

If you are cooking chicken breasts, season the chicken with some salt and pepper and put some olive oil in a medium skillet.  Cook the chicken until it is no longer pink.  Remove and let sit for about 5 minutes.  Slice thin.  Put aside.

In a medium pot, melt the butter and add the flour and garlic.  Cook about 1 minute to cook out the raw flour taste.  This makes your roux for the sauce.  Gradually add the milk, whisking continuously until thick.  Stir in the cheese and whisk until melted and sauce is smooth.  Remove from heat and add the pasta.  Pour into the prepared baking dish and add the chicken.  Add the fresh spinach and stir to incorporate the chicken and spinach.

Bake uncovered for 25 - 30 minutes until golden and bubbling.  Remove from oven and serve.

This is soooooooooo good.  The sauce is amazing with the mozzarella and parmesan.  One of the best mac and cheese type recipes I have found.  Yum.  Yum.  Yum.  The only thing I might add next time are some crushed red pepper flakes for just a little zing.   Feel free to leave the spinach out if you have eaters who are suspect of green things in their food.  Or, add some broccoli if they would prefer that, or green peas.   Spinach was just my addition and we loved it.  Next time, I might try another vegetable.

Serve this with a nice green salad and you have a complete meal.  Oh, maybe some crusty bread too.  Oh yeah.

This recipe is super easy to prepare, especially if you have some chicken on hand that is already cooked.  It reheats beautifully.  We had leftovers the next day and it was just as good as the first day.
Give this recipe a try.  I think it will be quite a hit.

Everyday Donna

Things to Remember:

Dude, macaroni and cheese if the food of the gods!  Haley James Scott


Monday, September 9, 2013

Quinoa Salad With Home Made Cilantro Dressing

Happy Monday one and all.  Hope your weekend was spectacular.  Ours was super busy with fall ball games and keeping grandsons overnight so our daughter and son in love could celebrate their anniversary with a stay at the Opryland Hotel.  With two little guys aged 3 and 18 months, they deserved a little respite and Grandma and Pawpaw were more than happy to help out.

Out other daughter and her family are in the throws of fall ball (no pun intended).  Practices, school, games, jobs - you know how busy life can be.  To show a little mercy, I invited them for dinner last night because Holly spends most of her Sunday on writing assignments to meet deadlines for her editors.  It helps if she doesn't have to worry about feeding her three boys and husband after a day of brain drain.

There is always that dilemma of what to fix that the boys will eat.  The 10 year old is super finicky, the 6 year old is not quite so finicky and the 3 year old is a roll of the dice.  Our son in love has celiac so there is that whole gluten issue to deal with.  Meals can present a challenge.  Last night I fixed enchilada casserole which is made with corn tortillas and contains no gluten.  I made the red sauce with corn starch instead of flour.  For sides, we grilled corn on the cob and I made this beautiful quinoa salad.

Do you know about quinoa (keen-wa) or have you tried it?  It is delicious and gluten free.  My research tells me it is not a true grain in the sense of wheat or oats, but has been cultivated in the Andes mountains for over 3,000 years.  Quinoa is full of protein and calcium, anti oxidants, and is easy to digest.  It is great for vegan diets.  The boys love it and will actually eat it.  It has a lovely mild, nutty flavor and can be served plain or added to other dishes.  There are many ways to "jazz" up quinoa.  The United Nations General Assembly has declared 2013 the year of Quinoa because they believe it could go a long way in eradicating food insecurity worldwide due to its nutritional value.

I had found a recipe for a southwest quinoa salad on Pinterest and it looked good.  It was made with quinoa, black beans, corn, and diced tomatoes.  We were having corn on the cob so I didn't want to use corn in the salad.  For this salad I used, black beans, tomatoes, avocado, green onions, red bell pepper, black olives, and a really tasty cilantro lime salad dressing.  Oh, and I threw in some crumbled bacon that I had left from BLT sandwiches.  Yum.  Crunchy vegetables work well with the soft, mild quinoa.

To make the salad, here is what you need:

Quinoa prepared according to package directions.

(You use 1 cup dry quinoa to 2 cups liquid.  I made 2 cups and that's a lot of quinoa.  If you are feeding 2-4 people, use 1 cup quinoa although I am loving the left over salad.)

1 medium red bell pepper diced
3 green onions, whites and greens cut on a diagonal
2 medium tomatoes, seeded and diced
1 can black beans, rinsed and drained
1 avocado, diced
sliced black olives, optional  (add as many as you like)
5 slices cooked crisp bacon, crumbled (optional)

Cook the quinoa according to package directions and let cool.  Put the cooled quinoa in a serving bowl and cover with the ingredients you choose to use.  The possibilities are endless really.  I like leaving all the "yummies" on the top so that when you serve the salad, they don't all fall to the bottom.  You can mix it up if you so desire.

Cilantro Lime Salad Dressing

I didn't measure what I threw in the blender, but this is pretty close.

about 1/2 cup plain fat free greek yogurt
2-3 tablespoons olive oil
2 tablespoons honey
juice of one lime or lemon
1/2 to 3/4 of a bunch of cilantro
small pinch of salt

Place ingredients in a blender and whir until blended and cilantro is all chopped.  This dressing is fantastic on any salad.

Serve dressing on the side.  You may like to eat the salad without the dressing like Dan does, but the bright, flavorful dressing adds a nice zip to the salad in my opinion.  If you don't like cilantro, use basil or avocado in it's place.

I had a nice big helping of this salad this evening and it is deeeeeeeeelicious.  Think of all the possibilities for things to add to quinoa to make a healthy salad or it could be eaten as an entree.  It would be especially good for a meatless meal (minus the bacon).

If you haven't tried quinoa, this salad a good way to introduce it into your diet, or you could serve it plain as a side dish in the place of rice or potatoes.  We will definitely be eating it more often since it has been called a super food.  We are always looking for things that taste good and are good for you.  Give it a try.  I think you will like it.

Everyday Donna

Things to Remember:


Quinoa is great for lazy day cooking because it's packed with complete proteins, but it cooks in only 20 minutes. And, you can flavor it any way you wish! I make mine with onions, lots of ground ginger, turmeric and coriander, and then whatever dried fruit and nuts I have around.
Aarti Sequeira, Food Network


Tuesday, September 3, 2013

Hanging Grapevine Lamp Tutorial


Hello everyone.  Truly hope you enjoyed the last big hurrah of summer better known as Labor Day.  We swam, we ate, we enjoyed the day with family.  Now, it's time for all things fall.  Bring it on!!

Last week we spent some time getting to know the new area we are living in a little better.  We checked out some of the stores and we found a really great little antique mall.  Of course, I had to go in and have a "look see."  And, of course, I found something that called my name and had to come home with me.  I wasn't really sure what it was and neither was the lady who helped us.  It was a huge basket with a beautiful design and very rustic.  When she took it off the wall, I noticed some stenciled letters that said Farmer's Burley on one side and Paducah, Kentucky, on the other.  Oh happy day!  It was a tobacco basket.  I had heard of them, but never seen an actual basket.  It is quite large, 39.5 x 39.5 inches and much heavier than it looks.  I did some research on them when we got home and found they were used to display rolls of tobacco leaves on auction floors.  They were made in the northeastern part of the country and Yadkin County was the "capital" of tobacco basket production.  Here is a link if you would like to read about how these beautiful baskets were made.  It is very fascinating how they were made.  www.journalnow.com/.../article_d08c29a7-35b3-5b75-9493-3c978f6d5.

 Here is my basket hanging on the wall.
When decorating, it seems that one thing always leads to another somehow.  There had been a small lamp sitting on the hutch previously.  The basket curves outward and now the lamp would not fit.  OH NO!  The lamp is vitally important to our dining area since there is no overhead light (don't ask me why).  There really, really needed to be a lamp on that side of the room.  Solution?  A hanging lamp.  If you haven't looked for hanging lamps, there aren't many available and not the look that I wanted.  Now, I had to make what I wanted so the hunt was on.

In the recesses of my brain, I knew that stores like Pier 1 and World Market had paper lanterns with separate sockets used to hold the light bulbs.  First stop, World Market.  Voila!  They had just what I wanted for only $12.00.
I love rustic, but a bare bulb was not in my plan.  I needed something for a "shade", but what?  I looked in several stores at baskets, but nothing was "it".  So, I headed to Michael's.  Surely there was something I could find in there.  I looked at baskets, even at a bird cage that was a possibility.  Then, I found a big grapevine ball that was "the look", but not big enough.  Rats.  Now what?  I was in the floral department, so I really started looking at all possibilities and then, ("cue magical music") I found exactly what I wanted.  Yes, there were stars and little birdies flying around.  No, not really, but there could have been I was that excited.  The "stuff" was called grapevine ribbon and was only $2.99 a roll.  It is 4 inches wide and wired on the top and bottom so it could be shaped.  Wahoo!  Two rolls were purchased and we headed home.  This is how it looks unrolled.
It is super tough to get a good picture, but it is open and rustic and just what I wanted.  And, wired.  Did I say wired?  It is shapable and that is the best part!  I already had some copper wire that comes on a spool like you find in the jewelry making section at Michael's and it was perfect for wiring the "rounds" of the shade together.  It's just a few dollars a roll, comes on a spool like thread, and comes in gold, copper, or silver.

First, I made the bottom round the diameter that I wanted so it would fit in the corner of the room.  The bottom round is 12 inches in diameter on my lamp.  You could make yours any diameter you want.  It will just take more "ribbon" if you make yours bigger.  I wired the ends of the first round together with the copper wire.
Remember, this is rustic so it doesn't have to be perfect.  Next, I made another round the same size as the bottom, wired the ends together and then wrapped the two rounds together using more copper wire, wrapping it around the bottom of one round and the top of the other.  If you look closely, you can see the wire.


Then, I made one more round and wrapped it to the second row in the same fashion using the copper wire.  My shade has 3 rounds total.

To hold the socket in place, I cut a piece of the grapevine ribbon long enough to go across the top of the shade and hang over just a bit on each side.  I wired it in place, then cut another piece and placed it perpendicular to the first piece and wired it in place.  The top looks like a plus sign.

I threaded the cord attached to the socket from the inside of the shade through the top and realized the socket would pull through.  To hold the socket in place, I wired the grapevine together to keep that from happening.
Done.


 It took me about an hour to put this together.  I added a frosted globe type bulb, hung the lamp and plugged it in.  The lamp weight practically nothing!
I was doing a happy dance.  It was exactly what I wanted.  Rustic, open, provides plenty of light to the corner of the room and it looks fantastic with the tobacco basket.  I don't know about you, but I really, really love when a plan comes together.   And the best part is the lamp cost less than $25.00 including the bulb.  
This grapevine ribbon is fantastic and could be used in a myriad of ways.  Now, it's time to start decorating for fall and I can see lots of uses for it.   Have you started decorating yet?

Everyday Donna

Things to Remember:

Sometimes, it takes a little ingenuity to come up with a "look" that you want.   It doesn't have to be expensive or complicated, just may take a little creativity.  Always look at what you already have and perhaps it can be used in a whole new way.  donna


Wednesday, August 28, 2013

Blueberry Cobbler With Biscuit Crumb Topping

 Did you ever have fruit that is going down, like fast.  You know, those brown bananas that have a day or so before you have to toss them?  Don't toss those bananas, cut them up and put them in a baggie to go in the freezer if nothing else.  They are good for smoothies!  Or, there is always banana bread.  Yum.

I happen to love all things blueberry and I buy them every time I go to the grocery and then suddenly I have several containers in the fridge and there is that first sign that they may start to shrivel at any moment and must be used!  No blueberry should ever be wasted!  Of course, you can put them in a baggie and freeze them just like the bananas.  But, I had a hankerin' for something sweet and desserty and I usually make a peach and blueberry cobbler, but alas I had no peaches.  Therefore, some other recipe must be used.  I make blueberry pie, but I didn't want to make crust.  It just seemed like too much effort so I started combing the world wide web.

I found this recipe on a blog called wickedgoodkitchen.com and it sounded just perfect so I thought I would give it a try.  It's a keeper!  It's easy and delicious.  I served it for dessert tonight and our 3 year old grandson ate two helpings - with ice cream of course.

Here is what you need:

Filling:

4-5 cups fresh blueberries, rinsed, dried and sorted.  (toss those shriveled ones)
1 cup sugar
2 tsp freshly grated lemon zest
3 Tbsp all purpose flour

Biscuit Crumb Topping:

1 cup + 5 TBSP all purpose flour
6 TBSP sugar
1 & 1/2 tsp baking powder
1/4 tsp salt
6 TBSP butter, cut into bits
1 large egg, slightly beaten
1 tsp vanilla
1 TBSP sugar
1 tsp ground cinnamon

Preheat oven to 375 degrees fahrenheit

Lightly butter a 10" baking dish

Combine the sugar, lemon zest, and flour called for in the filling.

Put the blueberries in the baking dish, sprinkle with the sugar/zest/flour in a very even manner so that there is no clumping of the sugar which allows it to dissolve while baking and won't be gritty.  I stirred mine a couple of times to prevent that from happening.  Continue to evenly sprinkle until all mixture has been used.

Make the crumb topping.  Put the flour in a bowl, add the sugar, baking powder and salt.  Whisk or mix with a fork.

Cut the cold butter into small bits and cut into the flour mixture until crumbly.  I used a pastry blender, or you can use your hands.  Add the beaten egg, vanilla and stir to thoroughly mix until you have a dough type mixture.

Spread over the blueberries using your hands.

Combine the sugar and cinnamon and sprinkle over the biscuit topping.

IMPORTANT.  SET THE BAKING DISH ON A BAKING SHEET BECAUSE IT WILL COOK OVER AND YOU WILL HAVE BURNED SUGAR AND SMOKE IN YOUR KITCHEN AND DON'T ASK ME HOW I KNOW THIS.  JUST SAVE YOURSELF A MESS.   TRUST ME.

Bake for 40-45 minutes until the top is nice and brown.  Remove from the oven and serve warm with a lovely dollop of ice cream or whipped cream or - both!

This really is a wonderful cobbler.  It is not too sweet, but the lemon zest gives it a really nice brightness.  The crust is like a big soft cinnamon biscuit that is absolutely delicious.

I will be making this again, and again, and ...... you know.  Give it a try.  I think you will really like it too.

Everyday Donna

Things to Remember:

Blueberries are considered one of the "super" foods.  So hey, why not enjoy them any way you can.  Cobbler works for me.  donna


Monday, August 26, 2013

Chicken Breasts With Greek Yogurt And Parmesan Cheese

 How can it possibly be August 26th?  WHERE has the summer gone?  Oh, I remember.  We were packing and moving and then unpacking and putting it all away.  That's where the summer has gone.  It is truly hard to believe that it will soon be September, the last big hurrah of summer, Labor Day will be over,  and fall will be on it's way. That is okay by me actually!  I do love fall.

Today, I am going to talk about recipes, and sites like Pinterest and Food Gawker, and now Facebook is being flooded with recipes with everyone sharing them over and over.  There is one particular recipe that may be shared more than any other and the picture is beautiful and looks so good that of course everyone wants to try it, including me.  That recipe is for this chicken made with yogurt and parmesan cheese.

I have several trepidations about Pinterest and the first one is that people pin recipes and craft DIY's without going to the original source.  Many times, they are simply pictures with no recipe or instructions on how to make said DIY.  Lots of times when you go to the original site, they will tell you the site has been reported as suspicious so I stay away from those.  I always, always try to go to the original site before I pin something so that later, when I want to try the recipe or craft, it will actually be usable.  I wish everyone did that so they would not be disappointed when they later find there is no recipe or instructions.

Let's talk about this chicken recipe.  I decided I would try it.  It is very simple.  Boneless, skinless chicken breasts, some yogurt, parmesan cheese, garlic powder, black pepper, and salt.  Baked.  The picture shows this beautiful brown chicken that makes your mouth water.  As Chef Anne Burrell of the Food Network always says, "Brown food tastes good."  It surely does.  And, here is the conundrum.  When you make this recipe, it is NOT brown, not even close.  It is pale and anemic looking and not very appetizing actually.  I was distraught.   I don't like pale, anemic food.  To me, it is very unappetizing.   I had to come up with a solution fast.  (Perhaps they had used a torch to brown the chicken for the picture?  I don't know.  Mine sure didn't look like the picture.)

What would make it brown?  Bread crumbs!  So I covered the chicken breasts with some Italian seasoned bread crumbs and put them back under the broiler for a couple of minutes just to brown them up a bit.  It helped.  As you can see in the picture, it still isn't very brown.

Now, the reality is the chicken is delicious.  It was tender and moist.  (I know, gross word, sorry)  It was SOOO flavorful.  Dan, who does not care for yogurt or parmesan cheese LOVED this chicken.  Really loved it.  I even used the left overs for sandwiches made in pita pockets the next day.  Yum.

We enjoyed this chicken with mashed potatoes and heirloom tomato salad.  The acidity and color of the tomatoes was a fabulous compliment to the pale chicken and potatoes.  We eat with our eyes too and I like some color on my plate.  Don't know about you.

Here is what you need to make this chicken recipe:

3 or 4 boneless, skinless chicken breasts (mine were very large, so I used 3)
1 cup plain greek yogurt
1/2 cup parmesan cheese
1 tsp garlic powder (I prefer fresh garlic to garlic powder, so I used 3 cloves, minced)
1 tsp salt

Spray a baking dish with cooking spray.  Place the chicken breasts in the dish and cover with the yogurt mixture.  *My suggest - sprinkle with bread crumbs now if you want brown chicken.*

Place in a 375 degree oven for 40-45 minutes until the chicken is no longer pink in the middle.

I placed mine under the broiler for about 2 minutes to brown the bread crumbs.  Remove from the oven and let sit for a few minutes and serve.


Yes, this recipe is worth making.  It is easy and delicious.  I have made it a second time it was so good, but I did use the bread crumbs because it still wasn't brown.  Still used the broiler after baking them to brown up the bread crumbs.

Bread crumbs or no bread crumbs is your choice.  If you try this recipe, let me know if yours comes out all golden brown.  I would be interested in knowing.

Everyday Donna

Things to Remember:

Sometimes you have to "doctor" a recipe to make it what you want it to be.  donna


Thursday, August 22, 2013

Sea Glass Pictures


I love all things beach and ocean.  Especially the sound of the ocean waves.  There is nothing more soothing, meditative, and contemplative that ocean waves and if I had my druthers I would live on the beach.  Unfortunately, I don't live there, but have been fortunate enough to visit there many times in my life.  This year may not be one of those years (insert sad face).

At the little yellow cottage, all the walls were a soft creamy yellow and I used mostly red accents with a little blue.  Our new home has taupe colored walls and some decorating changes were in order.  Our hall bath was being finished after we moved in so I had about two weeks to think about how I would decorate it.  The brown stone tile and sand colored vanity top made me think of the beach, so I decided I would go with blues and use shells and something, just wasn't sure what something.

I had made a really big shell wreath a couple of years ago, but it was too big for the bathroom, so I made a smaller one and purchased some blue towels and a beautiful blue rug for the room.
The wreath hangs on the wall at the end of the bathroom.  You see it when you enter the door.   I needed something for the wall across from the vanity.  I was working putting things away and spied these frames that my daughter had given me for my birthday while we were living at the other house.  I loved the color of them and had them hanging in the dining room because they were a perfect complement to my Bluebird Cafe poster.  Just one little thing, I had never removed the original pictures that came in the frames because I just never got around to it somehow.  Don't laugh.


In a flash of inspiration, I knew what I could do with the frames so I could  use them in the new bathroom.  I took the backs off which was really easy,  you just had to twist a couple of little doodads and remove the pictures.  It wasn't like it was hard.  

I had lots of shells to use and a bag of sea glass from the Dollar Tree.  No, it's not real sea glass because I could search from now until forever and never have enough to use for this project.  It is truly beautiful, but not that easily found, so I used what I had and it looks great.  Do you know what sea glass is?  Here is what Wikipedia has to say:

There are two methods of making sea glass. The first type of sea glass production is natural. Pieces of glass from broken bottles, broken tableware or even shipwrecks are rolled and tumbled in the ocean or lakes for years until all of their edges are rounded off and the slickness of the glass has been worn to a frosted appearance.
Sea glass also can be produced artificially, when pieces of glass are tossed into a rock tumbler or dipped in acid to produce the desired finish. Artificially-produced sea glass is much less expensive than natural sea glass.


I had this piece of green glittered scrap book paper I had bought because I liked it.  It was sparkly, ya know?  So, I used the picture from the frames and traced two squares on the sparkly green paper and cut them out.  That would be the background for my new inserts.

I dumped out the bag of sea glass and searched for pieces and colors I liked and laid them out on the paper until I got a design that I liked.  Then, I hot glued each piece to the paper and placed it in the frame and put the backs on.  Easy peasy and I LOVE the way they look on the wall.  The picture isn't great because I could not get back far enough for a good shot.  You'll just have to come see them in person.
The piece of paper was $.50 and the bag of sea glass was $1.00.  Frames were a gift.  Can't complain about the cost and I am so happy with the way they look.  It is just a beautiful reminder of memorable times spent at the beach.  They are perfect for my beach inspired bathroom.

One again, look at things you already have and may be tired of.  Is there a new way to use the piece?  Maybe it requires a little change, or some paint.  You don't have to spend a ton of money to give a room a nice facelift.  Sometimes just moving things around to different rooms will be a refreshing new look.  I have used all the same pieces, but many in different places.  The only thing I have bought for our new home are the four bar stools.  Use new eyes to "see".  Some call it recycling, some call it being "green", and I just call it fun.

Everyday Donna

Things to Remember:

I like to walk the aisles of the Dollar Tree and look at all the interesting things and think how I could use them in a new or different way from their "original" or intended purpose.  It's challenging, creative,  and fun.  Give it a try.  You may come up with a great new idea to share with all of us.  donna