Tuesday, August 21, 2012

How To Make A Book Page Wreath That Looks Like A Dahlia

Do you have things in your life that make you happy and you have no explanation why?  I have a list of such items and one of them is shutters.  Old wooden shutters and I cannot tell you why.  Perhaps it's because they make me think of dreams and possibilities.  The louvres are like eyelids that open and close, looking out on the world.  When you are tired of the world, you can close them and find solace in your own inner world.  I like their roughness, the hinges, the fact that they can be painted and changed - just like a life.  Don't call the men in the white coats - I'm just trying to explain and it makes no sense I know.

I found a great pair of shutters recently on a trip to the Habitat Re-Store, one of my favorite places to go.  Another great place of possibilities.  I knew they were coming home with me because they were only $ 7.00.  They were a dirty, dingy yellow and smelled like someone's kitchen disaster.  But, I was in love.  They needed paint, so I headed to my favorite store in Brentwood called C'est Moi.  They carry Annie Sloan Chalk Paint.  Do not be confused with chalkboard paint.  This paint has chalk in it and will cover any surface without priming which is outstanding.  It comes from England and the color choices are all historical in nature.  Beautiful, rich colors that can be waxed upon completion with clear and dark waxes and it just makes my heart warm to look at all the ways this paint can be used.

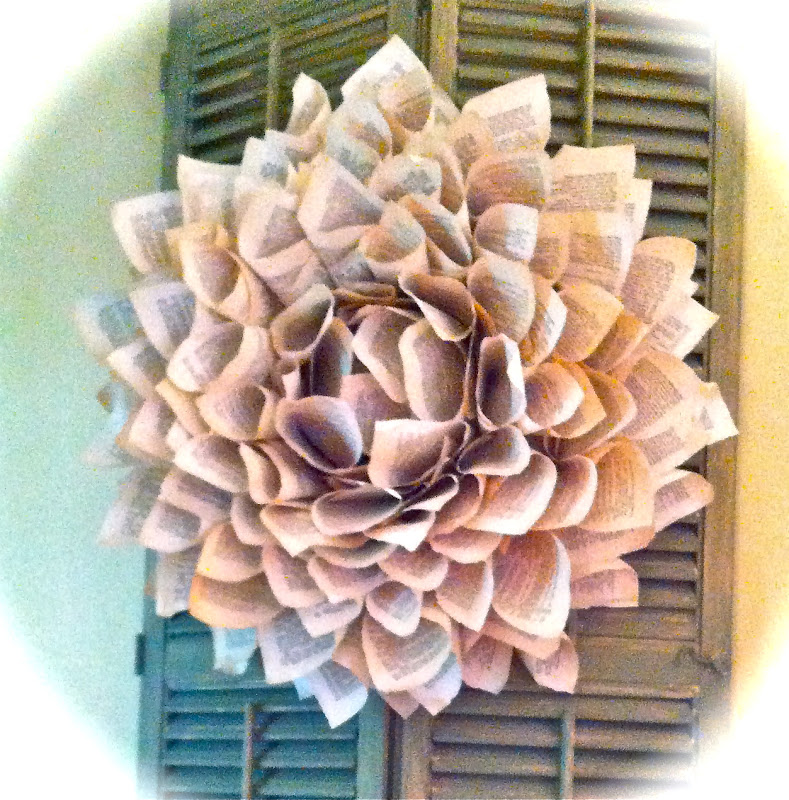
While I was there purchasing paint, I noticed several book page wreaths on the wall.  One of them looked like a big dahlia (one of my favorite flowers) and I knew I would have one of those and it would hang on my shutters once they were painted.  I just needed to figure out how to make one like it.

I went to JoAnn's and purchased a 12 inch styrofoam wreath that is flat on the back and curved on the top.  I knew I needed something that would give the wreath depth instead of something flat.  Then, we made a trip to McKay's Used books so I could find some old books with yellowed edges at a good price.  Shakespeare's Complete Works for 75 cents was it!  Lots of pages because I didn't know how many I would need for the project, perfect aging on the pages, and the book pages were the size I wanted.  Forgive me Will.

The first thing I did was remove the pages from the book cover.   I opened the book and used scissors to cut away the cover.
Do this on the front and back cover where it attaches to the pages.  (This was so hard to do, I LOVE books).  This is what you will end up with.
Those are all the glued together pages on the top and the spine on the bottom.  Now, you have to tear apart all the pages which must be done carefully since they are all glued together.  I used a ruler and placed it against the spine and pulled gently from top to bottom, so the pages did not tear.
As I tore pages, a ridge of glue would develop that would make the pages tear, so I cut it away with scissors, continuing to do so all the way to the bottom of the 1000 plus pages.  It will make things easier if you do this and your pages won't be a ragged disaster.  You want smooth edges.

Next, I started rolling cones.  Lots of cones.  I don't know how many cones I rolled, I just filled a box with them.  Start at the bottom right corner and roll to the top left corner.  I rolled the cones tightly, then loosened them until I had a big, round cone.  I did not want tight cones for this project.  Then, I stapled them at the bottom.  Do I have a picture of these?  No, I forgot.  Sorry.  You can see how they look as I started to put the wreath together.

Start on the back of the styrofoam wreath on the inside.  You will have to adjust the size of your cones for the opening in the wreath by making them smaller. You want the tips of the cones to touch.   Hot glue them at north, south, east and west.  Then, fill in between those.  Next, start at north, south, east and west on the outside edge and fill in between, leaving about a finger's width between each cone.  After you finish one layer of cones, go back and fill in between the first layer of cones, then repeat with a third layer.  On the inside of the wreath, do the same.  It will look like this on the back of the wreath.
Put the hanger on now just because it is easier.  I cut a piece of ribbon and pinned it through the cones to the styrofoam with a greening pin, then covered it with hot glue to hold it in place.  This wreath is light as a feather, so it doesn't take a big hanger.

When the glue is dry, flip the wreath over and begin working on the front.  It should look like this when you start.
First, you want to fill in the inside of the wreath.  You may have to re-staple your cones about half way up because you are going to cut them almost in half.  Flatten all the cones on the inside and start by gluing a round of cones to the inside edge of the styrofoam, starting at north, south, east and west, then fill in between.  Glue another round to the inside of these cones, only off set them between the first round of cones.  Continue until the center is filled in.
You want the center cones to stand straight up.  Next, cut a couple of inches from the bottom of the cones you are going to use, staple them, and put hot glue on the front side of the wreath so that the point is on the bottom, opening on the top, and place them under the outside edge of the styrofoam, off set between the layer of cones that are there.  You will want them to be the same length as the cones on the top layer.  Next, do a layer of cones that you have cut almost in half around the inside of the center hole, offset between the cones that are standing up.  Continue alternating from outside edge, then inside edge, until the entire wreath is filled in.  It will make much more sense as you are putting it together.  When you are finished, the wreath will look like this.
The hardest part is rolling all the cones.  Putting the wreath together is fairly simple.  It is definitely an inside wreath because it is paper and so very light.  I hung it with a push pin.  But I must say, I LOVE the way it looks.  The wreath on the shutters is extra special in my book (no pun intended).  The finished wreath is 24 inches across, so don't start with a big wreath form or your wreath will be enormous!  Just thought I'd warn you in case you don't have room for an enormous wreath.

Tomorrow, I will show you the finished vignette with the shutters and the wreath.  It is really lovely and I am so very happy with it.  Give this project a try and remember, Christmas is only 4 months away.  These could make lovely, inexpensive gifts.  Yes,  I had to go there, because it's time to start thinking about projects if you intend to do any for gift giving.  Have fun with this one, you will find yourself reading the pages as you roll the cones.  It is an enlightening experience.

Everyday Donna

Things to Remember:

A good book has no ending.  ~R.D. Cumming