
Last week I told you I was working on a project that I was very excited about and today I reveal the finished products to you - these gorgeous concrete planters. Love, love, love them. I happen to be a big fan of concrete items. I like the way they age, the way they get mossy, and the fact that they are a natural product. Yes, I have plastic planters, but now that I have discovered this inexpensive method of making my own concrete planters there will be many, many more of these in my future.
Have you ever looked at a website called Curbly.com? I discovered it by accident a good while ago, but I look at it every day. He culls the best of design and DIY from the world wide web and there are so many awesome ideas on his site that I could start now and make things until the end of time. Needless to say, he posted a link about making these planters a couple of weeks ago and I knew I would definitely be making some. They are a Better Homes and Garden project that you can find on their website and not only are they fun, they are gorgeous.
They are made by using inexpensive "molds" and quick drying concrete product. I found my bowls at the Dollar Tree and we purchased two bags of Sakrete Quick Dry concrete from Home Depot. Lowe's also carries it. A 50 pound bag costs less than $4.00.
I did learn some things while making these and sadly, I lost two of my favorite planters because I used glass jars in the middle and they would NOT come out of the set concrete. Also, I used a couple of metal containers in the middle to make the center planting well and we had to cut those out with wire cutters. This is to say, it is important to use plastic containers for your molds. You brush them with vegetable oil and voila! The concrete slips right out of the mold just like a cake out of a baking pan.
We made a total of 7 planters with the two bags of Sakrete which makes them cost about $3.00 each. Nice huh? Find anything interesting (plastic) to use as a mold. I even used a 1990's era pleated waste basket and it was my favorite!! It looked so cool when it came out of the mold. Unfortunately, it was a failure because I used a large glass jar in the center which we could not get out. Can't wait to make some more using a plastic center this time.
Here is what you need for this project.
A large "outside" bowl or container for the mold
A smaller "inside" container that will fit in the middle of the outside container, leaving a rim
some vegetable oil and a brush
Sakrete
A brick or big rock for a weight
A bucket
A trowel
Access to a hose/water
First, brush the inside of the large container with vegetable oil and the outside of the smaller container that will make the planting well. I did this out of doors because it is kind of messy and I suggest that you do the same if you can.


Next, mix some Sakrete in a bucket with some water using a trowel. You want it pretty thick, not runny. Using the trowel, scoop the Sakrete into the mold until it is about 1.5 - 2 inches from where you want the top of the planter to be. Push the center container down with your hands and put a brick or big rock in it for a weight.

While your planters dry, make sure they are sitting level so your planters will not be lopsided. I have one that is a little crooked, but it's not awful.

(I maybe did or didn't do that. The biggest one in the trash can was really heavy. I do have a bruise in the middle of one of my fingernails.) Consider yourself warned. Just sayin'.
Here is a finished product and I LOVE the way they look. They make me happy, happy.
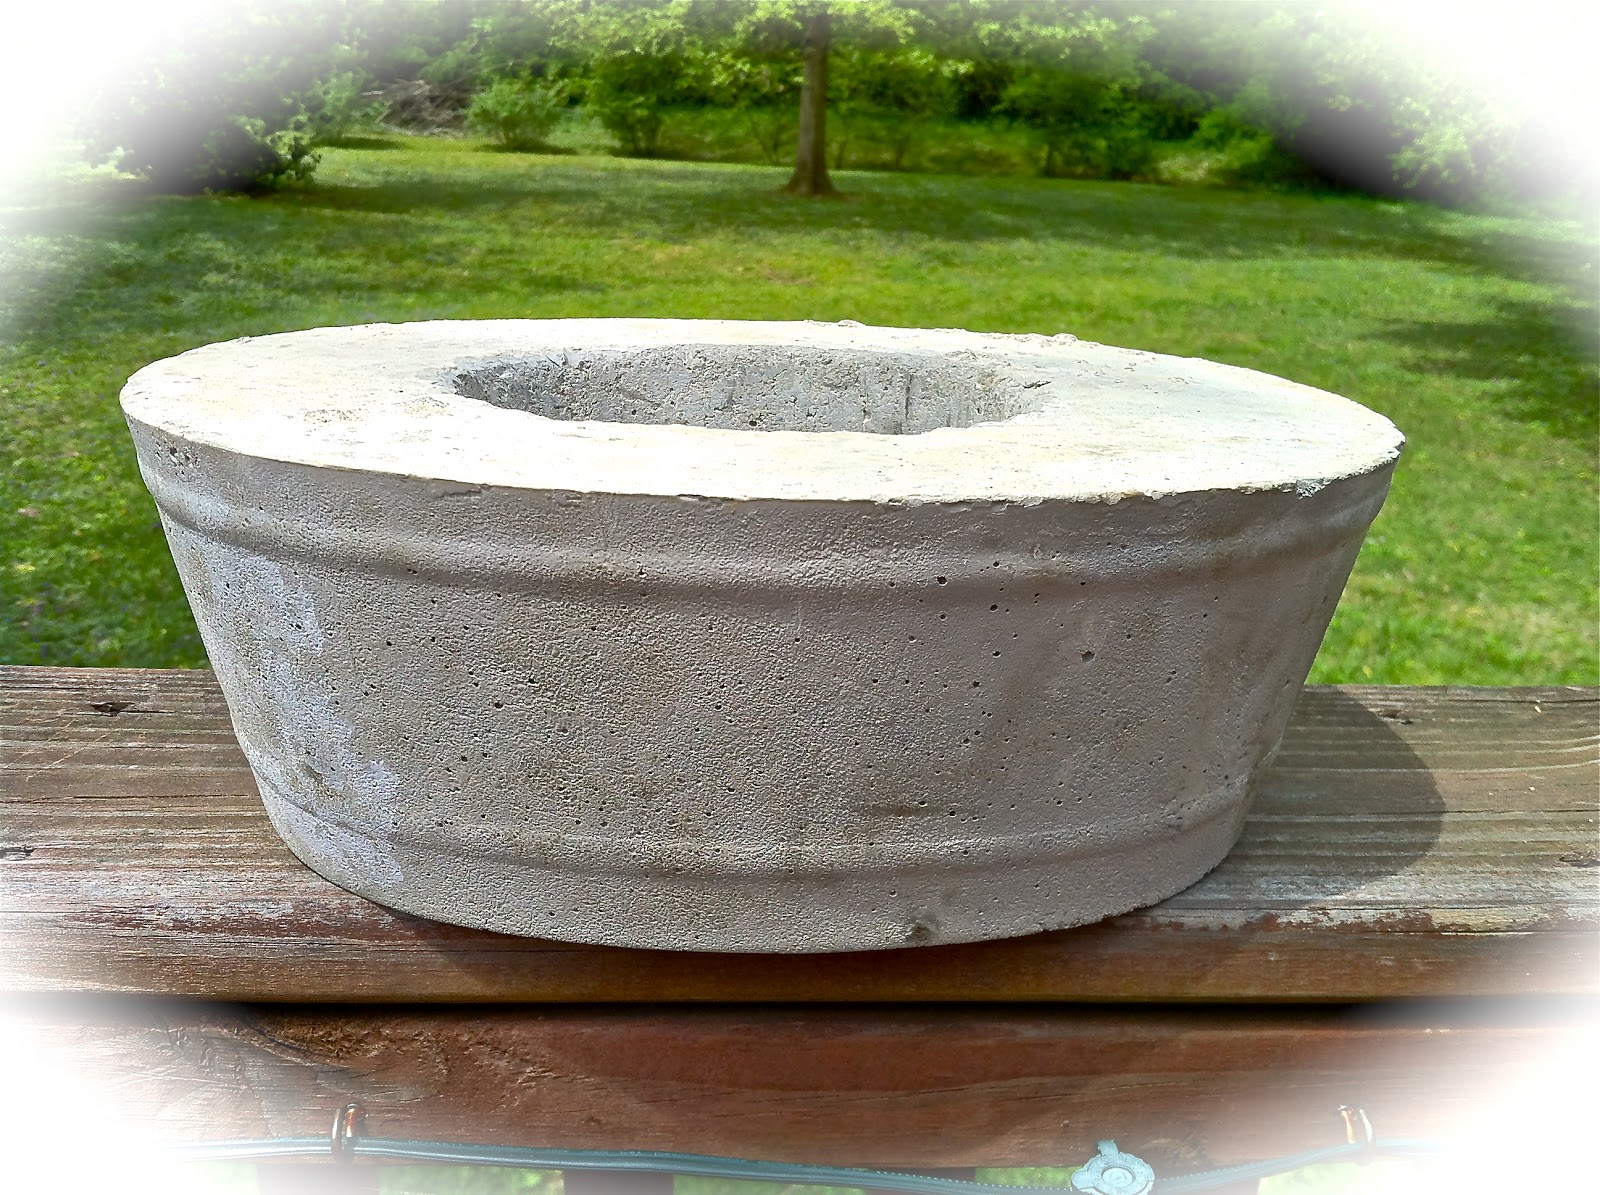


Here is how the inside looks. The shape of the planting well will depend on what kind of container you use. Remember, no glass and no metal. (FYI, the rim does not look "muddy" when completely dried.) To make drainage holes in the bottom, simply use a drill. You can make one large hole or several small ones.


I got so excited about these that I just dropped some potted plants into them to see how they look. And how do they look? Awesome!! It has been cool and I didn't want to risk the plants getting frost bitten over the weekend. I will plant them permanently this week. Did I say I am way excited about these? I am! Could you tell?
For less than $20 I made 7 planters. Sadly, I had to pitch two of them because of the glass centers. I did not want to try to break the glass out and risk an accident. Better to say bye bye and know that I can make more.
These are going to sit on the left and right top rails of our deck and the bigger ones that I am going to make will sit on the floor of the deck.
If you have ever priced concrete planters, you know how expensive they can be. You can even make little ones to use for candle holders! Simply use an outside mold, put the Sakrete in and push a votive candle into the wet concrete! Yes, those are on the agenda too!
Perhaps you have ideas for other things you could make for your outside living space using this method. I am presently on the lookout for more interesting containers. It's gonna be a concrete jungle when I get done. If you have any ideas, let me know! I am always looking for interesting projects and I sure hope you have fun with this one. Let me know what you make.
Everyday Donna
Things to Remember:
The earth is what we all have in common. Wendell Berry
Happy Earth Day 2013.