Wednesday, August 28, 2013

Blueberry Cobbler With Biscuit Crumb Topping

 Did you ever have fruit that is going down, like fast.  You know, those brown bananas that have a day or so before you have to toss them?  Don't toss those bananas, cut them up and put them in a baggie to go in the freezer if nothing else.  They are good for smoothies!  Or, there is always banana bread.  Yum.

I happen to love all things blueberry and I buy them every time I go to the grocery and then suddenly I have several containers in the fridge and there is that first sign that they may start to shrivel at any moment and must be used!  No blueberry should ever be wasted!  Of course, you can put them in a baggie and freeze them just like the bananas.  But, I had a hankerin' for something sweet and desserty and I usually make a peach and blueberry cobbler, but alas I had no peaches.  Therefore, some other recipe must be used.  I make blueberry pie, but I didn't want to make crust.  It just seemed like too much effort so I started combing the world wide web.

I found this recipe on a blog called wickedgoodkitchen.com and it sounded just perfect so I thought I would give it a try.  It's a keeper!  It's easy and delicious.  I served it for dessert tonight and our 3 year old grandson ate two helpings - with ice cream of course.

Here is what you need:

Filling:

4-5 cups fresh blueberries, rinsed, dried and sorted.  (toss those shriveled ones)
1 cup sugar
2 tsp freshly grated lemon zest
3 Tbsp all purpose flour

Biscuit Crumb Topping:

1 cup + 5 TBSP all purpose flour
6 TBSP sugar
1 & 1/2 tsp baking powder
1/4 tsp salt
6 TBSP butter, cut into bits
1 large egg, slightly beaten
1 tsp vanilla
1 TBSP sugar
1 tsp ground cinnamon

Preheat oven to 375 degrees fahrenheit

Lightly butter a 10" baking dish

Combine the sugar, lemon zest, and flour called for in the filling.

Put the blueberries in the baking dish, sprinkle with the sugar/zest/flour in a very even manner so that there is no clumping of the sugar which allows it to dissolve while baking and won't be gritty.  I stirred mine a couple of times to prevent that from happening.  Continue to evenly sprinkle until all mixture has been used.

Make the crumb topping.  Put the flour in a bowl, add the sugar, baking powder and salt.  Whisk or mix with a fork.

Cut the cold butter into small bits and cut into the flour mixture until crumbly.  I used a pastry blender, or you can use your hands.  Add the beaten egg, vanilla and stir to thoroughly mix until you have a dough type mixture.

Spread over the blueberries using your hands.

Combine the sugar and cinnamon and sprinkle over the biscuit topping.

IMPORTANT.  SET THE BAKING DISH ON A BAKING SHEET BECAUSE IT WILL COOK OVER AND YOU WILL HAVE BURNED SUGAR AND SMOKE IN YOUR KITCHEN AND DON'T ASK ME HOW I KNOW THIS.  JUST SAVE YOURSELF A MESS.   TRUST ME.

Bake for 40-45 minutes until the top is nice and brown.  Remove from the oven and serve warm with a lovely dollop of ice cream or whipped cream or - both!

This really is a wonderful cobbler.  It is not too sweet, but the lemon zest gives it a really nice brightness.  The crust is like a big soft cinnamon biscuit that is absolutely delicious.

I will be making this again, and again, and ...... you know.  Give it a try.  I think you will really like it too.

Everyday Donna

Things to Remember:

Blueberries are considered one of the "super" foods.  So hey, why not enjoy them any way you can.  Cobbler works for me.  donna


Monday, August 26, 2013

Chicken Breasts With Greek Yogurt And Parmesan Cheese

 How can it possibly be August 26th?  WHERE has the summer gone?  Oh, I remember.  We were packing and moving and then unpacking and putting it all away.  That's where the summer has gone.  It is truly hard to believe that it will soon be September, the last big hurrah of summer, Labor Day will be over,  and fall will be on it's way. That is okay by me actually!  I do love fall.

Today, I am going to talk about recipes, and sites like Pinterest and Food Gawker, and now Facebook is being flooded with recipes with everyone sharing them over and over.  There is one particular recipe that may be shared more than any other and the picture is beautiful and looks so good that of course everyone wants to try it, including me.  That recipe is for this chicken made with yogurt and parmesan cheese.

I have several trepidations about Pinterest and the first one is that people pin recipes and craft DIY's without going to the original source.  Many times, they are simply pictures with no recipe or instructions on how to make said DIY.  Lots of times when you go to the original site, they will tell you the site has been reported as suspicious so I stay away from those.  I always, always try to go to the original site before I pin something so that later, when I want to try the recipe or craft, it will actually be usable.  I wish everyone did that so they would not be disappointed when they later find there is no recipe or instructions.

Let's talk about this chicken recipe.  I decided I would try it.  It is very simple.  Boneless, skinless chicken breasts, some yogurt, parmesan cheese, garlic powder, black pepper, and salt.  Baked.  The picture shows this beautiful brown chicken that makes your mouth water.  As Chef Anne Burrell of the Food Network always says, "Brown food tastes good."  It surely does.  And, here is the conundrum.  When you make this recipe, it is NOT brown, not even close.  It is pale and anemic looking and not very appetizing actually.  I was distraught.   I don't like pale, anemic food.  To me, it is very unappetizing.   I had to come up with a solution fast.  (Perhaps they had used a torch to brown the chicken for the picture?  I don't know.  Mine sure didn't look like the picture.)

What would make it brown?  Bread crumbs!  So I covered the chicken breasts with some Italian seasoned bread crumbs and put them back under the broiler for a couple of minutes just to brown them up a bit.  It helped.  As you can see in the picture, it still isn't very brown.

Now, the reality is the chicken is delicious.  It was tender and moist.  (I know, gross word, sorry)  It was SOOO flavorful.  Dan, who does not care for yogurt or parmesan cheese LOVED this chicken.  Really loved it.  I even used the left overs for sandwiches made in pita pockets the next day.  Yum.

We enjoyed this chicken with mashed potatoes and heirloom tomato salad.  The acidity and color of the tomatoes was a fabulous compliment to the pale chicken and potatoes.  We eat with our eyes too and I like some color on my plate.  Don't know about you.

Here is what you need to make this chicken recipe:

3 or 4 boneless, skinless chicken breasts (mine were very large, so I used 3)
1 cup plain greek yogurt
1/2 cup parmesan cheese
1 tsp garlic powder (I prefer fresh garlic to garlic powder, so I used 3 cloves, minced)
1 tsp salt

Spray a baking dish with cooking spray.  Place the chicken breasts in the dish and cover with the yogurt mixture.  *My suggest - sprinkle with bread crumbs now if you want brown chicken.*

Place in a 375 degree oven for 40-45 minutes until the chicken is no longer pink in the middle.

I placed mine under the broiler for about 2 minutes to brown the bread crumbs.  Remove from the oven and let sit for a few minutes and serve.


Yes, this recipe is worth making.  It is easy and delicious.  I have made it a second time it was so good, but I did use the bread crumbs because it still wasn't brown.  Still used the broiler after baking them to brown up the bread crumbs.

Bread crumbs or no bread crumbs is your choice.  If you try this recipe, let me know if yours comes out all golden brown.  I would be interested in knowing.

Everyday Donna

Things to Remember:

Sometimes you have to "doctor" a recipe to make it what you want it to be.  donna


Thursday, August 22, 2013

Sea Glass Pictures


I love all things beach and ocean.  Especially the sound of the ocean waves.  There is nothing more soothing, meditative, and contemplative that ocean waves and if I had my druthers I would live on the beach.  Unfortunately, I don't live there, but have been fortunate enough to visit there many times in my life.  This year may not be one of those years (insert sad face).

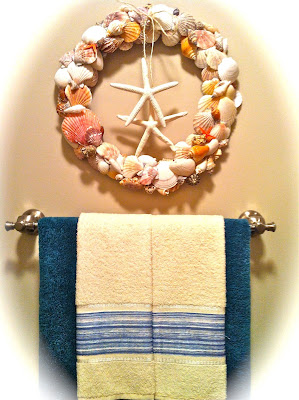
At the little yellow cottage, all the walls were a soft creamy yellow and I used mostly red accents with a little blue.  Our new home has taupe colored walls and some decorating changes were in order.  Our hall bath was being finished after we moved in so I had about two weeks to think about how I would decorate it.  The brown stone tile and sand colored vanity top made me think of the beach, so I decided I would go with blues and use shells and something, just wasn't sure what something.

I had made a really big shell wreath a couple of years ago, but it was too big for the bathroom, so I made a smaller one and purchased some blue towels and a beautiful blue rug for the room.
The wreath hangs on the wall at the end of the bathroom.  You see it when you enter the door.   I needed something for the wall across from the vanity.  I was working putting things away and spied these frames that my daughter had given me for my birthday while we were living at the other house.  I loved the color of them and had them hanging in the dining room because they were a perfect complement to my Bluebird Cafe poster.  Just one little thing, I had never removed the original pictures that came in the frames because I just never got around to it somehow.  Don't laugh.


In a flash of inspiration, I knew what I could do with the frames so I could  use them in the new bathroom.  I took the backs off which was really easy,  you just had to twist a couple of little doodads and remove the pictures.  It wasn't like it was hard.  

I had lots of shells to use and a bag of sea glass from the Dollar Tree.  No, it's not real sea glass because I could search from now until forever and never have enough to use for this project.  It is truly beautiful, but not that easily found, so I used what I had and it looks great.  Do you know what sea glass is?  Here is what Wikipedia has to say:

There are two methods of making sea glass. The first type of sea glass production is natural. Pieces of glass from broken bottles, broken tableware or even shipwrecks are rolled and tumbled in the ocean or lakes for years until all of their edges are rounded off and the slickness of the glass has been worn to a frosted appearance.
Sea glass also can be produced artificially, when pieces of glass are tossed into a rock tumbler or dipped in acid to produce the desired finish. Artificially-produced sea glass is much less expensive than natural sea glass.


I had this piece of green glittered scrap book paper I had bought because I liked it.  It was sparkly, ya know?  So, I used the picture from the frames and traced two squares on the sparkly green paper and cut them out.  That would be the background for my new inserts.

I dumped out the bag of sea glass and searched for pieces and colors I liked and laid them out on the paper until I got a design that I liked.  Then, I hot glued each piece to the paper and placed it in the frame and put the backs on.  Easy peasy and I LOVE the way they look on the wall.  The picture isn't great because I could not get back far enough for a good shot.  You'll just have to come see them in person.
The piece of paper was $.50 and the bag of sea glass was $1.00.  Frames were a gift.  Can't complain about the cost and I am so happy with the way they look.  It is just a beautiful reminder of memorable times spent at the beach.  They are perfect for my beach inspired bathroom.

One again, look at things you already have and may be tired of.  Is there a new way to use the piece?  Maybe it requires a little change, or some paint.  You don't have to spend a ton of money to give a room a nice facelift.  Sometimes just moving things around to different rooms will be a refreshing new look.  I have used all the same pieces, but many in different places.  The only thing I have bought for our new home are the four bar stools.  Use new eyes to "see".  Some call it recycling, some call it being "green", and I just call it fun.

Everyday Donna

Things to Remember:

I like to walk the aisles of the Dollar Tree and look at all the interesting things and think how I could use them in a new or different way from their "original" or intended purpose.  It's challenging, creative,  and fun.  Give it a try.  You may come up with a great new idea to share with all of us.  donna

Wednesday, August 21, 2013

New Fall Wreath

 Summer is definitely on the wane.  How do I know?  The sun is lower in the sky, it is getting dark a little earlier each evening, and there are little hints of color starting to show in the trees.  All the stores have their fall merchandise for sale (and yes, Christmas too) and there were potted mums at the grocery store yesterday.  That means pumpkins are just around the corner.  Yahoo!

Today, I had a total creative itch that had to be scratched.  I was restless and irritable, annoyed actually.  The moving and unpacking is finished and I haven't done anything creative in almost two months.  Unacceptable.   Time to solve that issue.

I know it's a little early, but I made my first fall wreath and hung it on the front door.  I mean really, there is no use making anything else since autumn is on the way right?  Right.  I dug around in the craft closet and pulled out everything I needed.

The only new item used was that beautiful printed burlap ribbon I found last week at Michael's and it has been teasing me every time I go in my craft room.  Taunting me.  Look at the beautiful detail.  They have it with different designs on it.  I just happened to like the one that looked like cursive writing.

Today, the taunting ceased!  I unrolled that ribbon and twisted it into a couple of big loops and made two tails that I cut into V shapes and went from there.  It is anchored to the wreath with a brown chenille stem.  Now what?  Here's a tip.  I almost always start with the bow before adding anything else.  It's just easier that way.

 I have lots of fall leaves in a huge bag from previous seasons and I bought several silk flower bushes at the Dollar Tree the other day.  Glue gun, glue sticks, wreath form (from Dollar Tree) - voila, everything I needed so I went to work.

Sometimes, I know how Michaelangelo felt when he looked at a piece of marble and saw a vision of what it could be, like the statue of David.  Don't get me wrong, I am NOT comparing a door wreath with the statue of David, but I am talking about envisioning what something can be, how you see it finished.  It takes creativity and imagination - maybe even a little thoughtful study.  And sometimes, there are just happy accidents and something miraculous happens and you are happy, happy, happy with the outcome.  There is no right or wrong, just whatever you want it to be.

Sorry, got sidetracked there for a minute.  I put the big bow on the wreath and then proceeded to hot glue leaves in varying shapes and colors around the wreath.  I finished by arranging silk flowers in and around the bow, hot glueing them to the burlap ribbon.  That is really all I did.  Place first, glue second. Make sure you like the placement before you glue something down.  It's like measure twice, cut once.  It is hard to move something after the glue has set and you don't like where it is.  That's just a another little FYI from a floral designer with many years experience.

So, my itch was scratched and I am ready to move on to the next project whatever it may be.  Think about what you want to do for the fall season and start now.  It will be September in just a short while and then the real fun begins.  Let's hear it for fall y'all.

Everyday Donna

Things to Remember:

Be creative.  Be original.  Think outside the box.  There is no right or wrong in creating.  It may not always turn out the way you want, or it could be a creative catastrophe (have had a few of those).  What matters is if you like it!  donna


Tuesday, August 20, 2013

Home Made Egg Noodles

 Our oldest grandson came home from two weeks in Maine enjoying sun, surf and his paternal grandparents and promptly came down with a stomach virus.  Here we go.  You know the rest of the story.  People in the family started dropping like dominoes.  Kids and adults.  Dan succumed on Saturday.  Down.  For.  The. Count.  Ugh.   Fortunately, I have escaped.  Whew.

Do you have a favorite comfort food when you are ill?  Mine is potato soup, Dan's is chicken and noodles with red jello on the side.  He doesn't care what flavor jello, just red.  To make him feel better, I decided to make some chicken and noodles on Sunday when he felt maybe he could eat something.  I had a whole chicken, but not one egg noodle in the pantry.  No, not one.  That never happens.  My only choice?  Make them from scratch and I did.  The recipe was found on Allrecipes.com - you know, my "go to" website.

Let me tell you, I will never use packaged egg noodles again.  Ever.  These were so easy to make and they are wonderful.  The texture is such that they do not disintegrate in the broth and turn to wall paper paste like many packaged noodles do.  And they are eggy and yummy.  When reheated the second day, they held their shape and did not fall apart.  Excellent.  And, so, so, so good.

To make the egg noodles, here is what you need.

2 cups all purpose flour
1 tsp salt
2 beaten eggs
4 TBSP milk

Sift the flour and then remeasure 2 cups.  Keep the remaining flour for your board when you roll out the noodles.

Beat the eggs until yellow.  Add the salt and milk.  Combine wet ingredients with the flour.  Do not over mix.  Mix just until a ball is formed.  I used a fork.  If the dough is gooey, add flour a spoonful at a time until the dough is set.  I didn't have to add any extra flour.

Generously flour a surface and break the dough in half.
Roll the dough very thin, about 1/8 inch.  (These are not dumplings so you don't want them to be thick)
Using a knife or a pizza cutter, cut your noodles to the size you want.
Roll and cut the second ball of dough.  Sprinkle lightly with flour and let sit for about 2 hours to dry slightly.

How to cook your chicken using a whole chicken:

Rinse a whole chicken inside and out and pat dry with paper towels.  Place in a pot deep enough to hold the chicken and be able to cover it with water.  Put a couple teaspoons of salt in the water and cook for about 45 minutes to an hour on simmer until the chicken is done.  (The legs/thighs, will start to come away from the body of the chicken.)

Keep the water on simmer and remove the chicken, placing it in a 9x13 pan so you can pick the meat from the bones.  I remove the skin first and discard it, then using two forks, pull all the meat from the bones.

Drop the noodles (start with a few) in the simmering water while you are removing the meat from the chicken bones.  The noodles should float on top of the water if it is at a rapid simmer.  You don't want them to sink and stick to the bottom of the pan.  If they don't float, turn the heat up a bit, you want bubbles in the broth.  Once you have all the meat removed, drop it in the simmering broth with the noodles.

The noodles will get a little wider and longer as they cook.  You don't want them to turn to mush, so keep an eye on them.  Once they are done (at least al dente), turn the heat off, check the broth to see if you need to add more salt.  Add salt if needed, stir (not too much) and serve.  DELICIOUS!

The richness of the broth, the tenderness of the chicken and the wonderful flavor and texture of the noodles makes a truly enjoyable comfort food that even children enjoy.  This is SO much better than canned soup, it is totally worth the effort.

This recipe makes enough noodles for one chicken.  If you are making a larger quantity, say with two chickens, double the noodle recipe.  There should be enough chicken and noodles for several meals (at least with two of us there is more than plenty).  If you have a large family, it may not go quite as far because it is so good, everyone will want seconds.  You might want to add some of your favorite jello as a side.  It is a nice complement and comforting for a sick tummy.

As we approach the winter season, you will want to try this recipe for those "sick" days of colds, flu, and viruses that leave you feeling icky all over.  Chicken soup is known as "Jewish" penicillin, especially good for respiratory infections.

It seems early in the season for these things to start, but here they come.  Be prepared.  Do a test run.  Make some noodles for practice so you will be ready when "the time" comes.  Your family will love them.  Promise.

Everyday Donna

Things To Remember:

Making your own broth using real chicken is so much better than canned or boxed broth.  Give it a try, it's not hard.  You will be glad you did.  Chicken soup is good for the soul as well as the body.  donna


Monday, August 19, 2013

Herb Roasted Chicken

Hello all.  Hope you had a great weekend and you are settling into the "back to school" routine that is already here in most places.  Because we were looking for a place to live, packing, and moving in June and July, I feel as if the summer flew by and we missed it.  Now, the sun is lower in the sky and there is a feeling of fall in the air.  That's okay though as it is my favorite season and I totally look forward to it.

The condominium we are living in has a lovely pool, and two of our grandsons and their mom and dad came over for a late afternoon swim a couple of Friday's ago.  I had told them I would make dinner so they didn't have to rush home and try to feed their two little ones.  It's so nice to be able to prepare meals again, now that everything is out of boxes.  Eating out loses it's enchantment quickly.  Home cooked meals are tastier, cheaper to fix, and so much healthier.  And, I just happen to like cooking.

I had two whole chickens that I had planned on frying, but somehow that seemed like too much effort for a Friday evening.  Perhaps something baked?  I went to my "go to" web site, Allrecipes.com, to look for something different.  This herbed chicken was one of the first recipes that popped up and it sounded easy and delicious.

I would compare this to the roasted chickens you can buy at the grocery or Sam's Club only better.  It was soooooo good and easy to make.  Here is what you do.

Preheat oven to 450 degrees fahrenheit.

Spice Mix:

1/4 tsp salt
1/4 tsp black pepper
1/4 tsp dried oregano
1/4 tsp drie basil
1/4 tsp paprika
1/8 tsp cayenne pepper (I baked 2 chickens so I doubled this recipe.)

Mix spices together in a bowl and put aside.

Rinse the chicken inside and out and pat dry with paper towels.

Put the whole chicken in a baking pan, breast side up.  Rub the entire chicken with some good olive oil.  Sprinkle the spice mix over the chicken and rub it all over.

Put the baking pan with chicken in the 450 degree oven for 20 minutes.  Lower the oven temperature to 400 degrees and roast for an additional 40-45 minutes or until the internal temperature is 165 degrees.  Let cool 10-15 minutes before serving.  (The leg/thigh section should fall away from the chicken and juices should run clear)

Cut the legs, thighs, and wings away from the chicken.  Carve the breast meat.  Serve.

I have to say, this is one of the best roasted chickens I have ever made or eaten.  It was simply delicious.  Actually, I roasted two at the same time.  We ate one and I had the second one to use the next day.  The meat was so tender and flavorful, the skin was brown and crispy -  mm, mm, delicious.

There are so many uses for the left over roasted chicken.  You can make chicken salad, use it in a casserole, make sandwiches, or put it on a green salad.  Makes dinner preparation so easy for another meal.

This recipe is one you should put in your "go to" file for those days when you want something comforting, delicious, but not too much trouble.  You can make this one hands down.  Everyone will think you spent hours slaving in the kitchen.  Just don't tell them otherwise.

Everyday Donna

Things to Remember:

Cooking is like love.  It should be entered into with abandon or not at all.  Harriet Van Horne


Thursday, August 15, 2013

Storage Solutions

 On May 1 and 2, 2010, torrential rains fell in middle Tennessee with some areas receiving as much as 19 inches of rain in a matter of hours causing devastating floods in many parts of the area.  The Cumberland River runs through Nashville, winding like a snake so that it affects many areas.  On the west side of town, there is the Cumberland and the Harpeth River which also flooded.  

The house we lived in previous to our present home was directly across from the Cumberland River.  We could see Opry Mills Outlet Mall across the river.  Opry Mills sits on the land where Opryland used to be.  Our house had 40 inches of water in it at the time of the flood.  That was before we moved to Nashville and the house was completely rebuilt after the flood.

The thing that is hard to imagine is that we were way above the river which means there was an unimaginable amount of water that flooded both sides of the river - Opry Mills, the beautiful Opryland Hotel, and the Grand Ol' Opry on the east bank of the river - and many, many homes on the west bank of the river where our house was located.  This happened all over the city in the low places between the hills.  A lot of downtown was flooded because it sits along the river.  If you have never been to Nashville, it is extremely hilly which means the water ran to all the low places.

On the west side of town where we now live, there was also a lot of flooding because there are two rivers running through the area.  Many homes have not yet been rebuilt.  The condominium complex we are living in also received flood damage.  That meant there was a need for rebuilding all over the area and quickly so that people could return to their homes.  It did not mean that all of the contractors and builders were necessarily the best in town.  Everyone was in demand.  Our condominium had to have work done in it.  You are probably asking yourself what the odds are of moving from one flooded area to another?  Actually, they are quite high since there was so much flooding.  The May, 2010, flood was declared a 1,000 year flood which means the chances of it happening again are practically nil, thank goodness.

The only problem I had with this condo when we leased it was that the top cabinets in the kitchen are really high in the air.  Like someone who is 6'5" could use these cabinets.  I am only slightly over 5 feet tall and I can only reach the knob on the bottom cabinet.  Therefore, all the top cabinets are pretty much useless to me except for things I don't use often.

There was a contractor working on the bathroom when we first moved in and I asked about the cabinets.  He said there should have been at least a 12" space at the top of the cabinets, with 3 less rows of tile between the top and bottom cabinets.  Presently, the tops of the cabinets are against the ceiling.  So, it wasn't just my imagination!  Our landlady said she will have them moved down which is awesome.  It just won't be right away.  Therefore, I had to find a storage solution for all my casseroles, glasses, platters, etc.  All my cooking pans are on shelves in the utility closet, but this is what I came up with for the kitchen.

Since open shelves are quite the rage now in kitchen decorating, I thought why not use my bookshelves to solve my dilemma.  So, that's what I did.  I had an old white bookshelf that had been in our daughters' room while they were growing up.  These shelves held all their memorabilia from school.  When we moved from Evansville, I boxed all that up and sent it to live with them.  The bookshelf came with us, since there were no built ins in our new home.  After we moved in, we purchased another bookshelf to hold all our games, videos, and books.  I could not find a white one, so we bought a black one and they lived side by side in our sun room.  These were going to become my kitchen solution after our move here.

They needed to match, so we primed them with white primer so there would be no bleed through on the new paint.  I used flat white paint on the outsides, and Annie Sloan chalk paint on the insides of the shelves.  I did not want them to be to matchy/matchy with the bar stools, so I combined some Duck Egg Blue and Provence Blue to create a color similar to the bar stools, but slightly darker.
Then, it was a matter of placing all the "stuff" on the shelves.  If you look, the bowls on the middle of the top shelf are older than me.  (Didn't think that was possible did you?)  They were my moms and she got married in 1947.  Most of my casseroles were wedding gifts in 1969 and I still use them every day.  Now, they are past "vintage" and almost antiques.  They have certainly been useful all these years.
The bottom right shelf contains many of my cookbooks and the baskets above contain all my cloth napkins, dish cloths, and tea towels.  It is actually quite handy and I really like the look.  It's much easier than trying to pull things out of cabinets.  I may just keep it this way.
 This arrangement also solves the problem of where to put the trash can.    That seems to be an issue in almost every kitchen I have ever had.  Do you have that problem or is it just me?  The trash can now sits to the right of the bookshelves in a perfect little unobtrusive space.  Two problems solved.  I love when that happens.

This is another instance of thinking outside the box to solve a problem.  Storage can be such an issue.  If you are having storage problems, look around and think about what you could use or do differently to stretch or create new storage.  It doesn't have to be expensive.  Two $30 bookshelves and some paint solved our problem.  It could solve yours too.

Everyday Donna

Things to Remember:

Look through magazines, catalogs, and websites like Houzz.com for ideas.  You don't have to spend a lot of money on expensive furniture.  There are thrift stores, Goodwill, craigslist, and consignment stores where you can find real bargains to solve a dilemma.  All it takes is a little imagination and some paint.  You can do it!  donna


Wednesday, August 14, 2013

Loving Our New Home

 Hellooooooo everyone.  It's been quite a while since I have posted to my blog because we have been moving to a new home.  Talk about a time killer.  First, we were notified that our landlord was going to put the house we were living in on the market.  Shock and despair was the first reaction, then we immediately got over that and knew we had to get busy, busy finding a new place to live.

Nashville has been fairly impervious to the real estate meltdown that has occurred in a lot of the country because the job market has remained good and so has the real estate market.  Let me put it this way, prices on rents and homes here are sky rocketing.  People are moving here in droves and the inventory is limited which has driven rent prices WAY up.  Not good for us old fogies living on fixed incomes.  So, the hunt was on and I was spending hours on rental sites like craigslist, Zillow, Trulia, Homes.com.  Every few hours I would scan them all looking for anything in our price range, calling, driving to look at them and experiencing a lot of disappointment.  But, if you are persistent and keep a positive attitude, the perfect place will appear and it did!  We found a lovely condo that had just been redone and we were lucky enough to be chosen to live in it.  It really is like winning the lottery at the moment if you are the lucky one chosen for the place you want.  Places are being rented site unseen.  It's kind of crazy.

Next, it was weeks of packing, pitching, and donating.  Then came the big day.  We worked hard in the heat of July loading and unloading the moving truck.  Then, two  weeks of unpacking and placing things.  Rearranging, getting it right.  You know how it goes.

Anyway, This is a picture of our beautiful new kitchen.  It is different from anything we have had before because it is contemporary and I am more of a shabby chic/country kind of girl.  Here is the kitchen before we moved in.

 It's very sleek and I love it.  The 5 burner gas stove is a dream!!  I knew we needed some kind of bar stools for the counter.  Especially since I sold our table and chairs to the couple buying the house we lived in.  It would not fit in this setting.  So, we had to have someplace to sit until I decide on the kind of table and chairs I want in here.  (I do have some ideas!)

The search for bar stools was on.  I looked at several places and was very discouraged at the cost and there wasn't a lot of them that I liked.  A light bulb went off in my head one day and I told Dan we needed to make a trip to the Habitat Re-Store here in Nashville.  It was truly our lucky day.  They had the bar stools in the picture for $ 7.00 each.  You read that right - $7.00 each.  Talk about the right price!!  I had seen similar ones at Target for $99.00 each.  That was not happening, but these beauties were coming home with us.

These bar stools didn't look like they do in the picture above.  Actually, they were pretty grungy, but the bones were good.  They were good and sturdy. Paint and fabric would make them ours.  This is how they looked.
Yeah, the seats were GROSS, but they could be recovered.  We paid for the stools and crammed them in our car.  Next, it was a stop to get some Annie Sloan chalk paint at my favorite little supplier, C'est Moi in Brentwood.  Once again, I wanted something a little different color wise from what I had been using.  Annie Sloan paints are based on historical colors and I fell in love with the Provence Blue which is a sort of turquoise color.  Paint purchased and on to the next stop at the home dec fabric stores.

There are several really great home decorator fabric stores here in the area and I hit all of them.  I found what I wanted at the last store (of course).  The background is a gold color with dark red roses, green leaves and hints of the turquoise color in the smaller flowers.  Perfect.

Annie Sloan paint can be used over most anything without priming.  They do recommend priming over dark wood if you are using a light colored paint.  I didn't want to risk bleed through from the dark stain on the stools, so I primed them all with white primer.

 All the stools were then painted with the Provence Blue and waxed with Annie Sloan clear wax.  I recovered the seats with the beautiful new fabric and sprayed them all with Scotch Guard.  Here is the finished product.
Oh, I  am so happy with the way they turned out and it saved us hundreds of dollars.  That is the very best part!  They are definitely being put to good use.

Next time you need or want to make a change, consider recycling something you have or buying from a thrift store.  Purchasing from a Habitat Re-Store helps fund habitat homes.  Picture a piece in a new and different way.  It's so creative and fun to see the results - and it's super friendly on the old pocket book and environment!

I'm so glad to be back and will be sharing all kinds of new recipes and ideas.  Hope to see you here!

Everyday Donna

Things to Remember:

It doesn't have to cost a lot to look good and serve a purpose.   See things with new eyes!   donna