Wednesday, June 18, 2014

Awesome Way To Slice A Watermelon!

 It is suddenly summer here in Nashville.  It was 93 degrees today and yes, it is hot.  I am not complaining.  I will take it over the cold, never ending winter we had this year any day.  Give me hot over cold any time.  But, with the hot comes different ways of preparing meals and foods to cool you down and keep you hydrated.

Recently, someone posted this way of slicing a watermelon on Facebook and I thought it was absolutely genius!  Bells rang, birds tweeted, whistles blew.  I mean, why have I never thought of this?  Just duh, is all I can say.

Our daughter had an end of year school party for her oldest son's class and she had a huge watermelon for the kids and their parents.  I told her I would like to try slicing it this way and she was all for it.  Let me tell you, it is not only genius, it is the best way to serve watermelon - like ever!!  You have these wonderful  popsicle like wedges of watermelon, easy to carry around and eat, no plate necessary, and no huge pieces of watermelon rind to get rid of.  All the pieces are nice little 1.5 squares - the perfect bite sized piece of watermelon!!!  I am talking life changing here people.  Here is what you do.

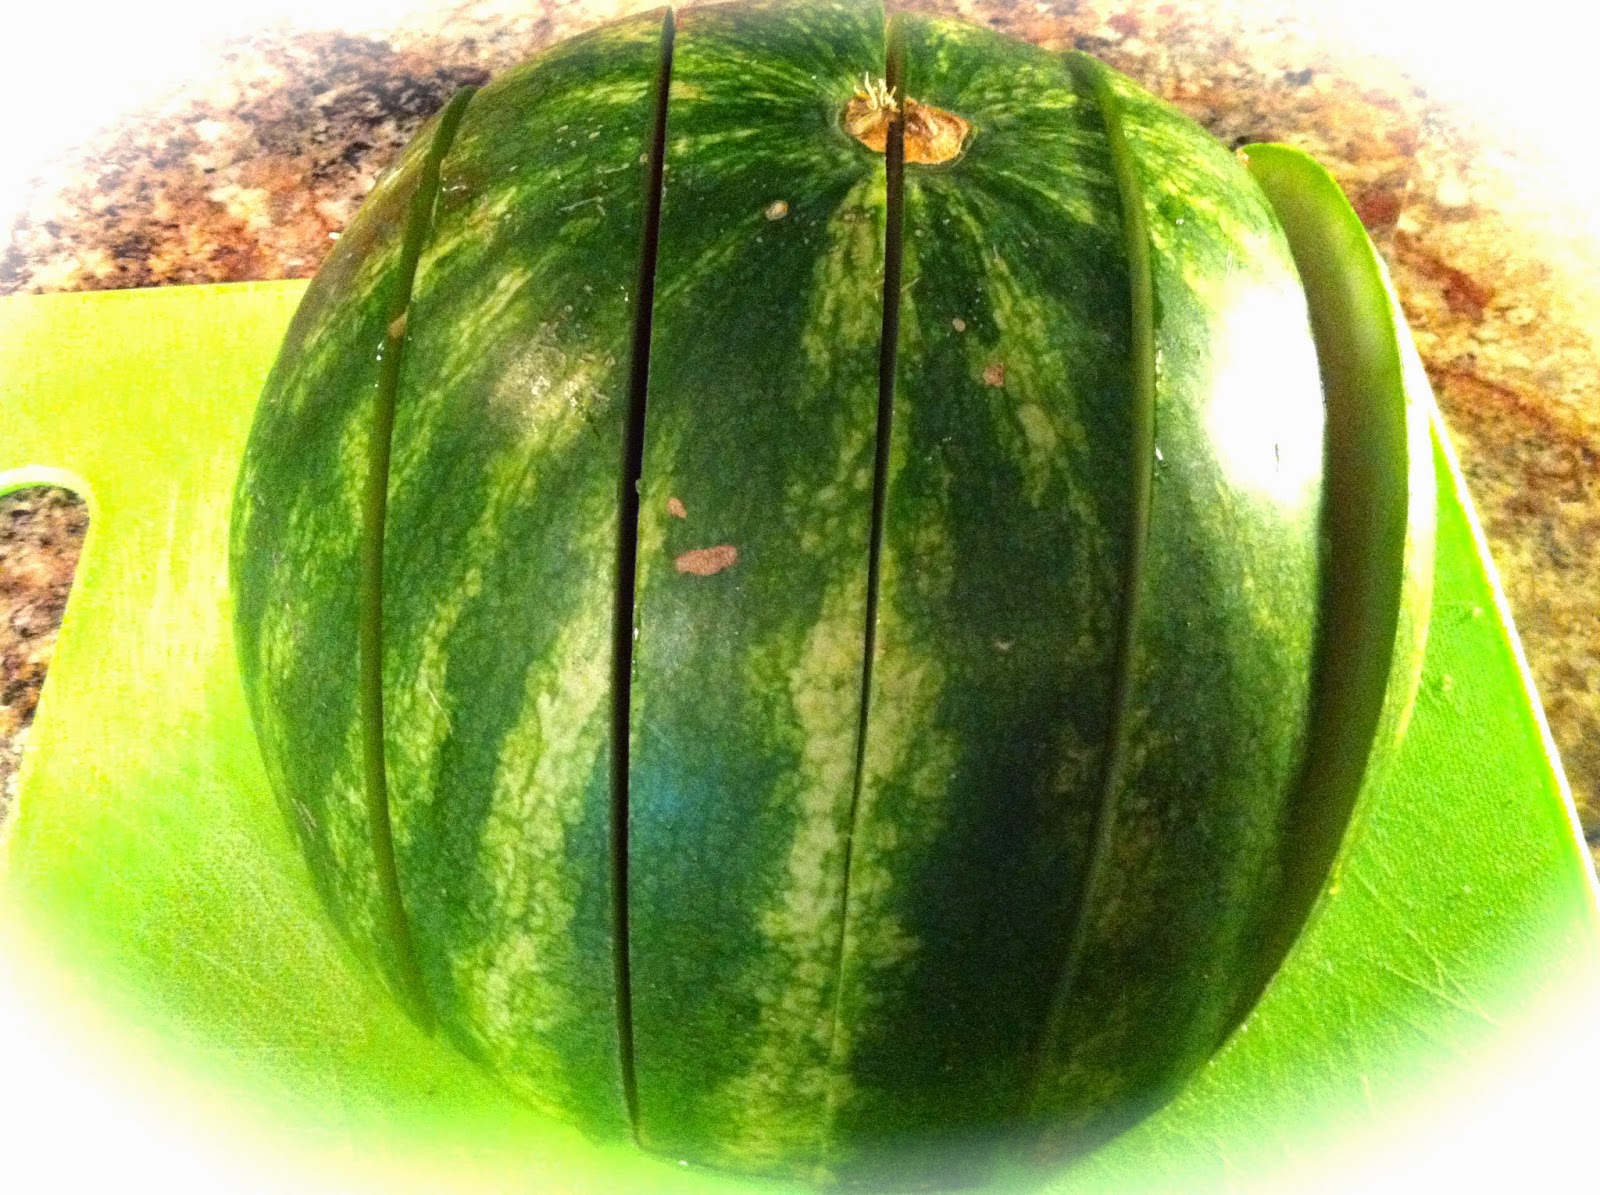
First, you need a round watermelon, not an oblong one.  Most of the seedless ones are round.  The one in the picture is small, but you can do the same with a big one - you just need a slightly different method.

First, cut the watermelon in half - not so it is oblong, but round on each end.  Does that make sense?  Then, trim it up if necessary so it will sit flat.  Sometimes the watermelon will split if it's really ripe and be uneven.  Just do a little fancy knife work to make it flat (and don't waste those lovely thin slices of watermelon - eat them!).

 Now, put it on something you can turn.  I used a cutting board.  Make sure you have a long knife and start at one end cutting in about 1.5/2 inch segments.


 Cut from one side to the other.  It should look like this.


Now, turn your cutting board so the vertical slices are horizontal.  Start at the end, and slice about 1.5/2 inch segments across like this.
You can start eating by pulling the middle piece.  When you pull it out, you have this beautiful cube of watermelon.  It is just amazing.  Perfect bite sized cubes of watermelon.  Genius I tell you.  Also, you no longer need a giant bowl to put all the slices in.  It sits right on the platter.  Ah-mazing!

Now, have someone help you transfer it to a serving platter.  I put the serving plate next to the cutting board and had Dan picked up the cutting board with the watermelon on it.  I put my hands firmly on the watermelon to hold it together, and slid it to the serving platter.  Ta dah!  Then, I put  the second half on the cutting board and sliced it so it was ready to go when this half was eaten.  If you are having a large crowd, put both halves on serving platters after you slice them this way.   Easy peasy.

For a bigger melon like we used at Holly's, I cut half way across the watermelon because my knife wasn't long enough to go all the way across.  I didn't want any cut fingers, so I cut halfway and turned the watermelon half way around and continued to cut from the original slices.  Then, I turned the watermelon 1/4 way and cut halfway across, turned it half way around and completed the slices.  Here is the bigger melon.
Dan helped me move it to the serving platter and it worked just perfectly.  The kids at the party LOVED the watermelon cut this way.  They would run by, grab and wedge and off they would go.

Not only is is super convenient for serving, it looks really pretty on the platter.  I don't know who thought this up, but thank you whoever and wherever you are.  I will be eternally grateful and will never wrestle another watermelon as long as I live.  Clean up was a breeze - no huge drippy pieces of watermelon rind to dispose of.  You can eat right down to the white or green part easily.   Then, simply toss that little green square of rind.  Awesome.

You really should try this.  You will never go back to the "way it was" - ever!  For the melon that wasn't eaten, I stored it in a zip lock back and it was delicious for several days AND it didn't take up half the refrigerator!  If we got hot outside, we could come in an grab a piece of perfectly cubed watermelon and enjoy.  Yes, try this.  It will make your summer.

Everyday Donna

Things to Remember:

When one has tasted watermelon, he knows what the angels eat."  Mark Twain


Monday, June 16, 2014

Old Fashioned Cornbread Made Gluten Free - Delicious!

Hi everybody.  I'm back.  I have been on quite a hiatus as I completed a 100 day painting challenge and other things in life.  It went very well.  I am painting with acrylics on canvas.  I learned a LOT in the process about myself and painting techniques.  It's amazing how dedicating yourself to something for 100 days can change your life.  I will write about that in more depth later.

Today, I wanted to share this recipe I found for gluten free cornbread that is absolutely delicious and as close to what my grandma used to make as I can find.  We have several people in our family who are eating gluten free by doctor's orders, including myself.  Talk about changing lifelong habits!  Wow.  Especially when it comes to all the baking I have done most of my life.  But, life will go on.

This recipe is made with Greek yogurt which is a definite change up from the buttermilk we always used.  It also makes it just a tad healthier.  Here is what you need.

2 cups yellow cornmeal, coarsely ground if you can find it.  (make sure it's gluten free)
1 tsp salt
1 tsp baking soda
2 tsps baking powder
1 egg, beaten
4 TBSP melted butter, cooled
1 1/2 cups plain Greek yogurt
4 TBSP honey

Preheat your oven to 400 degrees.  Hopefully, you have a 10 or 12 inch cast iron skillet to bake this in, but you can use an 8x8 square pan if you don't.  Grease the pan either way.  I used spray coconut oil.

First, combine the cornmeal, salt, baking soda, and baking powder.   Thoroughly combine with a whisk.

In a separate bowl, mix the egg, cooled melted butter, yogurt and honey.  Thoroughly combine with a whisk or fork.

Create a "well" in the center of the dry ingredients and pour the wet ingredients into the "well."  Use a fork and just combine.  Don't over mix.  This is a very thick batter.

Pour the mixture into the prepared pan.  Bake for 20-30 minutes or until golden brown on top.  Remove the pan from the oven and let sit for a few minutes to cool down.  Slice and serve.  Slather on a big pat of fresh butter and add some honey if you like.  This is absolutely delicious and I could eat it for my meal.

This recipe was found on Gluten Free on a Shoestring!  Give it a try.  You are going to love this one!!

Everyday Donna

Things to Remember:

If we keep doing things in the same old way expecting different results, nothing will every change.  Try something new.  Dedicate yourself to something for 100 days and see the changes that occur in your life.  It is truly worth the dedication.  donna