Do you hang some sort of seasonal decoration on your house or front door? Perhaps a wreath or basket filled with seasonal flowers? Well, I do and have done so for most of our 42 years of marriage. To me, it is welcoming and adds texture and dimension wherever you place it and is also a way to celebrate the changing of the seasons. I am a trained floral designer and have worked with flowers for 30 years. There is a method to making a wreath and I will show you how.
Last week I made a trip to some of the craft stores and of course, to the local Dollar Tree. September had begun and we all know that the fall season is upon us. The aisles were filled with lots of beautiful fall leaves and flowers and it put me in the mood to make a new wreath for the front of the little yellow cottage. It was time to take down my summer wreath and jump into the wonder of the fall season I love so much. This is the wreath I took down.
For my summer wreath I had used reds, yellows and a beautiful tiffany blue ribbon. It had given a cheery welcome to all guests during the summer season, but now it is time to put it away.
I was just in the nick of time with my purchases. This weekend, our temperatures went from the high 90's nearing 100 down to the high 60's and rain. Because of the few days of cool weather, there are already hints of red in the dogwood leaves and yellow hints in the maples. Yes indeed, fall is on the way! Hot dog!! If you want to make a wreath for your home, here are some suggestions for how to do it.
When purchasing decorations, make sure you do not skimp. You don't want to be in the middle of your project and discover you do not have enough decorations to fill the wreath and have to go purchase more. If you have decorations left over, you can always find uses for them to add to the fall flavor in your home. I had enough left that I will be able to make a centerpiece for my table and I still only spent $25.00. Shopping at Hobby Lobby or Michaels when flowers are 1/2 off saves you lots of money and of course everything at Dollar Tree is - your guessed it - only $1 per item or package. I purchased the mini pumpkins and small gourds at Dollar Tree. The small gourds were in a package of 6 or 7 for $1.00 and the mini pumpkin were $1.00 each. That is a big savings over prices you will pay at other stores.
The 18" grapevine wreath was $2.99 at Hobby Lobby. I purchased one large bush of fall leaves and "weedy" things at Hobby Lobby also for 1/2 price and it was $6.00 and provided me with lots of filler for my wreath. There were 15 stems total on the bush.
I purchased 3 large yellow sun flowers, a grapevine type garland with fall leaves, a small bush with 5 stems of thistle and two bolts of ribbon at Dollar Tree for $1 per item. The hank of raffia came from Hobby Lobby for $2.99. I love raffia because it adds texture and interest and there are so many uses for it!
These are the things I purchased to make this wreath. I did not use the packages of individual leaves on this project. They came from Dollar Tree and I will have another project for them which I will share with you when it is completed.
The tools you need are a pair of wire cutters, a hot glue gun and glue sticks, some chenille stems for making the bow and a piece of floral wire to make the wreath hanger. Remember, they call hot glue "hot" for a reason. Be careful with your fingers when placing flower stems covered in hot glue in the wreath.
The first think you need to decide is where you want the flowers on your wreath. Top, bottom, left or right side? It's up to you. You can make the design any way you want. I always visualize how I want the finished project to look and go from there. Because we are taught to read left to right, we tend to look at things as more balanced when they are made that way. Therefore, I made my wreath with the flowers on the left hand side. You choose however you want to make yours, just use the same general method.
First, I placed the grapevine garland with the fall leaves in a reverse "S" shape on the wreath and hot glued both ends to the wreath. Be sure and use enough glue when making an outdoor wreath so that weather and wind will not make everything fall off.
Next, I pulled the green leaves from the sunflower stems and glued them at different angles along the left side of the wreath. This makes your "base" working area. Place your flowers where you think you may want them before gluing them down. I cut the sunflower stems about 6 inches long. You want them to stand out from the wreath. You can move them around until you get the look you want. I glued two of the sunflowers and mini pumpkins angled up and one sunflower and mini pumpkin angled down leaving a space for filler flowers and another space where my bow would go.
Next, I took the bush with all the fall leaves and filler "weedy" things and cut it apart leaving the stems as long as they could be. I placed the stems in different places on the wreath, moving them around until I got the look I wanted and cut each stem to the length needed. Then, I placed lots of hot glue on the end of each stem and up about 3 inches and placed it back in the wreath.
The final step was making the bow and adding long strands of raffia to the back of the bow when I twist tied it with the chenille stem. Twisting another chenille stem to the one tying the bow and wrapping it around the wreath snuggly keeps it in place along with some hot glue. I added some more raffia throughout the rest of the arrangement so that there was lots of texture to represent all the dried weeds, pods and flowers of fall. I made a hanger on the back of the wreath by putting a piece of floral wire through some of the grapevine and twisted it making a loop strong enough to hang the wreath.
Your beautiful fall wreath like the one in the first picture is now ready to hang wherever you like - on the wall, over the mantel, on the door or front of your house. And you can say "I did that!" This wreath would cost $50 - $75 depending on where you bought it. You made it and saved a lot of money in the process! I hope you try this project and enjoy it through the fall season. This same technique can be used to make a wreath for any season or holiday! Let me know if you try this and how it turns out. Happy Fall Y'All.
Everyday Donna
Things to remember:
Everyone must take time to sit and watch the leaves turn. ~Elizabeth Lawrence
Showing posts with label how to make a shell wreath. Show all posts
Tuesday, September 6, 2011
Friday, June 3, 2011
Wishing I Was At The Beach - How To Make A Shell Wreath
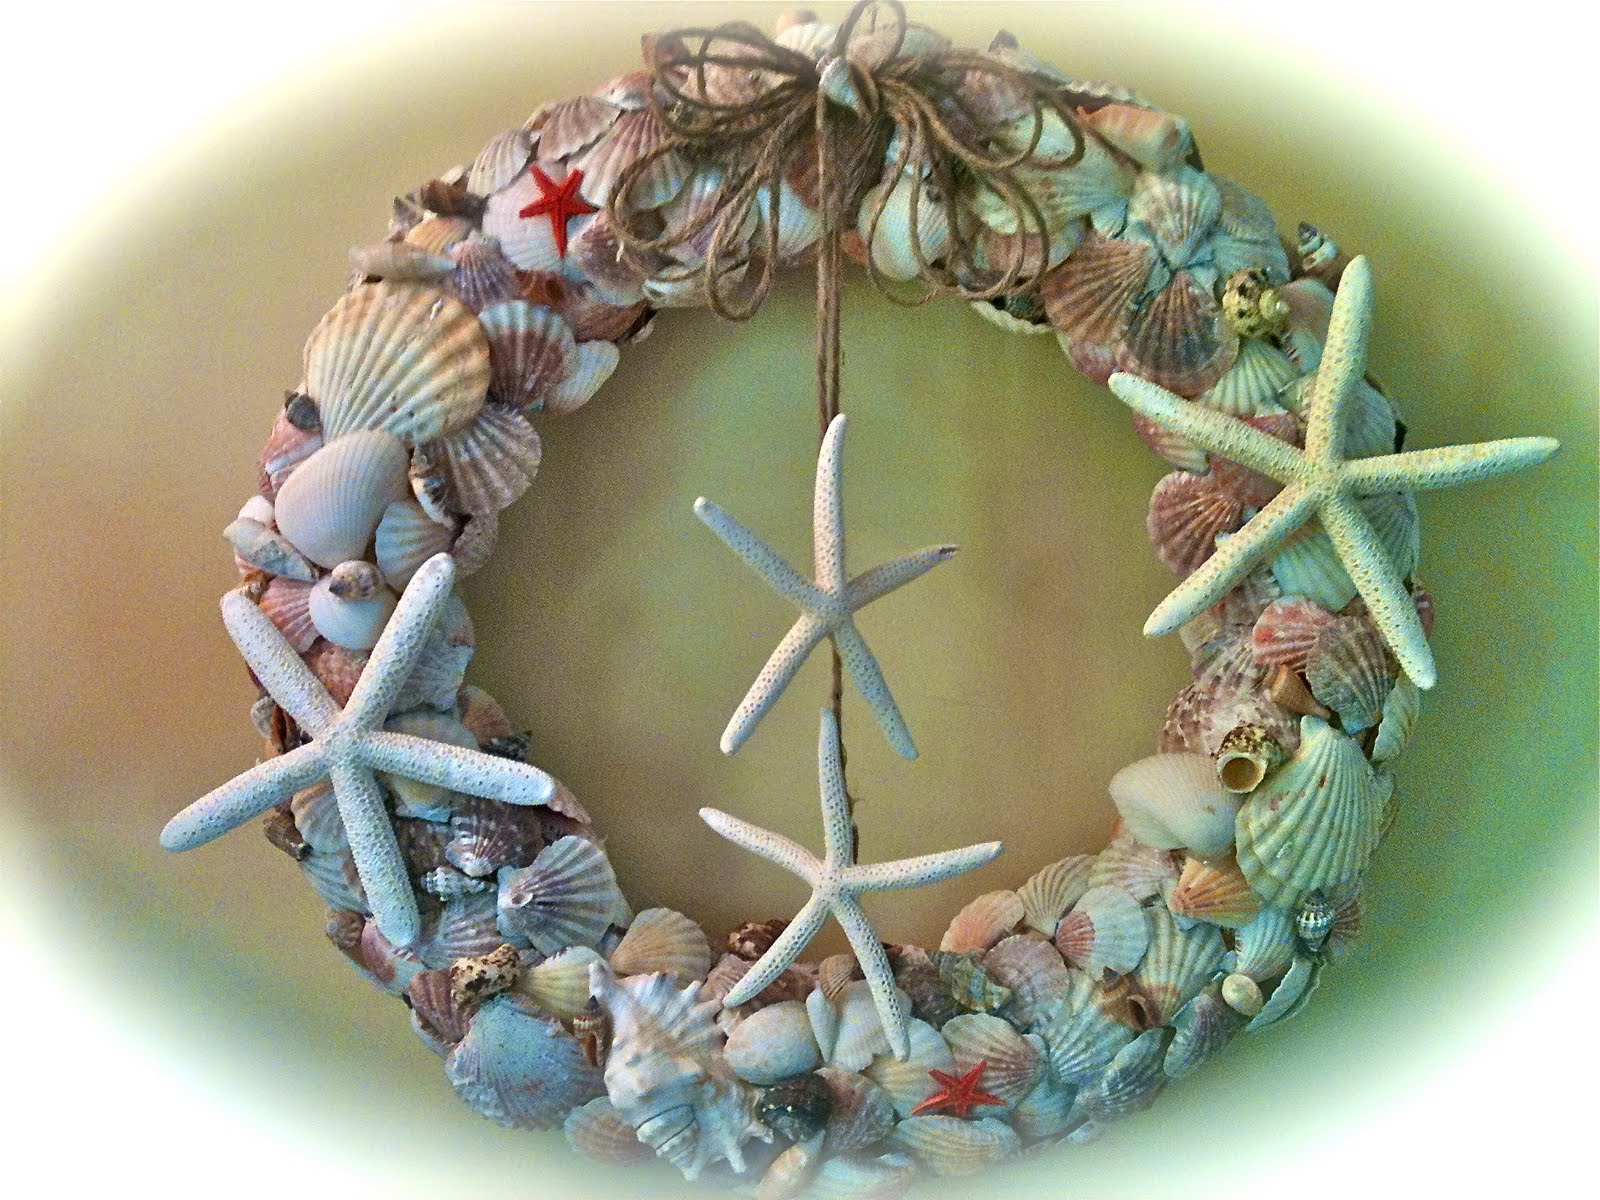
There is nothing better than sun, sand, and surf. Nothing. Did I say nothing? And that is how I feel. I would love to live on the beach with a front window view of the ocean. Unfortunately, that is not where I live. Summertime is here in middle Tennessee and it is plenty hot already, but it is not like being at the beach. So, I will do the next best thing and use a beach theme in the little yellow cottage. This season there are a lot of decorative accessories with a beach theme and many are very inexpensive. That is just my price range.
Thursday morning I was watching the Today show and there was a segment on how to make your house more cottage or beach like. Um hmmm. Just my style. I have been working on our little yellow cottage, making some changes in my decorating style and I have been adding some beach type items. As they panned the set, they showed a fabulous shell wreath that really made me sit up and take notice. The person doing the segment said they had copied it from a wreath costing $150.00. Excuse me? Did you say $150.00? Whoa. They had done a DIY and made their own. Well, the creative juices started flowing immediately and I knew exactly where I could get a lot of shells. Big Lots! Time for a road trip.
Here are my shell finds from Big Lots. I bought two of the $4.00 bags of shells and one of the baskets of six starfish for $6.00. I had an 18 inch straw wreath which cost about $2.00. Time to get out the glue gun, heat it up and start gluing! First, make a hanger on the wreath by putting a piece of wire around the wreath, twisting it and making a loop, twisting again. I visually divided the wreath into north, south, east and west. I laid down a patch of shells at each point and then filled in between the sections. I used as many of the flat shells as I could to cover the top, inside and outside of the wreath leaving no wreath "form" showing. Leave the back of the wreath open with no shells on it so it will lay flat against the wall.
Some of the shells were big and they covered a lot of area. I used the smaller shells to fill in the gaps. It took me about an hour and a half to make the wreath. Once all of the area was covered, I went back and filled in with all of the little decorative shells and added two starfish (as you can see in the picture). I made a "bow" by looping sisal back and forth and tied it in the middle, gluing it to the center of the wreath. I left two long tails on the bow. I cut the tails to different lengths and glued a small starfish onto each length. Below is a picture of what the shells look like close up so you can see how closely I placed them.
After I finished gluing all the shells on, I removed all of the glue "webs" and hung it on the wall. There were just enough shells in the two packages to cover the 18 inch wreath. Could anything make you feel more "beach like"? I don't think so. I had a few starfish left so I placed them in a small basket on the cabinet to continue the theme. One of these days I will post a picture of my mantle, which also has a bit of a shabby chic/beach theme. The wreath helps tie the room together. Things are looking very beachy here in the little yellow cottage and that puts a smile on my face.
For less than $20.00 and a little time, you can make a beautiful shell wreath that can be used year after year. Don't you love saving money? I sure do! Now, if only there were an ocean out my front window.
Everyday Donna
Things to Remember:
"We don't see things as they are, we see them as we are." Anais Nin
Tuesday, May 31, 2011
What Can You Do With Tissue Paper and Glue? This!
We spent some time in Dallas recently with our oldest daughter and her three sons, the oldest of whom is seven. Her husband had to be out of town for a week long photo shoot and she needed some help. Having raised four children of our own, we knew she had her hands full. Grandma and Pawpaw to the rescue! Spending time with those three precious little boys is a chance we try to never miss. So, we packed the car and headed to Big D.
It's funny how inspiration can come from any place at any time. We were there the week before Mother's Day. Grandson #2 is 4 and goes to pre-school. He came up to me and whispered in my ear that he had wrapped his mother's gift at school that day. "Don't tell her grandma, but it's a picture of poppies that I made!" He was so proud and excited. Makes your heart want to burst. It was a super busy week of running children to school, going to karate lessons, cooking meals, playing games, doing mounds of laundry, giving baths and having a wonderful time all week. The baby, who is 9 months old worked hard all week at trying to crawl from one place to another "army" style. He hadn't quite figured out how to make it all work on his hands and knees yet. Brought back so many memories of how busy all those days were and why you can't remember so many things that happened because you are just trying to get through the general living of it all.
On Friday, we picked #2 up from pre-school and he came out the door with a lovely package in his hand. He got in the van and handed his mother her gift. It was a 5x7 rectangle wrapped in pink tissue paper (because they had run out of purple, his favorite) with ribbons and a card made by him. He jubilantly said "Open it!" Mom said it's not Mother's Day yet. Are you sure?" Oh yes, yes, yes! She carefully took the tissue paper off and inside was a lovely piece of artwork, mixed media of a red poppy done with paint, tissue paper and real poppy seeds. It was truly lovely and made with all the love a 4 year old's heart and hands can create. I LOVED it. Mom was so very touched and filled with love while #2 was overjoyed that mom loved his creation.
We moved to Tennessee recently after living my entire life in the same town. We downsized after 41 years of marriage and so many of the things I had used in our previous home just don't seem to fit in our little yellow cottage. I have spent time trying to make things work and figuring out new things to enjoy. When I saw his little piece of art work I was completely inspired. I needed something to go above our bed and had just not found the right thing. This I could do! I made a trip to Michael's and bought 4 canvases. They came two for $5.99. Then a trip to, where else but, the Dollar Tree for a package of multi-colored tissue paper which cost, what else but, a dollar. I buy Elmer's glue by the gallon and I have a set of acrylic paints so I was good to go. Oh, and a small bottle of Modge Podge.
First, I mixed a color of blue that I wanted using baby blue, blue lake and phthalo green. I base coated all of my canvases.
After letting that dry, I used different colors of green and black to make grass on the bottom of the canvases, each one different. Now for the fun part. I cut red tissue paper in approximately 4" squares. I applied Elmer's with a brush in a flower shape and put the tissue down. I squished it around, turning up some of the edges for a 3D effect. Next, I added another layer of glue on top of the tissue paper that was already down and put another layer of tissue paper on top of that. I made each canvas different.
After letting everything dry overnight, I added stems and leaves. To make the stems, I cut pieces of green tissue paper about 1 inch wide and 10 inches long and rolled them between the finger and thumbs of both hands making a long "snake." I put glue on the canvas and laid the stems on top of the glue, taking the stems over the edge of the canvas. Any remainder was cut off with scissors. Then, I used a brush and made leaf shapes with glue. Once again, I cut 4 inch squares of green tissue paper and squished it and manipulated it until I got a 3D leaf shape I liked. I let this dry overnight.
Now for the "careful" part. I loaded a 1inch brush with Elmer's and applied it to all of the tissue paper pieces on the canvas. Poppies, leaves and stems received a coat of glue. They had a bit of stiffness from the original glue used but I didn't want to ruin the 3D effect of the flower petals and leaves. I went slowly and carefully, making sure I got glue in all of the cracks and crevices. Again, they had to dry overnight. The fun part after this was peeling all the dried glue off my hands - almost as good as bubble wrap!
After everything was dry, I made centers in all my flowers with a little puddle of glue and added real poppy seeds to the glue. Again, let dry overnight. And now, the final step......Modge Podge! Cover the entire canvas and flowers, leaves, stems and poppy seed centers with a coat of Modge Podge. This gives everything a nice sheen and just the right stiffness so everything doesn't go flat. Let dry complete and your pictures are ready to hang.
There are so many possibilities for this application. You don't have to be Van Gogh (oh how I wish), you can be creative and create your own art work, even a 4 year old can do this. His didn't have the 3D effect, but it was beautiful. I already have a new project in mind. Will let you know how that goes. Thanks to his pre-school for your inspiration!
Everyday Donna
Things to Remember:
Anyone can create! Inspiration is everywhere.
Subscribe to:
Posts (Atom)